Android广播接收器示例教程
今天我们将讨论和实施Android BroadcastReceiver,它是Android框架中非常重要的组件。
Android广播接收者
安卓中的广播接收器是一种休眠的组件,它监听系统范围的广播事件或意图。当这些事件中的任何一个发生时,它会通过创建状态栏通知或执行任务来激活应用程序。与活动不同,安卓广播接收器不包含任何用户界面。广播接收器通常被实现为根据接收到的意图数据类型将任务委托给服务。以下是一些重要的系统范围生成的意图。
- android.intent.action.BATTERY_LOW: 表示设备电池电量低。
android.intent.action.BOOT_COMPLETED: 系统启动完成后广播一次。
android.intent.action.CALL: 拨打指定号码进行电话通话。
android.intent.action.DATE_CHANGED: 日期已更改。
android.intent.action.REBOOT: 使设备重新启动。
android.net.conn.CONNECTIVITY_CHANGE: 移动网络或Wi-Fi连接发生变化(或重置)。
Android中的广播接收器
在Android应用程序中设置广播接收器,我们需要完成以下两个步骤。
- 创建一个广播接收器
注册一个广播接收器
创建一个广播接收器
让我们按照下面的示例快速实现一个自定义的广播接收器。
public class MyReceiver extends BroadcastReceiver {
    public MyReceiver() {
    }

    @Override
    public void onReceive(Context context, Intent intent) {

        Toast.makeText(context, "Action: " + intent.getAction(), Toast.LENGTH_SHORT).show();
    }
}
广播接收器是一个抽象类,其中onReceiver()方法是抽象的。onReceiver()方法在任何事件发生时首先调用注册的广播接收器。意图对象通过传递所有的附加数据。还有一个可用的上下文对象,用于使用context.startActivity(myIntent); 或 context.startService(myService); 来启动活动或服务。
在Android应用程序中注册BroadcastReceiver。
可以通过两种方式注册广播接收器。
- 通过在AndroidManifest.xml文件中如下所示定义。
<receiver android:name=".ConnectionReceiver" >
             <intent-filter>
                 <action android:name="android.net.conn.CONNECTIVITY_CHANGE" />
             </intent-filter>
</receiver>
通过使用意图过滤器,我们告诉系统任何与我们的子元素匹配的意图都应该传递到特定的广播接收器中。3. 通过编程定义
以下代码片段展示了一个注册广播接收器的示例。
IntentFilter filter = new IntentFilter();
intentFilter.addAction(getPackageName() + "android.net.conn.CONNECTIVITY_CHANGE");

MyReceiver myReceiver = new MyReceiver();
registerReceiver(myReceiver, filter);
在活动的 onStop() 或 onPause() 方法中,可以使用以下代码片段来取消注册广播接收器。
@Override
protected void onPause() {
    unregisterReceiver(myReceiver);
    super.onPause();
}
从Activity中发送广播意图
以下代码片段用于向所有相关的BroadcastReceivers发送一个意图。
Intent intent = new Intent();
      intent.setAction("com.Olivia.CUSTOM_INTENT");
      sendBroadcast(intent);
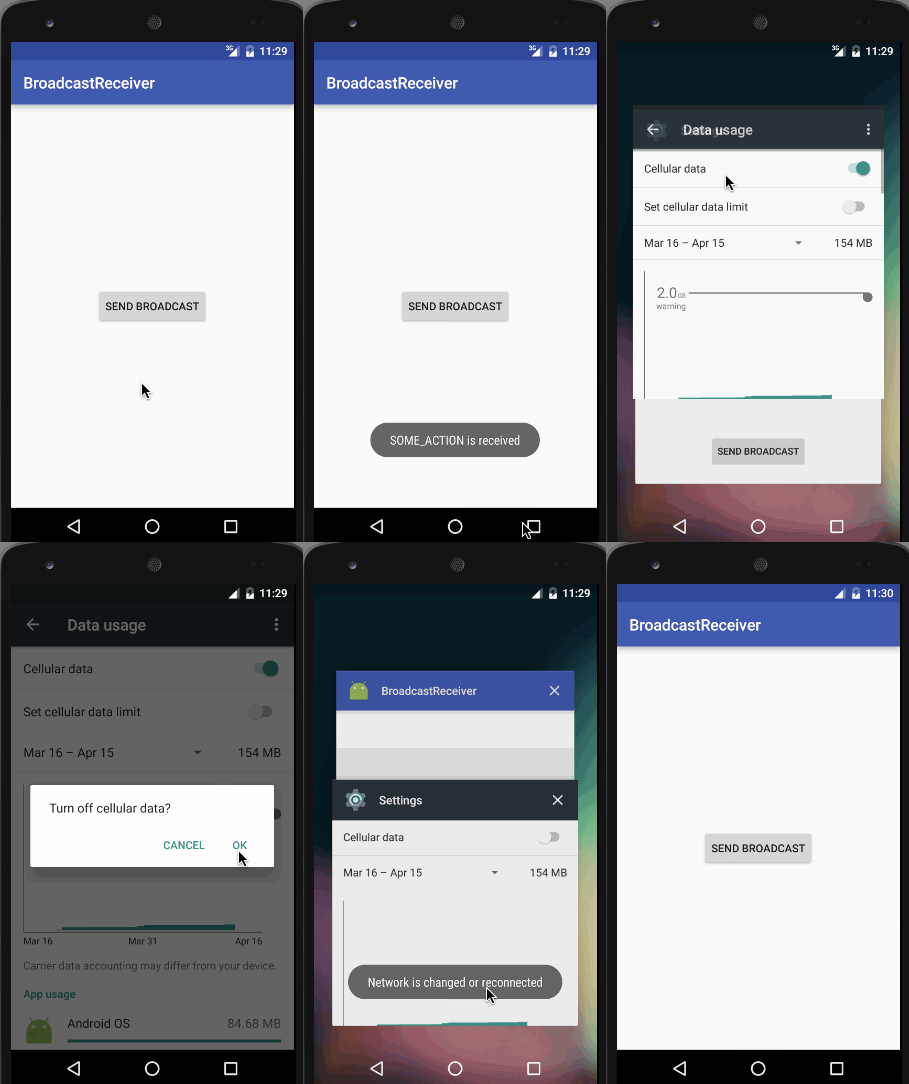
不要忘记在清单文件或程序中的intent filter标签中添加上述行为。让我们开发一个应用程序,监听网络变化事件和自定义intent,并相应处理数据。
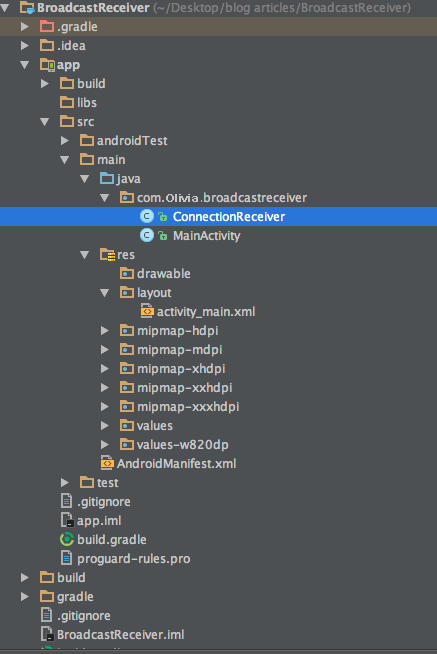
Android 项目结构中的广播接收器

Android BroadcastReceiver 代码
activity_main.xml 文件中包含一个按钮,该按钮位于中心位置并发送一个广播意图。
<?xml version="1.0" encoding="utf-8"?>
<RelativeLayout xmlns:android="https://schemas.android.com/apk/res/android"
    xmlns:tools="https://schemas.android.com/tools"
    android:layout_width="match_parent"
    android:layout_height="match_parent"
    android:paddingBottom="@dimen/activity_vertical_margin"
    android:paddingLeft="@dimen/activity_horizontal_margin"
    android:paddingRight="@dimen/activity_horizontal_margin"
    android:paddingTop="@dimen/activity_vertical_margin"
    tools:context="com.Olivia.broadcastreceiver.MainActivity">

    <Button
        android:layout_width="wrap_content"
        android:layout_height="wrap_content"
        android:id="@+id/button"
        android:text="Send Broadcast"
        android:layout_centerVertical="true"
        android:layout_centerHorizontal="true" />
</RelativeLayout>
下面给出了MainActivity.java文件的代码。
package com.Olivia.broadcastreceiver;

import android.content.Intent;
import android.content.IntentFilter;
import android.support.v7.app.AppCompatActivity;
import android.os.Bundle;
import android.util.Log;
import android.view.View;
import android.widget.Button;

import butterknife.ButterKnife;
import butterknife.InjectView;
import butterknife.OnClick;

public class MainActivity extends AppCompatActivity {
    ConnectionReceiver receiver;
    IntentFilter intentFilter;

    @Override
    protected void onCreate(Bundle savedInstanceState) {
        super.onCreate(savedInstanceState);
        setContentView(R.layout.activity_main);

        ButterKnife.inject(this);

        receiver = new ConnectionReceiver();
        intentFilter = new IntentFilter("com.Olivia.broadcastreceiver.SOME_ACTION");

    }

    @Override
    protected void onResume() {
        super.onResume();
        registerReceiver(receiver, intentFilter);

    }

    @Override
    protected void onDestroy() {
        super.onDestroy();

        unregisterReceiver(receiver);
    }

    @OnClick(R.id.button)
    void someMethod() {

        Intent intent = new Intent("com.Olivia.broadcastreceiver.SOME_ACTION");
        sendBroadcast(intent);
    }
}
在上面的代码中,我们以编程的方式注册了另一个自定义操作。ConnectionReceiver在AndroidManifest.xml文件中定义如下。
<?xml version="1.0" encoding="utf-8"?>
<?xml version="1.0" encoding="utf-8"?>
<manifest xmlns:android="https://schemas.android.com/apk/res/android"
    package="com.Olivia.broadcastreceiver">

    <uses-permission android:name="android.permission.INTERNET" />
    <uses-permission android:name="android.permission.ACCESS_NETWORK_STATE" />

    <application
        android:allowBackup="true"
        android:icon="@mipmap/ic_launcher"
        android:label="@string/app_name"
        android:supportsRtl="true"
        android:theme="@style/AppTheme">
        <activity android:name=".MainActivity">
            <intent-filter>
                <action android:name="android.intent.action.MAIN" />
                <category android:name="android.intent.category.LAUNCHER" />
            </intent-filter>
        </activity>

        <receiver android:name=".ConnectionReceiver">
            <intent-filter>
                <action android:name="android.net.conn.CONNECTIVITY_CHANGE" />
            </intent-filter>
        </receiver>

    </application>
</manifest>
以下是ConnectionReceiver.java类的定义。
public class ConnectionReceiver extends BroadcastReceiver {
    @Override
    public void onReceive(Context context, Intent intent) {

        Log.d("API123",""+intent.getAction());

        if(intent.getAction().equals("com.Olivia.broadcastreceiver.SOME_ACTION"))
            Toast.makeText(context, "SOME_ACTION is received", Toast.LENGTH_LONG).show();

        else {
            ConnectivityManager cm =
                    (ConnectivityManager) context.getSystemService(Context.CONNECTIVITY_SERVICE);

            NetworkInfo activeNetwork = cm.getActiveNetworkInfo();
            boolean isConnected = activeNetwork != null &&
                    activeNetwork.isConnectedOrConnecting();
            if (isConnected) {
                try {
                    Toast.makeText(context, "Network is connected", Toast.LENGTH_LONG).show();
                } catch (Exception e) {
                    e.printStackTrace();
                }
            } else {
                Toast.makeText(context, "Network is changed or reconnected", Toast.LENGTH_LONG).show();
            }
        }
    }

}


