Ubuntu 20.04搭建Ruby on Rails 7与React全栈项目指南
引言
Ruby on Rails是一款热门的服务器端Web应用框架。它驱动着今天网络上许多流行的应用程序,如GitHub、Basecamp、SoundCloud、Airbnb和Twitch。凭借注重程序员体验和围绕它建立的充满激情的社区,Ruby on Rails将为您提供构建和维护现代Web应用程序所需的工具。
React是一个用于创建前端用户界面的JavaScript库。由Facebook支持,它是当今最流行的前端库之一。React提供了诸如虚拟DOM、组件架构和状态管理等功能,使前端开发过程更有组织和高效。
随着网络前端逐渐从服务器端代码中分离出来,将Rails的优雅与React的高效结合,您将能够构建强大而现代的应用程序,并了解当前趋势。通过在Rails视图中使用React来渲染组件(而不是Rails模板引擎),您的应用程序将获益于JavaScript和前端开发的最新进展,同时利用了Ruby on Rails的表现力。
在本教程中,您将创建一个Ruby on Rails应用程序,用于存储您喜爱的食谱,然后使用React前端将其显示出来。当您完成后,您将能够使用Bootstrap风格的React界面创建、查看和删除食谱。

前提条件
按照本教程,您需要:
- 在您的开发机器上安装Node.js和npm。本教程使用Node.js版本16.14.0和npm版本8.3.1。Node.js是一个JavaScript运行时环境,允许您在浏览器外运行代码。它附带一个预装的包管理器npm,让您可以安装和更新软件包。要在Ubuntu 20.04或macOS上安装这些,请按照《如何在Ubuntu 20.04上安装Node.js》中的”使用PPA安装”部分或《如何在macOS上安装Node.js并创建本地开发环境》中的步骤进行操作。
- 在您的开发机器上安装Yarn包管理器,这将允许您下载React框架。本教程在版本1.22.10上进行了测试;要安装此依赖项,请遵循官方Yarn安装指南。
- 安装Ruby on Rails。要获取此功能,请按照我们的《如何在Ubuntu 20.04上使用rbenv安装Ruby on Rails》指南进行操作。如果您想在macOS上开发此应用程序,可以使用《如何在macOS上使用rbenv安装Ruby on Rails》。本教程在Ruby版本3.1.2和Rails版本7.0.4上进行了测试,因此在安装过程中请确保指定这些版本。
注意
- 安装PostgreSQL,如《如何在Ubuntu 20.04上将PostgreSQL与Ruby on Rails应用程序一起使用》或《如何在macOS上将PostgreSQL与Ruby on Rails应用程序一起使用》中的步骤1和2所述。要遵循本教程,您可以使用PostgreSQL版本12或更高版本。如果您想在不同的Linux发行版或其他操作系统上开发此应用程序,请参阅官方PostgreSQL下载页面。有关如何使用PostgreSQL的更多信息,请参阅《如何安装和使用PostgreSQL》。
步骤一 – 创建一个新的Rails应用程序
在这一步中,你将使用Rails应用程序框架构建你的食谱应用。首先,你将创建一个新的Rails应用程序,并设置为与React一起工作。
Rails提供了几个名为生成器的脚本,用于创建构建现代Web应用所需的一切。要查看完整的命令列表及其功能,请在终端中运行以下命令。
- rails -h
这个命令将提供一个全面的选项列表,允许你设置应用程序的参数。其中一个列出的命令是新命令,用于创建一个新的Rails应用程序。
现在,你将使用新的生成器创建一个新的Rails应用程序。在你的终端中运行以下命令:
- rails new rails_react_recipe -d postgresql -j esbuild -c bootstrap -T
前面的命令在名为rails_react_recipe的目录中创建一个新的Rails应用程序,安装所需的Ruby和JavaScript依赖,并配置Webpack。与这个新的生成器命令相关的标志包括以下内容:
- -d标志指定首选的数据库引擎,在这种情况下是PostgreSQL。
- -j标志指定应用程序的JavaScript处理方式。Rails提供了几种不同的方法来处理Rails应用程序中的JavaScript代码。传递给-j标志的esbuild选项指示Rails将esbuild预配置为首选的JavaScript打包工具。
- -c标志指定应用程序的CSS处理器。在这种情况下,Bootstrap是首选选项。
- -T标志指示Rails跳过测试文件的生成,因为你不会在本教程中编写测试。如果你想使用与Rails提供的不同的Ruby测试工具,也建议使用此命令。
命令完成后,转到rails_react_recipe目录,这是您应用程序的根目录。
- cd rails_react_recipe
接下来,请列出目录的内容。
- ls
内容将以类似于以下方式打印出来:
输出Gemfile README.md bin db node_modules storage yarn.lock
Gemfile.lock Rakefile config lib package.json tmp
Procfile.dev app config.ru log public vendor
这个根目录包含了一些自动生成的文件和文件夹,构成了Rails应用的结构,其中包括一个package.json文件,里面包含了React应用的依赖项。
现在您已经成功创建了一个新的Rails应用程序,下一步将是将其连接到一个数据库。
第二步 — 设置数据库
在运行新的Rails应用程序之前,你必须首先将其连接到一个数据库。在这一步中,你将把新创建的Rails应用程序连接到一个PostgreSQL数据库,以便可以根据需要存储和获取食谱数据。
在config/database.yml中找到的database.yml文件包含了不同开发环境的数据库名称等数据库细节。Rails通过在环境名称后面添加下划线(_)来指定各个开发环境的数据库名称。在本教程中,您将使用默认的数据库配置值,但如果需要,可以更改配置值。
注意
在这一点上,你可以修改config/database.yml来设置你希望Rails使用哪个PostgreSQL角色来创建你的数据库。在前提条件中,你根据《如何在你的Ruby on Rails应用程序中使用PostgreSQL》教程创建了一个由密码保护的角色。如果你还没有设置用户,现在你可以按照同样前提条件教程中的第4步——配置和创建你的数据库的说明来操作。
Rails提供了许多命令,使得开发Web应用程序变得简单,包括用于与数据库交互的命令,例如创建、删除和重置。要为您的应用程序创建一个数据库,请在终端中运行以下命令。
- rails db:create
这个命令会创建一个开发和测试数据库,并产生以下输出:
输出Created database 'rails_react_recipe_development'
Created database 'rails_react_recipe_test'
现在应用程序已经连接到数据库,通过运行以下命令来启动应用程序:
- bin/dev
Rails 提供了一个替代的 bin/dev 脚本,通过使用 Foreman gem 在应用的根目录中执行 Procfile.dev 文件中的命令来启动 Rails 应用程序。
一旦你执行这个命令,你的命令提示符将会消失,然后下面的输出将会出现在原来的位置上。
输出started with pid 70099
started with pid 70100
started with pid 70101
yarn run v1.22.10
yarn run v1.22.10
$ esbuild app/javascript/*.* --bundle --sourcemap --outdir=app/assets/builds --public-path=assets --watch
$ sass ./app/assets/stylesheets/application.bootstrap.scss:./app/assets/builds/application.css --no-source-map --load-path=node_modules --watch
=> Booting Puma
=> Rails 7.0.4 application starting in development
=> Run `bin/rails server --help` for more startup options
[watch] build finished, watching for changes...
Puma starting in single mode...
* Puma version: 5.6.5 (ruby 3.1.2-p20) ("Birdie's Version")
* Min threads: 5
* Max threads: 5
* Environment: development
* PID: 70099
* Listening on http://127.0.0.1:3000
* Listening on http://[::1]:3000
Use Ctrl-C to stop
Sass is watching for changes. Press Ctrl-C to stop.
要访问您的应用程序,请打开一个浏览器窗口并导航到http://localhost:3000。Rails的默认欢迎页面将加载,这意味着您已经正确设置了Rails应用程序。
要停止网页服务器,在运行服务器的终端上按下CTRL+C。你会收到来自Puma的告别信息。
输出^C SIGINT received, starting shutdown
- Gracefully stopping, waiting for requests to finish
=== puma shutdown: 2019-07-31 14:21:24 -0400 ===
- Goodbye!
Exiting
sending SIGTERM to all processes
terminated by SIGINT
terminated by SIGINT
exited with code 0
然后你的终端提示符将重新出现。
您已成功为您的食谱应用程序设置了数据库。下一步,您将安装所需的JavaScript依赖项,以组合您的React前端。
第三步 — 安装前端依赖
在这个步骤中,您将安装食谱应用程序前端所需的JavaScript依赖项。它们包括:
- React,用于构建用户界面。
- React DOM,使React能够与浏览器DOM交互。
- React Router,用于处理React应用程序中的导航。
使用Yarn软件包管理器运行以下命令安装这些软件包。
- yarn add react react-dom react-router-dom
这个命令使用Yarn来安装指定的软件包并将它们添加到package.json文件中。要验证这一点,打开项目根目录中的package.json文件。
- nano package.json
安装的软件包将在依赖项键下列出。
~/rails_react_recipe/package.json的中文原生解释:
~/rails_react_recipe/package.json
{
"name": "app",
"private": "true",
"dependencies": {
"@hotwired/stimulus": "^3.1.0",
"@hotwired/turbo-rails": "^7.1.3",
"@popperjs/core": "^2.11.6",
"bootstrap": "^5.2.1",
"bootstrap-icons": "^1.9.1",
"esbuild": "^0.15.7",
"react": "^18.2.0",
"react-dom": "^18.2.0",
"react-router-dom": "^6.3.0",
"sass": "^1.54.9"
},
"scripts": {
"build": "esbuild app/javascript/*.* --bundle --sourcemap --outdir=app/assets/builds --public-path=assets",
"build:css": "sass ./app/assets/stylesheets/application.bootstrap.scss:./app/assets/builds/application.css --no-source-map --load-path=node_modules"
}
}
通过按下CTRL+X键关闭文件。
你已经安装了一些应用程序的前端依赖项。接下来,你将为你的食谱应用程序设置一个主页。
步骤四 — 设置主页
在安装了所需的依赖项之后,您现在将为应用程序创建一个主页,作为用户首次访问应用程序时的着陆页面。
Rails遵循应用程序的模型-视图-控制器架构模式。在MVC模式中,控制器的目的是接收特定请求并将其传递到适当的模型或视图。当前应用程序在浏览器加载根URL时显示Rails欢迎页。为了改变这一点,您需要创建一个控制器和视图来处理主页,并将其与一个路由进行匹配。
Rails 提供了一个控制器生成器来创建控制器。控制器生成器接收一个控制器名称和相应的操作。要了解更多信息,请查阅 Rails 文档。
本教程将调用控制器为Homepage。运行以下命令创建一个带有index行为的Homepage控制器。
第三部分:在Ubuntu 20.04上创建Rails控制器并设置根路由
在本部分中,您将学习如何在Ruby on Rails v7项目中创建控制器,设置根路由,并为后续集成React前端做准备。这是构建Ubuntu 20.04上Rails与React应用的重要步骤。
创建Homepage控制器
首先,让我们使用Rails生成器创建一个Homepage控制器,这是Ruby on Rails应用开发的基础步骤:
- rails g controller Homepage index
Linux系统提示:
如果在Ubuntu 20.04上遇到FATAL:侦听错误:无法监视目录中的更改错误,这可能是由于系统文件监视限制导致的。您的系统对可监视的文件数量有限制。运行以下命令解决此问题:
echo fs.inotify.max_user_watches=524288 | sudo tee -a /etc/sysctl.conf && sudo sysctl -p
此命令将永久增加Ubuntu系统可监视的目录数量至524288。您可以通过将524288替换为所需数字来再次调整此设置。
理解Rails生成的文件
运行控制器命令后,Ruby on Rails将生成以下关键文件:
- homepage_controller.rb – 用于接收所有与主页相关的请求。此文件包含您在命令中指定的index操作。
- homepage_helper.rb – 用于添加与Homepage控制器相关的辅助方法。
- index.html.erb – 作为视图页面,用于渲染与主页相关的任何内容。
除了这些新创建的文件,Rails还会自动更新位于config/routes.rb的路由文件,为您的主页添加一个GET路由,您可以将其修改为根路由。
配置Rails根路由
在Ruby on Rails中,根路由指定了用户访问应用程序根URL时所显示的内容。在这种情况下,您希望用户看到您的主页。请使用您喜爱的编辑器打开位于config/routes.rb的路由文件:
- nano config/routes.rb
在这个文件中,将get 'homepage/index'替换为root 'homepage#index',使文件内容如下:
~/rails_react_recipe/config/routes.rb
Rails.application.routes.draw do
root 'homepage#index'
# For details on the DSL available within this file, see http://guides.rubyonrails.org/routing.html
end
这个修改指示Ruby on Rails将应用程序的根请求映射到Homepage控制器的索引操作,然后在浏览器中呈现位于app/views/homepage/index.html.erb的index.html.erb文件中的内容。
保存并关闭文件。
测试Rails应用程序
为了验证配置是否有效,请启动您的Rails应用程序:
- bin/dev
当您在浏览器中打开或刷新应用程序时,将加载一个新的应用程序主页。

一旦您确认应用程序运行正常,按下Ctrl+C停止服务器。
准备React前端集成
接下来,打开~/rails_react_recipe/app/views/homepage/index.html.erb文件:
- nano ~/rails_react_recipe/app/views/homepage/index.html.erb
删除文件内的所有代码,然后将文件保存为空白。通过这样做,确保index.html.erb文件的内容不会干扰前端React的渲染。
现在您已经为Ruby on Rails应用程序设置了主页,您可以转到下一部分,其中您将配置应用程序的前端以使用React。
第五步 — 将React配置为Rails前端
在这一步中,您将配置Ruby on Rails使用React作为应用程序的前端,而不是使用其默认的模板引擎。这个新的配置将使您能够使用React创建一个更具视觉吸引力和交互性的主页,这是在Ubuntu 20.04上构建现代Web应用的关键步骤。
通过在生成Rails应用程序时指定的esbuild选项的帮助下,已经完成了大部分设置,使JavaScript能够与Rails无缝配合。现在只需要将React应用程序的入口点加载到JavaScript文件的esbuild入口点中。要做到这一点,请从app/javascript目录中开始创建一个components目录:
- mkdir ~/rails_react_recipe/app/javascript/components
组件目录将包含首页的组件,以及应用程序中的其他React组件,包括React应用程序的入口文件。
配置JavaScript入口点
接下来,打开位于app/javascript/application.js的文件:
- nano ~/rails_react_recipe/app/javascript/application.js
将以下标记的代码行添加到文件中:
~/rails_react_recipe/app/javascript/application.js
// Entry point for the build script in your package.json
import "@hotwired/turbo-rails"
import "./controllers"
import * as bootstrap from "bootstrap"
import "./components"
在application.js文件中添加的代码行将会导入components目录中的代码,使其能够被esbuild用于打包。通过将/components目录导入到Rails应用的JavaScript入口点,您可以为主页创建一个React组件。
保存并关闭文件。
创建React组件
然后,在组件目录中创建一个Home.jsx文件:
- nano ~/rails_react_recipe/app/javascript/components/Home.jsx
将以下代码添加到文件中:
~/rails_react_recipe/app/javascript/components/Home.jsx
// 在此添加React组件代码
这个React组件将为您的Ruby on Rails应用程序主页创建一个界面。接下来,您需要确保这个组件能够被Rails应用程序正确加载和渲染。
现在,您已经成功地在Ubuntu 20.04上的Rails应用程序中集成了React前端,并创建了一个基本的Home组件。在下一部分中,您将进一步开发这个React组件,并添加更多功能,完善您的Ruby on Rails与React应用。
创建React主页组件并配置路由
在本节中,我们将为Ruby on Rails应用创建React主页组件,并设置React Router来管理页面导航。这是构建现代单页应用的关键步骤。
步骤1:创建React主页组件
首先,让我们创建一个美观的主页组件。这个组件将使用Bootstrap进行样式设计,并包含导航到食谱页面的链接。
import React from "react";
import { Link } from "react-router-dom";
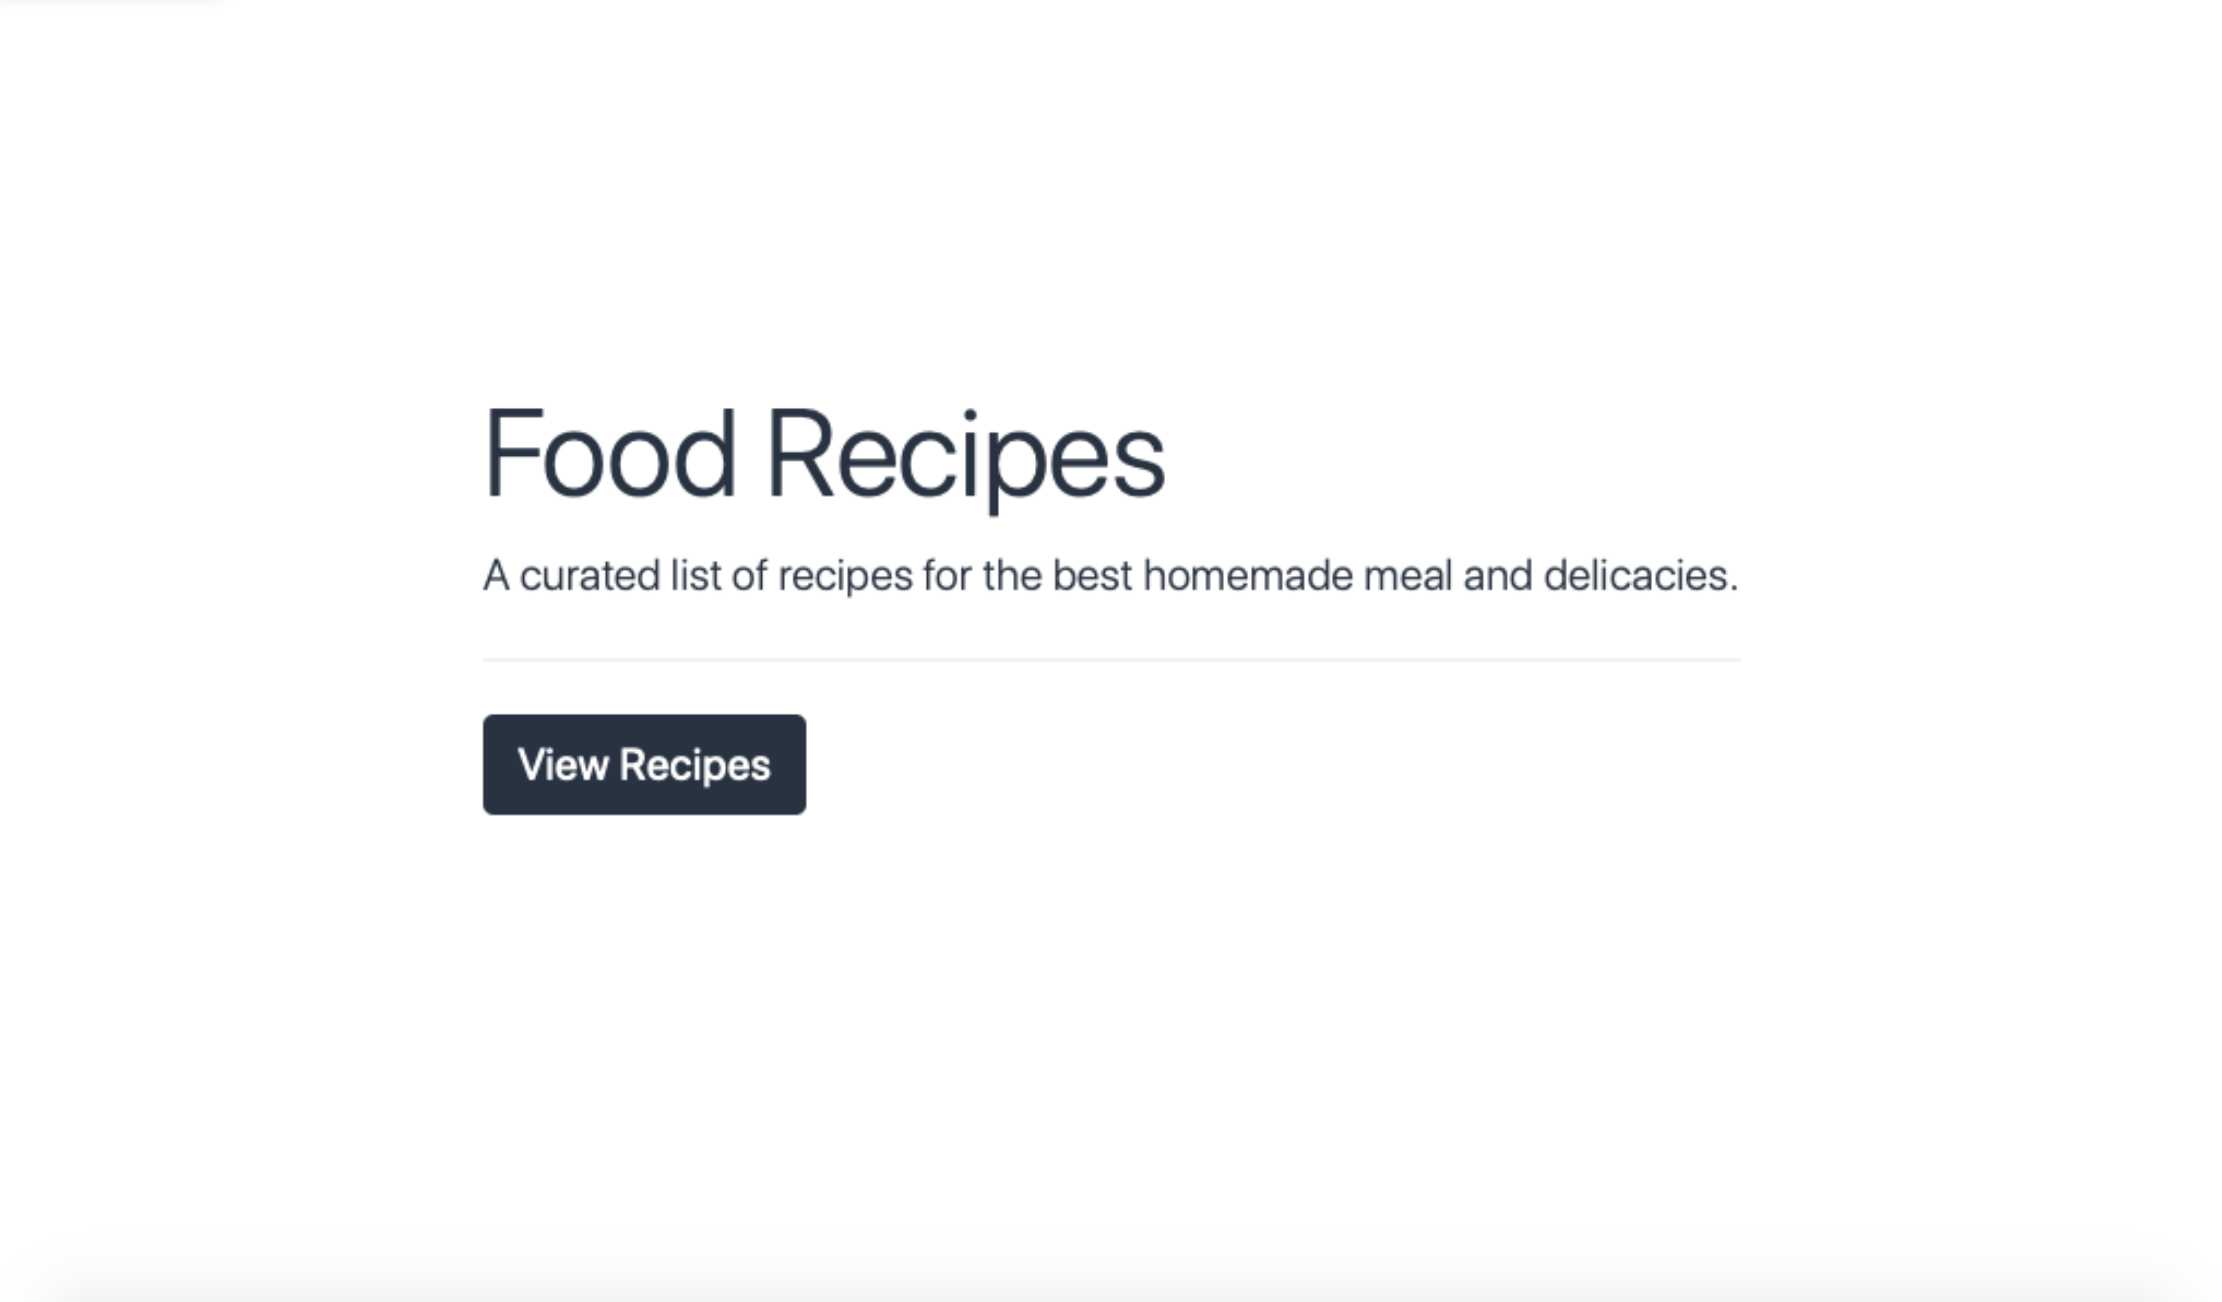
export default () => (
<div className="vw-100 vh-100 primary-color d-flex align-items-center justify-content-center">
<div className="jumbotron jumbotron-fluid bg-transparent">
<div className="container secondary-color">
<h1 className="display-4">Food Recipes</h1>
<p className="lead">
A curated list of recipes for the best homemade meal and delicacies.
</p>
<hr className="my-4" />
<Link
to="/recipes"
className="btn btn-lg custom-button"
role="button"
>
View Recipes
</Link>
</div>
</div>
</div>
);
在这段代码中,我们从React Router库导入了React和Link组件。Link组件用于创建应用内的导航链接,无需刷新页面即可在不同视图间切换。这个功能组件定义了一个引人注目的主页布局,使用了Bootstrap的类进行样式设计,包括一个醒目的标题、描述文本和指向食谱页面的按钮。
保存并关闭文件后,我们继续设置React路由系统。
步骤2:设置React路由目录结构
为了组织我们的路由配置,需要在JavaScript应用目录中创建一个专门的路由文件夹。执行以下命令:
- mkdir ~/rails_react_recipe/app/javascript/routes
这个路由目录将包含应用中所有页面的路由定义。每个路由都会映射到相应的React组件,当用户访问特定URL时,对应的组件将被渲染到浏览器中。
步骤3:创建路由配置文件
在路由目录中,创建一个index.jsx文件来定义应用的路由规则:
- nano ~/rails_react_recipe/app/javascript/routes/index.jsx
将以下代码添加到新创建的文件中:
import React from "react";
import { BrowserRouter as Router, Routes, Route } from "react-router-dom";
import Home from "../components/Home";
export default (
<Router>
<Routes>
<Route path="/" element={<Home />} />
</Routes>
</Router>
);
在这个路由配置文件中,我们导入了必要的模块:React库、React Router的BrowserRouter(重命名为Router)、Routes和Route组件。这些组件共同工作,实现了客户端路由功能。我们还导入了之前创建的Home组件,并将其映射到应用的根路径(“/”)。这意味着当用户访问应用根URL时,Home组件将被渲染。随着应用的发展,您可以在此文件中添加更多路由,每个路由对应一个页面组件。
保存并退出文件,继续下一步。
步骤4:创建应用主组件
为了使路由系统正常工作,我们需要创建一个App组件,它将负责渲染路由配置。在components目录中创建App.jsx文件:
- nano ~/rails_react_recipe/app/javascript/components/App.jsx
添加以下代码到App.jsx文件:
import React from "react";
import Routes from "../routes";
export default props => <>{Routes}</>;
在这个简洁的App组件中,我们导入了React和之前创建的路由配置。组件的功能非常简单:它渲染路由配置,使所有定义的路由在应用中可用。这个组件将在应用的入口点被渲染,确保当应用加载时,整个路由系统都能正常工作。
保存并关闭文件后,我们继续创建应用的入口文件。
步骤5:创建React应用入口点
现在我们需要创建一个入口文件,它将负责将React应用挂载到DOM中。在components目录中创建index.jsx文件:
- nano ~/rails_react_recipe/app/javascript/components/index.jsx
将以下代码添加到index.jsx文件:
import React from "react";
import { createRoot } from "react-dom/client";
import App from "./App";
document.addEventListener("turbo:load", () => {
const root = createRoot(
document.body.appendChild(document.createElement("div"))
);
root.render(<App />);
});
在这个入口文件中,我们导入了React库、ReactDOM的createRoot函数以及App组件。代码监听Turbo的加载事件(这是Rails 7中的Turbo功能),当页面加载时,它会创建一个React根节点,并将App组件渲染到新创建的div元素中。这种集成方式允许React应用与Rails的Turbo驱动页面加载协同工作,提供流畅的用户体验。
保存并退出文件,最后一步是添加一些自定义CSS样式。
步骤6:添加自定义CSS样式
为了使我们的应用看起来更加美观,让我们添加一些自定义样式。打开application.bootstrap.scss文件:
- nano ~/rails_react_recipe/app/assets/stylesheets/application.bootstrap.scss
将文件内容替换为以下代码:
// 导入Bootstrap样式
@import "bootstrap/scss/bootstrap";
// 自定义变量
$primary-color: #4a6fa5;
$secondary-color: #6c757d;
// 自定义样式
.primary-color {
background-color: $primary-color;
}
.secondary-color {
color: white;
}
.custom-button {
background-color: white;
color: $primary-color;
border: none;
padding: 10px 20px;
font-weight: bold;
transition: all 0.3s ease;
&:hover {
background-color: $secondary-color;
color: white;
transform: scale(1.05);
}
}
// 全局样式
body {
margin: 0;
font-family: -apple-system, BlinkMacSystemFont, 'Segoe UI', 'Roboto', 'Oxygen',
'Ubuntu', 'Cantarell', 'Fira Sans', 'Droid Sans', 'Helvetica Neue',
sans-serif;
-webkit-font-smoothing: antialiased;
-moz-osx-font-smoothing: grayscale;
}
这些样式定义了应用的主题颜色、按钮样式和一些全局设置。我们使用了SCSS的变量功能来定义颜色,使样式更易于维护。自定义按钮样式添加了悬停效果和过渡动画,提升了用户体验。全局样式确保了跨浏览器的一致性和更好的字体渲染。
保存并关闭文件。现在,我们已经成功创建了React主页组件,配置了路由系统,并添加了自定义样式。在下一节中,我们将继续构建应用的其余部分。
@import 'bootstrap/scss/bootstrap';
@import 'bootstrap-icons/font/bootstrap-icons';
.bg_primary-color {
background-color: #FFFFFF;
}
.primary-color {
background-color: #FFFFFF;
}
.bg_secondary-color {
background-color: #293241;
}
.secondary-color {
color: #293241;
}
.custom-button.btn {
background-color: #293241;
color: #FFF;
border: none;
}
.hero {
width: 100vw;
height: 50vh;
}
.hero img {
object-fit: cover;
object-position: top;
height: 100%;
width: 100%;
}
.overlay {
height: 100%;
width: 100%;
opacity: 0.4;
}
您为页面设置了一些自定义的颜色。.hero部分将为主页上的英雄图片或大型网页横幅创建框架,稍后您将添加。此外,custom-button.btn样式会应用于用户用来进入应用程序的按钮。
在CSS样式设置好后,保存并关闭文件。
接下来,重新启动您的应用程序的网络服务器。
- bin/dev
然后在您的浏览器中重新加载应用程序,一个全新的主页将加载出来。
使用CTRL+C停止网络服务器。
在这一步中,您配置了您的应用程序以使用React作为其前端。在下一步中,您将创建能够创建,读取,更新和删除食谱的模型和控制器。
第六步 – 创建菜谱控制器和模型
现在你已经为应用程序设置了React前端,你将创建一个Recipe模型和控制器。Recipe模型将代表包含有关用户配方信息的数据库表,而控制器将接收并处理创建、读取、更新或删除配方的请求。当用户请求配方时,配方控制器接收该请求并将其传递给配方模型,后者从数据库中检索所请求的数据。然后,模型将配方数据作为响应返回给控制器。最后,该信息在浏览器中显示出来。
从Rails提供的generate model子命令开始创建一个Recipe模型,指定模型的名称以及其列和数据类型。运行以下命令:
- rails generate model Recipe name:string ingredients:text instruction:text image:string
上述命令指示Rails创建一个Recipe模型,它包括一个名为name的字符串类型列、一个名为ingredients和instruction的文本类型列,以及一个名为image的字符串类型列。本教程将模型命名为Recipe,因为Rails中的模型使用单数名称,而它们对应的数据库表使用复数名称。
运行生成模型命令会创建两个文件并打印以下输出:
输出
调用 active_record
创建 db/migrate/20221017220817_create_recipes.rb
创建 app/models/recipe.rb
创建的两个文件有:
- 一个recipe.rb文件,包含所有与模型相关的逻辑。
- 一个20221017220817_create_recipes.rb文件(文件开头的数字可能取决于您运行命令的日期而有所不同)。这个迁移文件包含创建数据库结构的指令。
接下来,您将编辑配方模型文件以确保只将有效数据保存到数据库中。您可以通过在模型中添加一些数据库验证来实现此目标。
打开位于app/models/recipe.rb的配方模型。
- nano ~/rails_react_recipe/app/models/recipe.rb
请将以下代码中的突出部分添加到文件中。
~/rails_react_recipe/app/models/recipe.rb
class Recipe < ApplicationRecord
validates :name, presence: true
validates :ingredients, presence: true
validates :instruction, presence: true
end
在这个代码中,你添加了模型验证,检查名称、成分和指令字段是否存在。如果缺少这三个字段,则菜谱无效,不会保存到数据库中。
保存并关闭文件。
要让Rails在你的数据库中创建recipes表,你需要运行一个迁移(migration),这是一种以编程方式对数据库进行更改的方法。为了确保迁移与你设置的数据库配合工作,你必须对20221017220817_create_recipes.rb 文件进行修改。
请在你的编辑器中打开这个文件。
- nano ~/rails_react_recipe/db/migrate/20221017220817_create_recipes.rb
添加被标记的材料以使您的文件与下列内容相匹配。
db/migrate/20221017220817_create_recipes.rb
class CreateRecipes < ActiveRecord::Migration[5.2]
def change
create_table :recipes do |t|
t.string :name, null: false
t.text :ingredients, null: false
t.text :instruction, null: false
t.string :image, default: 'https://raw.githubusercontent.com/do-community/react_rails_recipe/master/app/assets/images/Sammy_Meal.jpg'
t.timestamps
end
end
end
这个迁移文件包含一个Ruby类,其中包含一个change方法和一个创建名为recipes的表以及列和它们的数据类型的命令。你还通过添加null: false,确保这些列在更改数据库之前都有一个值,更新了20221017220817_create_recipes.rb,在name、ingredients和instruction列上添加了一个NOT NULL约束。最后,你为image列添加了一个默认的图片URL;如果你想使用不同的图片,这可以是另一个URL。
完成这些更改后,保存并退出文件。现在,您已经准备好运行迁移并创建表。在您的终端中运行以下命令:
- rails db:migrate
您可以使用数据库迁移命令来运行迁移文件中的指令。命令成功运行后,您将会收到类似以下的输出信息:
输出
== 20190407161357 CreateRecipes: migrating ====================================
-- create_table(:recipes)
-> 0.0140s
== 20190407161357 CreateRecipes: migrated (0.0141s) ===========================
安装好你的配方模型后,接下来要创建配方控制器来添加创建、读取和删除配方的逻辑。运行下面的命令:
- rails generate controller api/v1/Recipes index create show destroy --skip-template-engine --no-helper
在这个命令中,你会在api/v1目录中创建一个Recipes控制器,包括index、create、show和destroy四个动作。 index动作将负责获取所有的食谱; create动作将负责创建新的食谱; show动作将获取单个食谱,而destroy动作将处理删除食谱的逻辑。
您还可以传入一些标志来使控制器更轻量化,包括:
- –skip-template-engine,该标志指示Rails跳过生成Rails视图文件,因为React负责处理前端需求。
- –no-helper,该标志指示Rails跳过为控制器生成辅助文件。
运行该命令还会在路由文件中为 Recipes 控制器中的每个操作添加一条路由。
当命令运行时,它将打印出以下类似的输出:
输出
创建 app/controllers/api/v1/recipes_controller.rb 控制器文件,并设置以下路由:
namespace :api do
namespace :v1 do
get 'recipes/index'
get 'recipes/create'
get 'recipes/show'
get 'recipes/destroy'
end
end
要使用这些路由,你需要对你的 config/routes.rb 文件进行更改。在文本编辑器中打开 routes.rb 文件:
nano ~/rails_react_recipe/config/routes.rb
将此文件更新为以下代码,修改或添加标记的行:
Rails.application.routes.draw do
namespace :api do
namespace :v1 do
get 'recipes/index'
post 'recipes/create'
get '/show/:id', to: 'recipes#show'
delete '/destroy/:id', to: 'recipes#destroy'
end
end
root 'homepage#index'
get '/*path' => 'homepage#index'
# Define your application routes per the DSL in https://guides.rubyonrails.org/routing.html
# Defines the root path route ("/")
# root "articles#index"
end
在这个路由文件中,你修改了创建和删除路由的HTTP谓词,以便可以发送和删除数据。你还通过在路由中添加 :id 参数,修改了展示和删除操作的路由。:id 将保存你想要读取或删除的食谱的标识号。
你可以使用 get '/*path' 添加一个捕获所有路径的路由,将所有不匹配现有路由的其他请求重定向到主页控制器的索引动作。前端路由将处理与创建、阅读或删除食谱无关的请求。
保存并退出文件。
要评估您应用程序中可用的路由列表,请运行以下命令:
rails routes
运行这个命令会显示项目中的URI模式、动词和匹配的控制器或动作的一个长列表。
接下来,您将添加一种逻辑来一次性获取所有的菜谱。Rails使用ActiveRecord库来处理与数据库相关的任务。ActiveRecord将类连接到关系型数据库表,并提供了丰富的API来与这些表进行交互。
为了获取所有的菜谱,你将使用ActiveRecord查询菜谱表,并从数据库中获取所有的菜谱。
使用以下命令打开 recipes_controller.rb 文件:
nano ~/rails_react_recipe/app/controllers/api/v1/recipes_controller.rb
将突出显示的行添加到食谱控制器中:
class Api::V1::RecipesController < ApplicationController
def index
recipe = Recipe.all.order(created_at: :desc)
render json: recipe
end
def create
end
def show
end
def destroy
end
end
在你的索引操作中,你使用了ActiveRecord的 all 方法来获取数据库中的所有菜谱。使用 order 方法,你按照创建日期的降序进行排序,这样最新的菜谱会排在首位。最后,你使用 render 将菜谱列表以JSON响应的形式发送出去。
接下来,你将添加有关创建新食谱的逻辑。与获取所有食谱一样,你将依赖于ActiveRecord来验证和保存所提供的食谱细节。请在你的食谱控制器中更新下面突出显示的代码行:
class Api::V1::RecipesController < ApplicationController
def index
recipe = Recipe.all.order(created_at: :desc)
render json: recipe
end
def create
recipe = Recipe.create!(recipe_params)
if recipe
render json: recipe
else
render json: recipe.errors
end
end
def show
end
def destroy
end
private
def recipe_params
params.permit(:name, :image, :ingredients, :instruction)
end
end
在创建操作中,您可以使用ActiveRecord的 create 方法来创建新的食谱。create 方法可以一次将所有控制器参数分配给模型。该方法使记录的创建变得简单,但也存在恶意使用的可能性。可以通过使用Rails提供的强参数功能来防止恶意使用。这样,只有被允许的参数才能被分配。您在代码中将一个 recipe_params 参数传递给 create 方法。recipe_params 是一个私有方法,在其中允许控制器参数,以防止错误或恶意内容进入您的数据库。在这种情况下,您允许使用 name、image、ingredients 和 instruction 参数来正确使用 create 方法。
您的配方控制器现在可以读取和创建配方了。剩下的就是读取和删除单个配方的逻辑。使用下面的代码更新您的配方控制器:
class Api::V1::RecipesController < ApplicationController
before_action :set_recipe, only: %i[show destroy]
def index
recipe = Recipe.all.order(created_at: :desc)
render json: recipe
end
def create
recipe = Recipe.create!(recipe_params)
if recipe
render json: recipe
else
render json: recipe.errors
end
end
def show
render json: @recipe
end
def destroy
@recipe&.destroy
render json: { message: '食谱已删除!' }
end
private
def recipe_params
params.permit(:name, :image, :ingredients, :instruction)
end
def set_recipe
@recipe = Recipe.find(params[:id])
end
end
在新的代码行中,你创建了一个私有的 set_recipe 方法,在show和delete操作匹配请求时由 before_action 调用。set_recipe 方法使用ActiveRecord的 find 方法找到一个id与params中提供的id匹配的recipe,并将其赋值给实例变量 @recipe。在show操作中,你将由 set_recipe 方法设置的 @recipe 对象作为JSON响应返回。
在销毁操作中,你使用了Ruby的安全导航运算符 &.,它在调用方法时避免了空值错误。这个附加功能允许你仅在存在时才删除一个菜谱,并作为响应发送一条消息。
在对 recipes_controller.rb 进行这些更改之后,保存并关闭文件。
在这一步中,你为你的食谱创建了一个模型和控制器。你已经编写了所有与后端食谱操作相关的逻辑。在接下来的部分中,你将创建组件来查看你的食谱。
第七步 - 浏览食谱
在此部分,您将创建用于查看食谱的组件。您将创建两个页面:一个用于查看所有现有的食谱,另一个用于查看单个食谱。
首先,您将创建一个页面来查看所有的食谱。在创建页面之前,由于您的数据库当前为空,您需要一些食谱供您使用。Rails 提供了一种为您的应用程序创建种子数据的方式。
打开名为seeds.rb的种子文件进行编辑。
- nano ~/rails_react_recipe/db/seeds.rb
用以下代码替换种子文件的初始内容。
~/rails_react_recipe/db/seeds.rb 的内容:
9.times do |i|
Recipe.create(
name: "食谱 #{i + 1}",
ingredients: '227克凝脂奶油,25克黄油,1茶匙玉米淀粉,100克帕尔马干酪,磨碎的肉豆蔻,250克新鲜意面或宽面条,切碎的细香葱或欧芹(可选)',
instruction: '在一个中等大小的平底锅中,用中小火搅拌凝脂奶油、黄油和玉米淀粉,煮至微沸。关火并保持温暖。'
)
end
在这段代码中,你使用一个循环命令Rails创建九个配方,包括名称、配料和指导部分。保存并退出文件。
为了用这些数据填充数据库,请在终端中运行以下命令。
- rails db:seed
运行这个命令将会向您的数据库中添加九个食谱。现在您可以获取并在前端渲染它们。
查看所有食谱的组件将向 RecipesController 的 index 操作发出 HTTP 请求,以获取所有食谱的列表。然后将在页面上以卡片的形式显示这些食谱。
在app/javascript/components目录下创建一个Recipes.jsx文件。
- nano ~/rails_react_recipe/app/javascript/components/Recipes.jsx
一旦文件打开,通过添加以下代码,导入React、useState、useEffect、Link和useNavigate模块。
~/rails_react_recipe/app/javascript/components/Recipes.jsx 的代码:
import React, { useState, useEffect } from "react";
import { Link, useNavigate } from "react-router-dom";
接下来,将所示的代码行添加到创建并导出一个功能性的React组件Recipes中。
~/rails_react_recipe/app/javascript/components/Recipes.jsx 的代码:
import React, { useState, useEffect } from "react";
import { Link, useNavigate } from "react-router-dom";
const Recipes = () => {
const navigate = useNavigate();
const [recipes, setRecipes] = useState([]);
};
export default Recipes;
在Recipe组件内部,React Router的导航API会调用useNavigate钩子。React的useState钩子将初始化recipes状态,该状态是一个空数组([]),以及一个用于更新recipes状态的setRecipes函数。
接下来,在useEffect钩子中,您将发送一个HTTP请求来获取所有的食谱。为了实现这一点,请添加以下突出显示的代码行:
~/rails_react_recipe/app/javascript/components/Recipes.jsx 的代码:
import React, { useState, useEffect } from "react";
import { Link, useNavigate } from "react-router-dom";
const Recipes = () => {
const navigate = useNavigate();
const [recipes, setRecipes] = useState([]);
useEffect(() => {
const url = "/api/v1/recipes/index";
fetch(url)
.then((res) => {
if (res.ok) {
return res.json();
}
throw new Error("网络响应不正常。");
})
.then((res) => setRecipes(res))
.catch(() => navigate("/"));
}, []);
};
export default Recipes;
在你的 useEffect hook 中,你使用 Fetch API 发起一个 HTTP 调用来获取所有的食谱。如果响应成功,应用程序会将食谱数组保存到 recipes 状态中。如果发生错误,它会将用户重定向到主页。
最后,当组件被渲染时,在浏览器页面上返回将被评估和显示的元素的标记。在这种情况下,组件将从recipes状态渲染一个食谱卡片。将这些高亮行添加到Recipes.jsx中。
~/rails_react_recipe/app/javascript/components/Recipes.jsx 的代码:
import React, { useState, useEffect } from "react";
import { Link, useNavigate } from "react-router-dom";
const Recipes = () => {
const navigate = useNavigate();
const [recipes, setRecipes] = useState([]);
useEffect(() => {
const url = "/api/v1/recipes/index";
fetch(url)
.then((res) => {
if (res.ok) {
return res.json();
}
throw new Error("Network response was not ok.");
})
.then((res) => setRecipes(res))
.catch(() => navigate("/"));
}, []);
const allRecipes = recipes.map((recipe, index) => (
<div key={index} className="col-md-6 col-lg-4">
<div className="card mb-4">
<img
src={recipe.image}
className="card-img-top"
alt={`${recipe.name} image`}
/>
<div className="card-body">
<h5 className="card-title">{recipe.name}</h5>
<Link to={`/recipe/${recipe.id}`} className="btn custom-button">
View Recipe
</Link>
</div>
</div>
</div>
));
const noRecipe = (
<div className="vw-100 vh-50 d-flex align-items-center justify-content-center">
<h4>
No recipes yet. Why not <Link to="/new_recipe">create one</Link>
</h4>
</div>
);
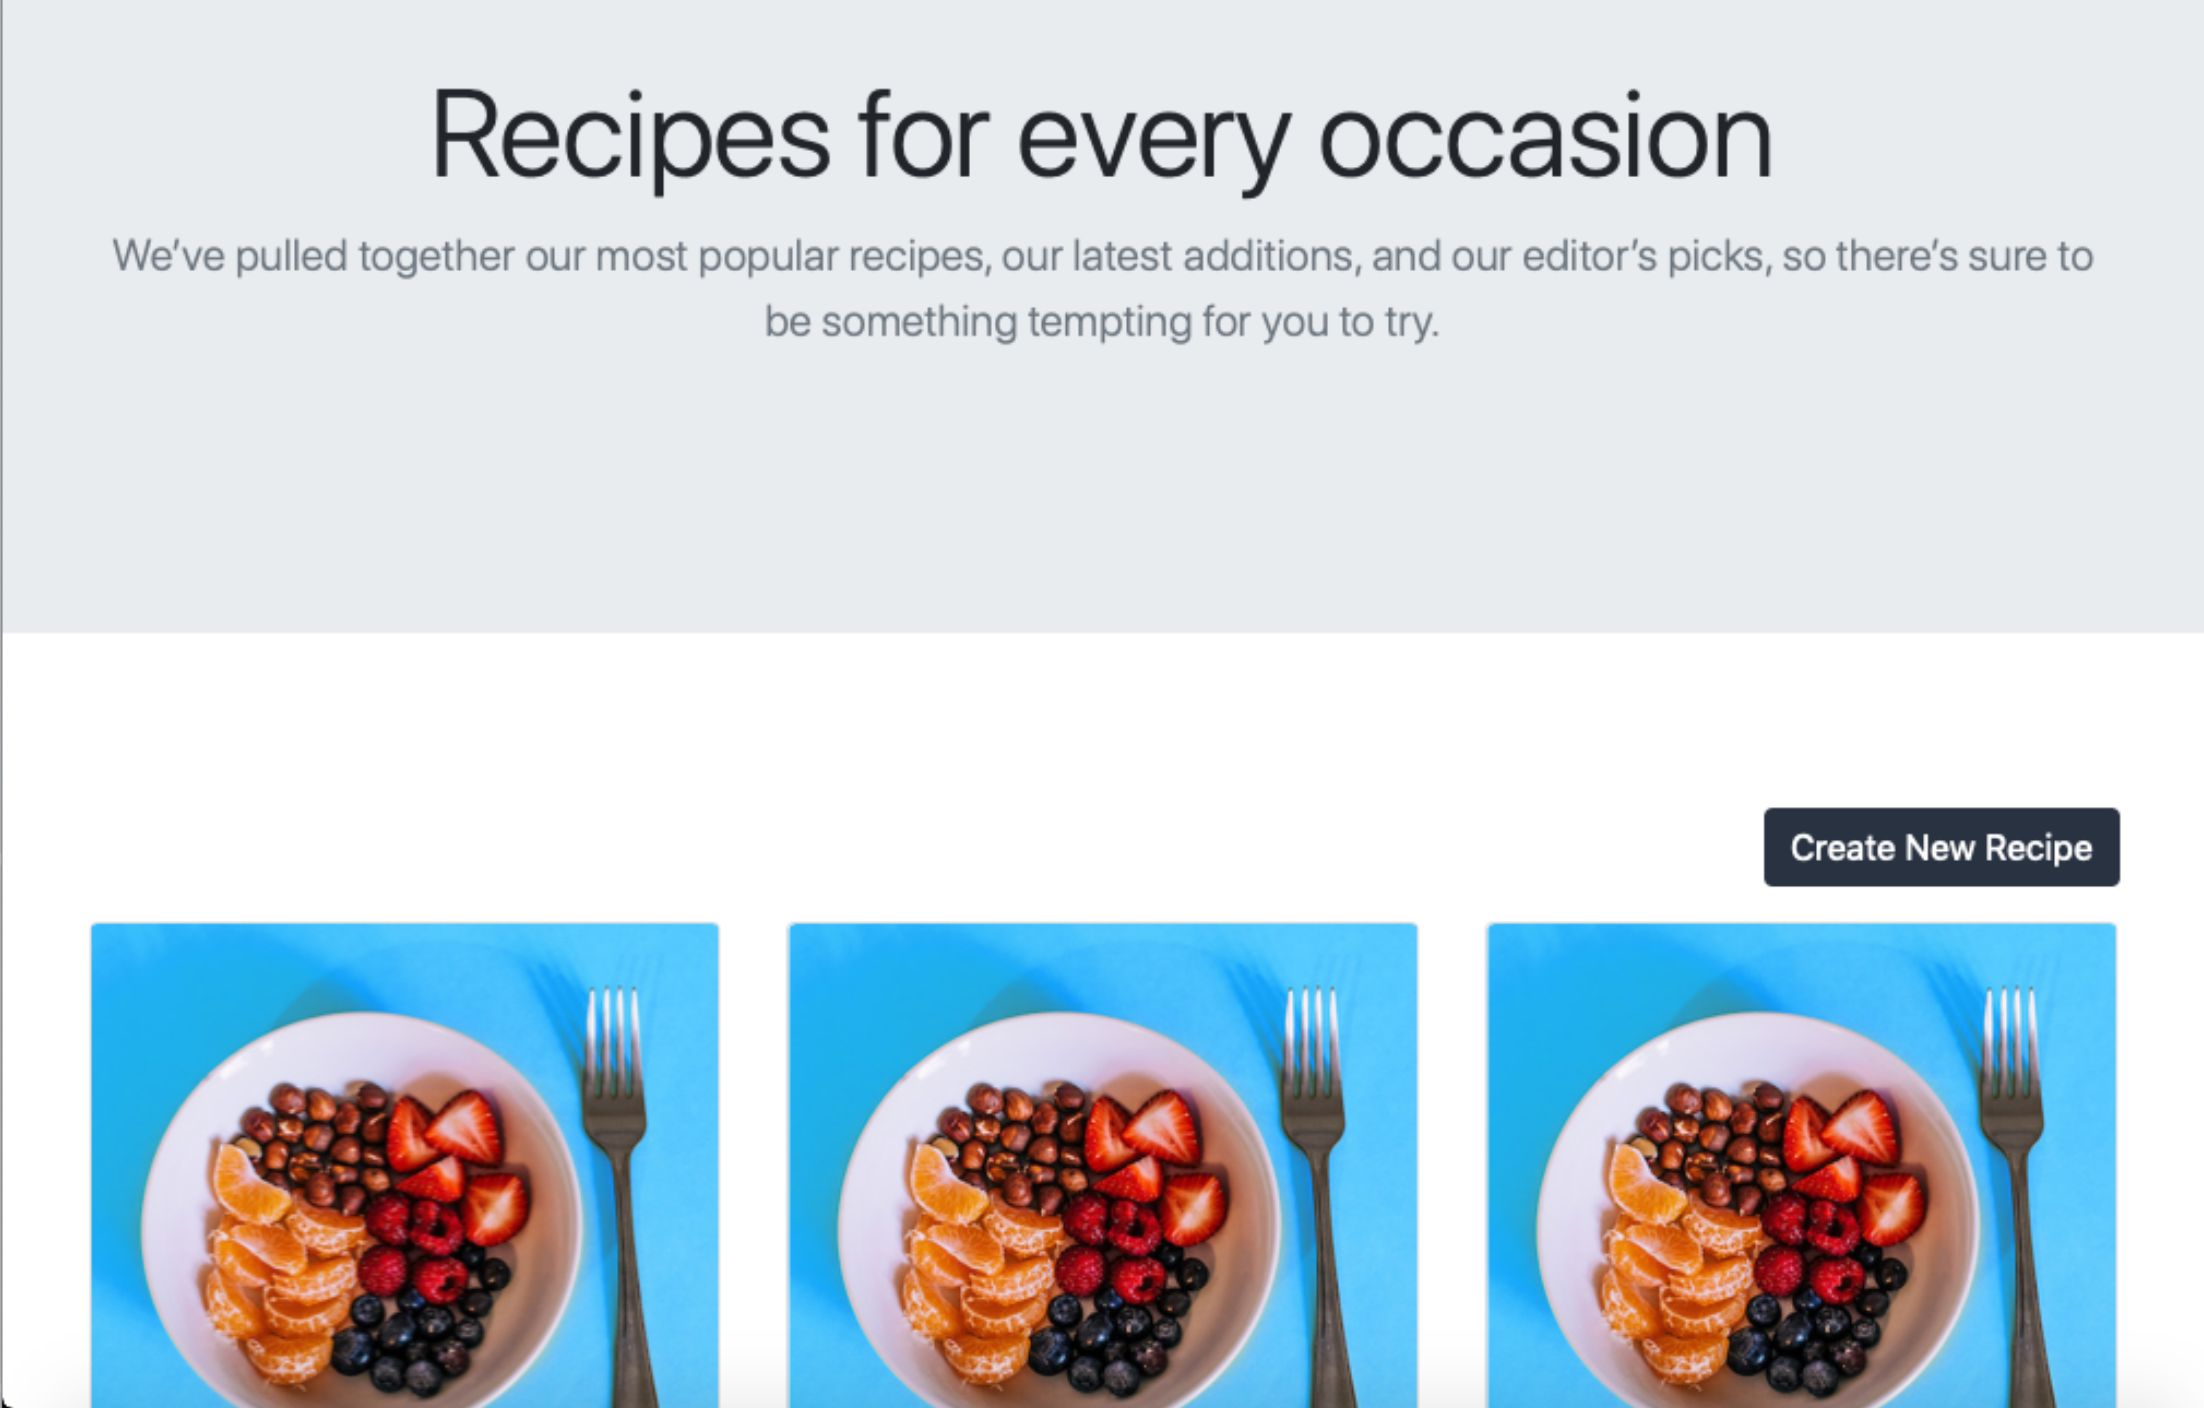
return (
<>
<section className="jumbotron jumbotron-fluid text-center">
<div className="container py-5">
<h1 className="display-4">Recipes for every occasion</h1>
<p className="lead text-muted">
We’ve pulled together our most popular recipes, our latest
additions, and our editor’s picks, so there’s sure to be something
tempting for you to try.
</p>
</div>
</section>
<div className="py-5">
<main className="container">
<div className="text-end mb-3">
<Link to="/recipe" className="btn custom-button">
Create New Recipe
</Link>
</div>
<div className="row">
{recipes.length > 0 ? allRecipes : noRecipe}
</div>
<Link to="/" className="btn btn-link">
Home
</Link>
</main>
</div>
</>
);
};
export default Recipes;
保存并退出Recipes.jsx。
既然你已经创建了一个用于显示所有食谱的组件,现在你需要为它创建一个路由。打开前端路由文件app/javascript/routes/index.jsx。
- nano app/javascript/routes/index.jsx
在文件中添加被突出显示的行。
~/rails_react_recipe/app/javascript/routes/index.jsx 请原生地用中文改写出来,只需要一个选项:
import React from "react";
import { BrowserRouter as Router, Routes, Route } from "react-router-dom";
import Home from "../components/Home";
import Recipes from "../components/Recipes";
export default (
<Router>
<Routes>
<Route path="/" exact component={Home} />
<Route path="/recipes" element={<Recipes />} />
</Routes>
</Router>
);
保存并退出文件。
在这一点上,验证代码是否按预期工作是一个好主意。就像之前一样,使用以下命令来启动你的服务器。
- bin/dev
然后在您的浏览器中打开该应用程序。在主页上按下“查看食谱”按钮,即可进入一个包含您的种子食谱的展示页面。
在终端中使用CTRL+C停止服务器并返回提示符。
既然你已经可以在应用程序中查看所有的食谱,现在是时候创建一个第二个组件来查看单个食谱了。在app/javascript/components目录下创建一个Recipe.jsx文件。
- nano app/javascript/components/Recipe.jsx
与“Recipes”组件一样,通过添加以下行来导入React、useState、useEffect、Link、useNavigate和useParam模块:
~/rails_react_recipe/app/javascript/components/Recipe.jsx 的本地中文漢字化選項(僅需一個)。
import React, { useState, useEffect } from "react";
import { Link, useNavigate, useParams } from "react-router-dom";
接下来,将高亮部分添加到代码中,创建并导出一个可用的React组件,命名为Recipe。
~/rails_react_recipe/app/javascript/components/Recipe.jsx 可以重新表示为以下中文方案:
~/rails_react_recipe/app/javascript/components/菜谱组件.jsx
import React, { useState, useEffect } from "react";
import { Link, useNavigate, useParams } from "react-router-dom";
const Recipe = () => {
const params = useParams();
const navigate = useNavigate();
const [recipe, setRecipe] = useState({ ingredients: "" });
};
export default Recipe;
与"菜谱"组件一样,您可以使用 useNavigate 钩子来初始化 React 路由导航。useState 钩子会使用一个 recipe 状态和 setRecipe 函数来更新状态。另外,您还可以调用 useParams 钩子,它会返回一个对象,该对象的键/值对是 URL 参数。
为了找到特定的食谱,您的应用程序需要知道食谱的id,这意味着您的食谱组件需要在URL中接收一个id参数。您可以通过params对象访问这个参数,该对象保存useParams钩子函数的返回值。
接下来,在useEffect钩子中声明一个变量,通过params对象获取id参数。一旦获取到食谱的id参数,你将发送一个HTTP请求来获取这个食谱。请将下面的代码添加到你的文件中:
~/rails_react_recipe/app/javascript/components/食谱.jsx
import React, { useState, useEffect } from "react";
import { Link, useNavigate, useParams } from "react-router-dom";
const Recipe = () => {
const params = useParams();
const navigate = useNavigate();
const [recipe, setRecipe] = useState({ ingredients: "" });
useEffect(() => {
const url = `/api/v1/show/${params.id}`;
fetch(url)
.then((response) => {
if (response.ok) {
return response.json();
}
throw new Error("Network response was not ok.");
})
.then((response) => setRecipe(response))
.catch(() => navigate("/recipes"));
}, [params.id]);
};
export default Recipe;
在useEffect钩子中,你使用params.id的值来发起GET HTTP请求,以获取拥有相应id的食谱,并使用setRecipe函数将其保存到组件状态中。如果食谱不存在,该应用会将用户重定向到食谱页面。
接下来,添加一个addHtmlEntities函数,用于将组件中的字符实体替换为HTML实体。addHtmlEntities函数将接受一个字符串,并将所有转义的开闭括号替换为它们对应的HTML实体。这个函数将帮助您将保存在食谱说明中的任何转义字符进行转换。添加以下突出显示的行:
~/rails_react_recipe/app/javascript/components/Recipe.jsx的中文释义是什么?
import React, { useState, useEffect } from "react";
import { Link, useNavigate, useParams } from "react-router-dom";
const Recipe = () => {
const params = useParams();
const navigate = useNavigate();
const [recipe, setRecipe] = useState({ ingredients: "" });
useEffect(() => {
const url = `/api/v1/show/${params.id}`;
fetch(url)
.then((response) => {
if (response.ok) {
return response.json();
}
throw new Error("Network response was not ok.");
})
.then((response) => setRecipe(response))
.catch(() => navigate("/recipes"));
}, [params.id]);
const addHtmlEntities = (str) => {
return String(str).replace(/</g, "<").replace(/>/g, ">");
};
};
export default Recipe;
最后,通过添加高亮行将标记返回到页面上的组件状态中,以渲染配方。
~ /rails_react_recipe/app/javascript/components/Recipe.jsx 这个路径下的文件。
import React, { useState, useEffect } from "react";
import { Link, useNavigate, useParams } from "react-router-dom";
const Recipe = () => {
const params = useParams();
const navigate = useNavigate();
const [recipe, setRecipe] = useState({ ingredients: "" });
useEffect(() => {
const url = `/api/v1/show/${params.id}`;
fetch(url)
.then((response) => {
if (response.ok) {
return response.json();
}
throw new Error("Network response was not ok.");
})
.then((response) => setRecipe(response))
.catch(() => navigate("/recipes"));
}, [params.id]);
const addHtmlEntities = (str) => {
return String(str).replace(/</g, "<").replace(/>/g, ">");
};
const ingredientList = () => {
let ingredientList = "没有可用的食材";
if (recipe.ingredients.length > 0) {
ingredientList = recipe.ingredients
.split(",")
.map((ingredient, index) => (
<li key={index} className="list-group-item">
{ingredient}
</li>
));
}
return ingredientList;
};
const recipeInstruction = addHtmlEntities(recipe.instruction);
return (
<div className="">
<div className="hero position-relative d-flex align-items-center justify-content-center">
<img
src={recipe.image}
alt={`${recipe.name} image`}
className="img-fluid position-absolute"
/>
<div className="overlay bg-dark position-absolute" />
<h1 className="display-4 position-relative text-white">
{recipe.name}
</h1>
</div>
<div className="container py-5">
<div className="row">
<div className="col-sm-12 col-lg-3">
<ul className="list-group">
<h5 className="mb-2">食材</h5>
{ingredientList()}
</ul>
</div>
<div className="col-sm-12 col-lg-7">
<h5 className="mb-2">制作说明</h5>
<div
dangerouslySetInnerHTML={{
__html: `${recipeInstruction}`,
}}
/>
</div>
<div className="col-sm-12 col-lg-2">
<button
type="button"
className="btn btn-danger"
>
删除食谱
</button>
</div>
</div>
<Link to="/recipes" className="btn btn-link">
返回食谱列表
</Link>
</div>
</div>
);
};
export default Recipe;
通过ingredientList函数,你可以将逗号分隔的食谱食材分成数组,并对其进行映射以创建食材列表。如果没有食材,应用程序会显示一个提示消息,表示没有可用的食材。接下来,你通过addHtmlEntities函数替换食谱制作说明中的所有开放和关闭括号。最后,该代码将食谱图像显示为主要图像,并在食谱制作说明旁边添加一个删除食谱按钮,以及一个返回食谱列表的按钮。
注意:使用React的dangerouslySetInnerHTML属性是有风险的,因为它会使你的应用暴露给跨站脚本攻击。通过确保在创建食谱时使用NewRecipe组件中声明的stripHtmlEntities函数替换输入的特殊字符,可以减少这种风险。
保存并退出文件。
要在页面上查看食谱组件,您需要将其添加到您的路由文件中。打开您的路由文件进行编辑。
- nano app/javascript/routes/index.jsx
请将下面的标记行添加到文件中:
请为我将以下内容以中文原生方式复述,只需要一种选项:
~/rails_react_recipe/app/javascript/routes/index.jsx
import React from "react";
import { BrowserRouter as Router, Routes, Route } from "react-router-dom";
import Home from "../components/Home";
import Recipes from "../components/Recipes";
import Recipe from "../components/Recipe";
export default (
<Router>
<Routes>
<Route path="/" exact component={Home} />
<Route path="/recipes" exact component={Recipes} />
<Route path="/recipe/:id" element={<Recipe />} />
</Routes>
</Router>
);
你需要在这个路由文件中引入你的食谱组件并添加一个路由。此路由包含一个:id参数,将被你想要查看的食谱的id替换。
保存并关闭文件。
使用bin/dev脚本重新启动服务器,然后在浏览器中访问http://localhost:3000。点击"查看食谱"按钮,转到食谱页面。在食谱页面中,通过点击"查看食谱"按钮访问任意食谱。你将会看到一个根据数据库数据填充的页面。

你可以使用CTRL+C停止服务器。
在这一步中,你向你的数据库添加了九个食谱,并创建了可以单独查看这些食谱和作为集合查看的组件。在下一步中,你将添加一个创建食谱的组件。
步骤8 —— 制作食谱
拥有可用食谱应用的下一步是能够创建新的食谱。在这一步中,您将创建一个用于此功能的组件。该组件将包含一个表单,用于从用户处收集所需的食谱详细信息,然后向食谱控制器中的创建操作发出请求,保存食谱数据。
在app/javascript/components目录中创建一个NewRecipe.jsx文件。
- nano app/javascript/components/NewRecipe.jsx
在新文件中,导入你在其他组件中使用的React、useState、Link和useNavigate模块。
· ~/rails_react_recipe/app/javascript/components/NewRecipe.jsx
import React, { useState } from "react";
import { Link, useNavigate } from "react-router-dom";
接下来,通过添加突出显示的行来创建和导出一个功能性的NewRecipe组件。
~/rails_react_recipe/app/javascript/components/NewRecipe.jsx
import React, { useState } from "react";
import { Link, useNavigate } from "react-router-dom";
const NewRecipe = () => {
const navigate = useNavigate();
const [name, setName] = useState("");
const [ingredients, setIngredients] = useState("");
const [instruction, setInstruction] = useState("");
};
export default NewRecipe;
与之前的组件一样,您可以使用useNavigate钩子来初始化React路由导航,然后使用useState钩子来初始化名称、配料和指导说明的状态,并分别使用其对应的更新函数。这些是您需要创建有效的食谱所需的字段。
然后,创建一个stripHtmlEntities函数,将特殊字符(如<)转换为其转义/编码值(如<)。为此,将以下突出显示的行添加到NewRecipe组件中。
~/rails_react_recipe/app/javascript/components/NewRecipe.jsx
import React, { useState } from "react";
import { Link, useNavigate } from "react-router-dom";
const NewRecipe = () => {
const navigate = useNavigate();
const [name, setName] = useState("");
const [ingredients, setIngredients] = useState("");
const [instruction, setInstruction] = useState("");
const stripHtmlEntities = (str) => {
return String(str)
.replace(/\n/g, "<br> <br>")
.replace(/</g, "<")
.replace(/>/g, ">");
};
};
export default NewRecipe;
在stripHtmlEntities函数中,你用它们的转义值替换了<和>字符。这样,你就不会在数据库中存储原始的HTML。
接下来,将以下高亮代码添加到NewRecipe组件中,以处理表单的编辑和提交功能:
~/rails_react_recipe/app/javascript/components/NewRecipe.jsx
import React, { useState } from "react";
import { Link, useNavigate } from "react-router-dom";
const NewRecipe = () => {
const navigate = useNavigate();
const [name, setName] = useState("");
const [ingredients, setIngredients] = useState("");
const [instruction, setInstruction] = useState("");
const stripHtmlEntities = (str) => {
return String(str)
.replace(/\n/g, "<br> <br>")
.replace(/</g, "<")
.replace(/>/g, ">");
};
const onChange = (event, setFunction) => {
setFunction(event.target.value);
};
const onSubmit = (event) => {
event.preventDefault();
const url = "/api/v1/recipes/create";
if (name.length == 0 || ingredients.length == 0 || instruction.length == 0)
return;
const body = {
name,
ingredients,
instruction: stripHtmlEntities(instruction),
};
const token = document.querySelector('meta[name="csrf-token"]').content;
fetch(url, {
method: "POST",
headers: {
"X-CSRF-Token": token,
"Content-Type": "application/json",
},
body: JSON.stringify(body),
})
.then((response) => {
if (response.ok) {
return response.json();
}
throw new Error("Network response was not ok.");
})
.then((response) => navigate(`/recipe/${response.id}`))
.catch((error) => console.log(error.message));
};
};
export default NewRecipe;
onChange函数接收用户输入的事件和状态设置函数,然后使用用户输入的值更新状态。在onSubmit函数中,您检查所有必填输入框不能为空。然后,您构建一个包含创建新食谱所需参数的对象。使用stripHtmlEntities函数,您将食谱说明中的<和>字符替换为它们的转义值,并将每个换行字符替换为换行标签,以保留用户输入的文本格式。最后,您发送POST HTTP请求来创建新食谱,并在成功响应时重定向到其页面。
为了防止跨站请求伪造(CSRF)攻击,Rails会将一个CSRF安全标记附加到HTML文档上。只要发起一个非GET请求,就需要这个标记。通过之前代码中的标记,您的应用程序可以在服务器上验证标记,并在安全标记与预期不符时抛出异常。在onSubmit函数中,应用程序会从Rails嵌入在HTML文档中的CSRF标记中检索出标记并发送一个带有JSON字符串的HTTP请求。如果成功创建了该食谱,应用程序会将用户重定向到食谱页面,用户可以在那里查看他们新创建的食谱。
最后,返回一个标记,用于渲染一个表单,让用户输入他们想要创建的菜谱的详细信息。添加高亮的行:
~/rails_react_recipe/app/javascript/components/NewRecipe.jsx 的中文本地化释义:新食谱组件。
import React, { useState } from "react";
import { Link, useNavigate } from "react-router-dom";
const NewRecipe = () => {
const navigate = useNavigate();
const [name, setName] = useState("");
const [ingredients, setIngredients] = useState("");
const [instruction, setInstruction] = useState("");
const stripHtmlEntities = (str) => {
return String(str)
.replace(/\n/g, "<br> <br>")
.replace(/</g, "<")
.replace(/>/g, ">");
};
const onChange = (event, setFunction) => {
setFunction(event.target.value);
};
const onSubmit = (event) => {
event.preventDefault();
const url = "/api/v1/recipes/create";
if (name.length == 0 || ingredients.length == 0 || instruction.length == 0)
return;
const body = {
name,
ingredients,
instruction: stripHtmlEntities(instruction),
};
const token = document.querySelector('meta[name="csrf-token"]').content;
fetch(url, {
method: "POST",
headers: {
"X-CSRF-Token": token,
"Content-Type": "application/json",
},
body: JSON.stringify(body),
})
.then((response) => {
if (response.ok) {
return response.json();
}
throw new Error("Network response was not ok.");
})
.then((response) => navigate(`/recipe/${response.id}`))
.catch((error) => console.log(error.message));
};
return (
<div className="container mt-5">
<div className="row">
<div className="col-sm-12 col-lg-6 offset-lg-3">
<h1 className="font-weight-normal mb-5">
向我们精彩的食谱集合添加一个新食谱。
</h1>
<form onSubmit={onSubmit}>
<div className="form-group">
<label htmlFor="recipeName">食谱名称</label>
<input
type="text"
name="name"
id="recipeName"
className="form-control"
required
onChange={(event) => onChange(event, setName)}
/>
</div>
<div className="form-group">
<label htmlFor="recipeIngredients">食材</label>
<input
type="text"
name="ingredients"
id="recipeIngredients"
className="form-control"
required
onChange={(event) => onChange(event, setIngredients)}
/>
<small id="ingredientsHelp" className="form-text text-muted">
请用逗号分隔每种食材。
</small>
</div>
<label htmlFor="instruction">制作说明</label>
<textarea
className="form-control"
id="instruction"
name="instruction"
rows="5"
required
onChange={(event) => onChange(event, setInstruction)}
/>
<button type="submit" className="btn custom-button mt-3">
创建食谱
</button>
<Link to="/recipes" className="btn btn-link mt-3">
返回食谱列表
</Link>
</form>
</div>
</div>
</div>
);
};
export default NewRecipe;
返回的标记包括一个包含三个输入字段的表单;其中一个用于配方名称(recipeName),一个用于配方成分(recipeIngredients),一个用于指令(instruction)。每个输入字段都有一个onChange事件处理器,调用onChange函数。还有一个onSubmit事件处理器附加到提交按钮上,并调用提交表单数据的onSubmit函数。
保存并退出文件。
为了在浏览器中访问此组件,请在您的路由文件中更新它的路由设置。
- nano app/javascript/routes/index.jsx
更新您的路由文件,添加以下高亮显示的代码行。
请使用以下内容更新文件:~/rails_react_recipe/app/javascript/routes/index.jsx
import React from "react";
import { BrowserRouter as Router, Routes, Route } from "react-router-dom";
import Home from "../components/Home";
import Recipes from "../components/Recipes";
import Recipe from "../components/Recipe";
import NewRecipe from "../components/NewRecipe";
export default (
<Router>
<Routes>
<Route path="/" exact component={Home} />
<Route path="/recipes" exact component={Recipes} />
<Route path="/recipe/:id" exact component={Recipe} />
<Route path="/recipe" element={<NewRecipe />} />
</Routes>
</Router>
);
设置好路由后,保存并退出文件。
重启您的开发服务器,然后在浏览器中访问http://localhost:3000。导航到食谱页面,点击"创建新食谱"按钮。您将跳转到一个包含表单的页面,该表单用于向数据库添加食谱。
输入所需的食谱详细信息,然后点击"创建食谱"按钮。新创建的食谱将显示在页面上。完成后,关闭服务器。
在这一步中,您为食谱应用程序添加了创建食谱的功能。下一步,您将添加删除食谱的功能。
第九步——删除食谱
在本部分中,您将修改食谱组件,以包含删除食谱的选项。当您在食谱页面上点击删除按钮时,应用程序将向数据库发送删除该食谱的请求。
首先,打开您的Recipe.jsx文件进行编辑。
- nano app/javascript/components/Recipe.jsx
在Recipe组件中,添加一个包含高亮代码行的deleteRecipe函数。
以下是~/rails_react_recipe/app/javascript/components/Recipe.jsx文件的内容:
import React, { useState, useEffect } from "react";
import { Link, useNavigate, useParams } from "react-router-dom";
const Recipe = () => {
const params = useParams();
const navigate = useNavigate();
const [recipe, setRecipe] = useState({ ingredients: "" });
useEffect(() => {
const url = `/api/v1/show/${params.id}`;
fetch(url)
.then((response) => {
if (response.ok) {
return response.json();
}
throw new Error("Network response was not ok.");
})
.then((response) => setRecipe(response))
.catch(() => navigate("/recipes"));
}, [params.id]);
const addHtmlEntities = (str) => {
return String(str).replace(/</g, "<").replace(/>/g, ">");
};
const deleteRecipe = () => {
const url = `/api/v1/destroy/${params.id}`;
const token = document.querySelector('meta[name="csrf-token"]').content;
fetch(url, {
method: "DELETE",
headers: {
"X-CSRF-Token": token,
"Content-Type": "application/json",
},
})
.then((response) => {
if (response.ok) {
return response.json();
}
throw new Error("Network response was not ok.");
})
.then(() => navigate("/recipes"))
.catch((error) => console.log(error.message));
};
const ingredientList = () => {
let ingredientList = "No ingredients available";
if (recipe.ingredients.length > 0) {
ingredientList = recipe.ingredients
.split(",")
.map((ingredient, index) => (
<li key={index} className="list-group-item">
{ingredient}
</li>
));
}
return ingredientList;
};
const recipeInstruction = addHtmlEntities(recipe.instruction);
return (
<div className="">
...
在deleteRecipe函数中,您获取要删除的食谱的ID,然后构建URL并获取CSRF令牌。接下来,您向Recipes控制器发送DELETE请求来删除该食谱。如果成功删除食谱,应用程序会将用户重定向到食谱页面。
在组件中的删除按钮元素上添加一个onClick事件,并将deleteRecipe函数作为点击事件处理程序传递给该按钮,以便在点击删除按钮时运行该函数。
...
return (
<div className="">
<div className="hero position-relative d-flex align-items-center justify-content-center">
<img
src={recipe.image}
alt={`${recipe.name} 图片`}
className="img-fluid position-absolute"
/>
<div className="overlay bg-dark position-absolute" />
<h1 className="display-4 position-relative text-white">
{recipe.name}
</h1>
</div>
<div className="container py-5">
<div className="row">
<div className="col-sm-12 col-lg-3">
<ul className="list-group">
<h5 className="mb-2">配料</h5>
{ingredientList()}
</ul>
</div>
<div className="col-sm-12 col-lg-7">
<h5 className="mb-2">制作说明</h5>
<div
dangerouslySetInnerHTML={{
__html: `${recipeInstruction}`,
}}
/>
</div>
<div className="col-sm-12 col-lg-2">
<button
type="button"
className="btn btn-danger"
onClick={deleteRecipe}
>
删除食谱
</button>
</div>
</div>
<Link to="/recipes" className="btn btn-link">
返回食谱列表
</Link>
</div>
</div>
);
...
在教程到达这一点时,你的完整的Recipe.jsx文件应该与这个文件相匹配。
~/rails_react_recipe/app/javascript/components/食谱.jsx
import React, { useState, useEffect } from "react";
import { Link, useNavigate, useParams } from "react-router-dom";
const Recipe = () => {
const params = useParams();
const navigate = useNavigate();
const [recipe, setRecipe] = useState({ ingredients: "" });
useEffect(() => {
const url = `/api/v1/show/${params.id}`;
fetch(url)
.then((response) => {
if (response.ok) {
return response.json();
}
throw new Error("Network response was not ok.");
})
.then((response) => setRecipe(response))
.catch(() => navigate("/recipes"));
}, [params.id]);
const addHtmlEntities = (str) => {
return String(str).replace(/</g, "<").replace(/>/g, ">");
};
const deleteRecipe = () => {
const url = `/api/v1/destroy/${params.id}`;
const token = document.querySelector('meta[name="csrf-token"]').content;
fetch(url, {
method: "DELETE",
headers: {
"X-CSRF-Token": token,
"Content-Type": "application/json",
},
})
.then((response) => {
if (response.ok) {
return response.json();
}
throw new Error("Network response was not ok.");
})
.then(() => navigate("/recipes"))
.catch((error) => console.log(error.message));
};
const ingredientList = () => {
let ingredientList = "No ingredients available";
if (recipe.ingredients.length > 0) {
ingredientList = recipe.ingredients
.split(",")
.map((ingredient, index) => (
<li key={index} className="list-group-item">
{ingredient}
</li>
));
}
return ingredientList;
};
const recipeInstruction = addHtmlEntities(recipe.instruction);
return (
<div className="">
<div className="hero position-relative d-flex align-items-center justify-content-center">
<img
src={recipe.image}
alt={`${recipe.name} image`}
className="img-fluid position-absolute"
/>
<div className="overlay bg-dark position-absolute" />
<h1 className="display-4 position-relative text-white">
{recipe.name}
</h1>
</div>
<div className="container py-5">
<div className="row">
<div className="col-sm-12 col-lg-3">
<ul className="list-group">
<h5 className="mb-2">Ingredients</h5>
{ingredientList()}
</ul>
</div>
<div className="col-sm-12 col-lg-7">
<h5 className="mb-2">Preparation Instructions</h5>
<div
dangerouslySetInnerHTML={{
__html: `${recipeInstruction}`,
}}
/>
</div>
<div className="col-sm-12 col-lg-2">
<button
type="button"
className="btn btn-danger"
onClick={deleteRecipe}
>
Delete Recipe
</button>
</div>
</div>
<Link to="/recipes" className="btn btn-link">
Back to recipes
</Link>
</div>
</div>
);
};
export default Recipe;
保存并退出文件。
重新启动应用服务器并导航至主页。点击查看菜谱按钮以访问所有已存在的菜谱,然后打开任何特定的菜谱并点击页面上的删除菜谱按钮以删除文章。您将被重定向至菜谱页面,被删除的菜谱将不再存在。
现在,随着删除按钮可用,你拥有了一个完全功能的食谱应用程序!
结论
在本教程中,您使用Ruby on Rails和React前端创建了一个食谱应用程序,使用PostgreSQL作为数据库,并使用Bootstrap进行样式设计。如果您想继续使用Ruby on Rails进行开发,请考虑按照我们的"使用SSH隧道安全通信的三层Rails应用程序"教程进行操作,或者访问我们的"如何使用Ruby进行编码"系列来复习您的Ruby技能。如果您想更深入地学习React,请尝试"如何使用React展示来自Silicon Cloud API的数据"教程。


