Playwright与Docker:高效运行端到端测试的终极指南
介绍
Playwright是一个出色的工具,用于跨浏览器的端到端测试,包括Chromium、Firefox和Webkit。由于Webkit是Safari浏览器的核心,Playwright的跨浏览器功能使其成为测试Web应用程序的不错选择。Playwright具有与浏览器的自动支持交互的功能,因此您无需手动安装网络驱动程序,并且它支持多种编程语言,如Java、Python和NodeJS。Playwright的灵活性意味着它可以用作网络抓取工具或用于端到端测试,以确保软件满足其要求。
要运行Playwright,您需要一个适当的环境,比如NodeJS运行时、Playwright核心框架或Playwright测试运行器。您的操作系统可能需要依赖项来支持Playwright。Docker是一个开源的容器化平台,可以为您提供Playwright环境,这样您就不需要为不同的操作系统创建多个环境了。
在本教程中,您将设置一个环境来使用Typescript和Playwright进行端到端测试,并编写和执行测试,以多种形式导出测试报告,并使用Docker部署测试。通过本教程的最后,您将能够使用Playwright进行自动化测试,并将您的测试集成到使用Docker封装的现有CI/CD流水线中。
先决条件
为了跟随本教程,您将需要:
- One Ubuntu 20.04 server with a sudo-enabled account set up by following the Ubuntu 20.04 initial server setup guide. You need a sudo-enabled account to install NodeJS and Docker on your server.
- Node.js set up on your server. If you are on Ubuntu 22.04, install the latest version of Node.js in How To Install Node.js on Ubuntu 20.04. For other operating systems, see the How to Install Node.js and Create a Local Development Environment series.
- Docker installed on your server, which you can set up by following Steps 1-4 in How To Install and Use Docker on Ubuntu 20.04. In Step 4, you will run docker run hello-world to ensure that Docker is properly installed and ready to use.
- Familiarity with end-to-end testing for web applications.
- Familiarity with Typescript for writing the test. If you would like to learn more about TypeScript, you can review the How To Code in TypeScript tutorial series.
- (Optional) Visual Studio Code, which has robust features support such as code navigation and compiler error warning when working in Typescript. This tutorial uses nano throughout.
第一步 – 准备环境
在实施端到端测试之前,您必须准备好Playwright项目环境。
首先,为这个项目创建一个文件夹。
- mkdir playwright-with-docker
移动到新文件夹中。
- cd playwright-with-docker
然后初始化一个新的节点环境。
- npm init
您将被要求提供新项目的信息,如项目名称、版本、应用程序入口以及测试命令。
您将被提示输入与新项目相关的以下提示的答案。
Outputpackage name: (playwright-docker)
version: (1.0.0)
description:
entry point: (index.js)
test command:
git repository:
keywords:
author:
license: (ISC)
你会看到类似这样的结果
OutputThis utility will walk you through creating a package.json file.
It only covers the most common items, and tries to guess sensible defaults.
See `npm help init` for definitive documentation on these fields
and exactly what they do.
Use `npm install <pkg>` afterward to install a package and
save it as a dependency in the package.json file.
Press ^C at any time to quit.
package name: (test) playwright-docker
version: (1.0.0)
description: A project for using playwright for end-to-end testing purpose with docker for deployment
entry point: (index.js)
test command:
git repository:
keywords:
author:
license: (ISC)
About to write to /your-path/test/package.json:
{
"name": "playwright-docker",
"version": "1.0.0",
"description": "A project for using playwright for end-to-end testing purpose with docker for deployment",
"main": "index.js",
"scripts": {
"test": "echo \"Error: no test specified\" && exit 1"
},
"author":
"license": "ISC"
}
Is this OK? (yes) yes
在添加必要的信息之后,输入“是”或按回车键以确认package.json文件的设置。
接下来,为项目安装所需的依赖项。
- npm install --save-dev playwright
- npm install --save-dev typescript
这些命令会在示例项目中安装Playwright和TypeScript。使用–save-dev标志来安装对应用程序运行并非必需的依赖项。
接下来,安装 Node.JS 的类型定义。
- npm install --save-dev @types/node
接下来,安装一个用于处理TOML配置文件的库。
- npm install --save-dev toml
TOML是应用程序配置中使用的文件类型之一。.toml文件是可读的,允许应用程序在不先读取文件的情况下更新其内容。
接下来,为主机系统安装Playwright所依赖的库。
- npx playwright install-deps
当提示时,请输入您的sudo密码。
Note
请注意:如果您收到一条消息,要求您将Node版本升级到更高的版本,例如:
输出:您正在运行Node.js 10.19.0。
Playwright需要Node.js 12或更高版本。
请更新您的Node.js版本。
您可以使用以下命令进行升级:
sudo npm cache clean -f
sudo npm install -g n
sudo n stable
npm cache clean -f 将强制清除所有缓存,而 npm install -g n 和 n stable 将在您的服务器上全局安装Node.js的稳定版本。运行这些命令后,请重新启动服务器。
接下来,安装 Playwright 测试运行器,这将在本教程的后续步骤中用到。
- npm install --save-dev @playwright/test
最后,为 Playwright 安装支持的浏览器。
- npx playwright install
通过这个命令,您可以使用多个浏览器来运行您的测试。
为了准备 TypeScript 配置文件,请使用 nano 或您喜欢的文本编辑器打开 tsconfig.json。
- sudo nano tsconfig.json
当前文件为空。要为该项目更新文件,请添加以下代码:
tsconfig.json 是 TypeScript 配置文件的缩写。
{
"compilerOptions": {
"strict": true,
"module": "commonjs"
},
"include": ["tests"]
}
一个 tsconfig.json 文件告诉 NodeJS 运行时当前目录是一个 TypeScript 项目。compilerOptions 列表列出了 NodeJS 编译该项目所需的条件。module 告诉编译器在编译为 JavaScript 时使用哪种模块语法。将 strict 字段设置为 true 将启用对 TypeScript 代码的类型检查,确保类型与变量或方法的数据值匹配。include 将显示应用程序中包含的文件名称或模式的列表。在此情况下,应用程序应该包括 tests 目录中的所有文件。
完成后保存并关闭文件。
在设置好环境之后,您现在可以开始构建您的测试了。
第二步 — 编写测试
通过第一步准备的 Playwright 测试环境,您现在将编写三个与 Silicon Cloud vServers 页面相关的示例测试。
您将构建的 TypeScript 测试将验证以下三项内容:
- 验证注册 Silicon Cloud 账户的三种选项:使用电子邮件注册、使用 Google 注册、使用 Github 注册。
- 验证 Silicon Cloud 支持两种类型的套餐:基础版和高级版。
- 验证有四种基本虚拟机成本:1 CPU、2 CPU、4 CPU、8 CPU。
尽管您可以在同一个测试文件中进行所有三个测试,但是本教程将使用三个单独的文件,因为每个测试都有不同的目的。
创建一个名为 tests 的新目录,用于存放所有的测试文件。
mkdir tests
然后导航到测试目录:
cd tests
因为您将进行三次具有不同目的的测试,所以您将在此步骤中创建三个分别位于项目的 tests 目录内的独立测试文件。
signUpMethods.spec.ts 将实现验证用户注册支持方法数量的测试。multiplePackages.spec.ts 将实现验证客户可选择套餐数量的测试。pricingComparison.spec.ts 将验证基本虚拟机成本数量的测试。
注意:
测试文件的默认格式将为 *.spec.ts(TypeScript 项目)或 *.spec.js(JavaScript 项目)。
测试的配置文件将会被命名为 configTypes.ts,并且也会被放置在 tests 目录中。在这个文件中,您将会定义用于与多个浏览器及其页面进行交互的全局变量。您还将会定义一些测试中使用的配置数值,比如被测试应用的 URL。本教程将会使用 DIGITAL_OCEAN_URL 作为被测试的 URL。
创建 configTypes.ts 文件
- nano configTypes.ts
将以下代码添加到当前为空的 configTypes.ts 文件中。
configTypes.ts 的含义是“配置类型文件”。
这是文章《如何使用Playwright和Docker运行端到端测试》的第3部分(共10部分)。
import { Browser, Page } from "playwright";
import fs from 'fs';
import toml from 'toml';
const config = toml.parse(fs.readFileSync('./config.toml', 'utf-8'));
declare global {
const page: Page;
const browser: Browser;
const browserName: string;
}
export default {
DIGITAL_OCEAN_URL: config.digital_ocean_url ?? '',
};
首先,从项目主目录下的./config.toml文件中导入函数以读取配置内容。
在端到端测试中,您需要声明用于初始化页面和浏览器实例的全局变量,包括page、browser和browserName。
最后,您使用digital_ocean_url键从./config.toml中读取的值导出DIGITAL_OCEAN_URL,以便稍后在测试中使用这个网址。
完成后保存并关闭文件。
对于第一次测试,请使用nano或您偏爱的文本编辑器创建并打开signUpMethods.spec.ts文件。
- nano signUpMethods.spec.ts
将以下代码添加到空文件中:
signUpMethods.spec.ts的中文本地化内容。
这是文章《如何使用Playwright和Docker运行端到端测试》的第4部分(共10部分)。
import endpoint from "./configTypes"
import { test, expect } from '@playwright/test'
test("期望注册选项有3个", async ({ page }) => {
// 导航到Silicon Cloud网页的vServers产品页面
await page.goto(endpoint.DIGITAL_OCEAN_URL);
// 等待页面加载完成
await page.waitForLoadState('networkidle');
// 获取注册选项的数量
const number_subscriptions_allowed = await page.locator('.SignupButtonsStyles__ButtonContainer-sc-yg5bly-0 > a').count()
// 验证数量是否等于3
expect(number_subscriptions_allowed).toBe(3)
});
signUpMethods.spec.ts 文件包含了测试代码,用于评估vServers页面的注册选项是否为三个。在前两行,您导入了 test 和 expect 方法。
测试可以异步或同步编写。以异步方式编写测试可以优化测试速度,因为您无需等待测试的每个步骤完成后才能执行下一步。当需要等待步骤完成后再进行下一步操作时,可以使用“await”关键字。由于这里的步骤涉及网络交互,所以在执行操作之前需要确保用户界面中的每个元素都已显示出来,这就是为什么在调用每个操作之前都要包含“await”方法的原因。
测试在 test 块中定义,并包含四个动作。第一个 await 关键字使用 page.goto() 函数告诉测试导航到在 configTypes.ts 文件中定义的 DIGITAL_OCEAN_URL。将全局变量 page 放在 async 声明中,这样您就可以在整个测试中使用 page 实例,而无需初始化它。
第二个 await 关键字告诉测试等待页面加载,使用 page.waitForLoadState() 函数。如果存在未完成的API调用,页面上可能会有不可用的元素,导致测试无法找到该元素而失败。
您使用 page.locator() 函数来定义 number_subscriptions_allowed,以查找注册选项的数量。您通过CSS选择器(在本例中为注册按钮)找到了注册选项组件,这使您能够获取它包含的子元素的数量。
最后,一个 expect 方法将会验证 page.locator() 找到的选项数量与预期输出的 3 相匹配。
保存并关闭文件。
接下来,您将编写第二个测试。请创建并打开 multiplePackages.spec.ts 文件。
- nano multiplePackages.spec.ts
在空文件中,添加以下代码:
multiplePackages.spec.ts
import endpoint from "./configTypes"
import { test, expect } from '@playwright/test'
test("期望订阅套餐数量为3", async ({ page }) => {
// 访问 Silicon Cloud 网站的 vServers 产品页面
await page.goto(endpoint.DIGITAL_OCEAN_URL);
// 等待页面加载完成
await page.waitForLoadState('networkidle');
// 获取订阅套餐的数量(应为2个:基础版和高级版)
const number_subscriptions_allowed = await page.locator('.CPUInfoStyles__StyledLeftCpuInfo-sc-ooo7a2-4 > div').count()
// 验证数量是否等于2
expect(number_subscriptions_allowed).toBe(2)
});
这部分是文章《如何使用Playwright和Docker运行端到端测试》的第5节(共10节)。
与 signUpMethods.spec.ts 文件类似,您将从 Playwright 依赖中导入测试配置和测试函数。
在此测试中,您首先使用 page.goto() 访问 DIGITAL_OCEAN_URL。然后,您使用 page.waitForLoadState('networkidle') 等待页面完成所有网络请求,确保页面完全加载。
接着,您通过定位器 .CPUInfoStyles__StyledLeftCpuInfo-sc-ooo7a2-4 > div 找到网页中订阅组件的子元素,并将其数量存储在 number_subscriptions_allowed 变量中。
最后,您使用 expect(number_subscriptions_allowed).toBe(2) 将 number_subscriptions_allowed 的值与期望的输出值 2 进行比较,以验证订阅套餐的数量是否正确。
完成上述操作后,请保存并关闭当前文件。
然后,通过以下命令创建并打开 pricingComparison.spec.ts 文件,用于定义第三个测试:
- nano pricingComparison.spec.ts
将以下代码添加到新创建的空文件中:
import endpoint from "./configTypes"
import { test, expect } from '@playwright/test'
test("预期订阅有3个套餐", async ({ page }) => {
// 访问Silicon Cloud网页的vServers产品页面
await page.goto(endpoint.DIGITAL_OCEAN_URL);
// 等待页面加载完成
await page.waitForLoadState('networkidle');
// 获取基本虚拟机配置(1 CPU, 2 CPU, 4 CPU, 8 CPU)的数量
const number_subscriptions_allowed = await page.locator('.PricingComparisonToolStyles__StyledCpuSelector-sc-1k0sndv-7 > button').count()
// 验证数量是否等于4
expect(number_subscriptions_allowed).toBe(4)
});
该测试中的异步函数使用了与前几个测试相同的 page.goto() URL 和 page.waitForLoadState() 方法。由于该测试与 vServers 页面上的订阅套餐相关联,代码块的后半部分设置了该测试。
对于此测试,您需要获取定价选项组件的子元素数量,并将该值存储在 number_subscriptions_allowed 变量中。您将验证 number_subscriptions_allowed 的值必须等于 4(当前支持的订阅数量)。
保存并关闭文件。
在您的测试中,您使用了来自 configTypes.ts 的 DIGITAL_OCEAN_URL,并且 configTypes.ts 从 ./config.toml 文件中读取了 digital_ocean_url 的值。
现在,您将在项目的主目录中创建 config.toml 文件。导航到主目录:
- cd ..
然后创建 config.toml 文件:
- nano config.toml
将以下内容复制到 config.toml 文件中:
config.toml 配置文件
digital_ocean_url="https://www.digitalocean.com/products/droplets"
保存并关闭文件。
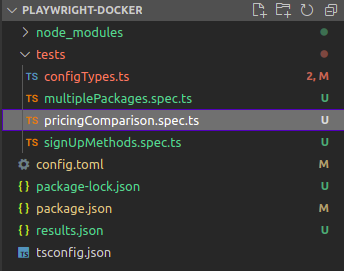
现在,项目的目录树将如下所示:
在这一步中,您编写了三个将要使用的测试。您还定义了测试所依赖的 config.toml 文件。您将在下一步执行这些测试。
步骤三 – 执行测试
可以使用 Playwright 测试运行器在命令行界面上进行多种操作,例如运行所有浏览器的所有测试、禁用并行处理、运行一组测试文件以及在调试模式下运行等等。在这一步中,您将使用所有浏览器来运行测试。
首先,运行此命令:
- npx playwright test --browser=all
您应该能够看到如下测试结果:
输出
这是文章《如何使用Playwright和Docker运行端到端测试》的第7部分(共10部分)。
Running 9 tests using 1 worker
✓ [chromium] › tests/multiplePackages.spec.ts:4:1 › Expect to have 3 packages for subscription (6s)
✓ [chromium] › tests/pricingComparison.spec.ts:4:1 › Expect to have 3 packages for subscription (4s)
✓ [chromium] › tests/signUpMethods.spec.ts:4:1 › Expect to have 3 options for signing up (3s)
✓ [firefox] › tests/multiplePackages.spec.ts:4:1 › Expect to have 3 packages for subscription (9s)
✓ [firefox] › tests/pricingComparison.spec.ts:4:1 › Expect to have 3 packages for subscription (5s)
✓ [firefox] › tests/signUpMethods.spec.ts:4:1 › Expect to have 3 options for signing up (7s)
✓ [webkit] › tests/multiplePackages.spec.ts:4:1 › Expect to have 3 packages for subscription (7s)
✓ [webkit] › tests/pricingComparison.spec.ts:4:1 › Expect to have 3 packages for subscription (6s)
✓ [webkit] › tests/signUpMethods.spec.ts:4:1 › Expect to have 3 options for signing up (6s)
9 passed (1m)
对勾表示在三种浏览器(Chromium、Firefox 和 Webkit)中所有测试都已通过。
工作进程(worker)数量将取决于当前服务器使用的核心数量和测试的当前配置。您可以通过在playwright.config.ts文件中设置工作进程值来限制其数量。有关测试配置的更多信息,请阅读Playwright产品文档。
Playwright测试运行器为测试报告提供了几个选项,可以集成到Jenkins或CircleCI等CI工具中。有关测试报告的更多信息,请参阅Playwright测试报告文档页面。
在本教程中,您将使用HTML报告文件运行测试,该文件比在CLI中查看测试更易读。
运行此命令以生成HTML测试报告:
- npx playwright test --browser=all --reporter=html
您会看到这样的结果:
OutputRunning 9 tests using 2 workers
9 passed (40s)
To open last HTML report run:
npx playwright show-report
要查看HTML报告,请运行:
- npx playwright show-report
您将会看到这样的输出:
OutputServing HTML report at http://your_ip_address:9323. Press Ctrl+C to quit.
现在您应该能够通过9323端口访问您的报告了。
注意:如果您是远程访问服务器,您需要将您的远程服务器暴露给当前本地机器,才能在本地浏览器中查看测试报告。在您本地机器的新终端会话中运行以下命令:
ssh -L 9323:localhost:9323 您的非根用户@您的服务器IP
SSH端口转发将服务器端口转发到本地端口。-L 9323:localhost:9323 部分表示本地机器上的9323端口将转发到远程服务器的同一端口。
现在您应该能够通过在本地机器上的浏览器中导航到 http://localhost:9323 来查看测试报告。
当报告加载到浏览器中时,您会发现每个测试都在三个浏览器上运行:Chromium、Firefox和Webkit。您将了解每个浏览器上每个测试运行所花费的时间,以及整个测试所花费的时间。
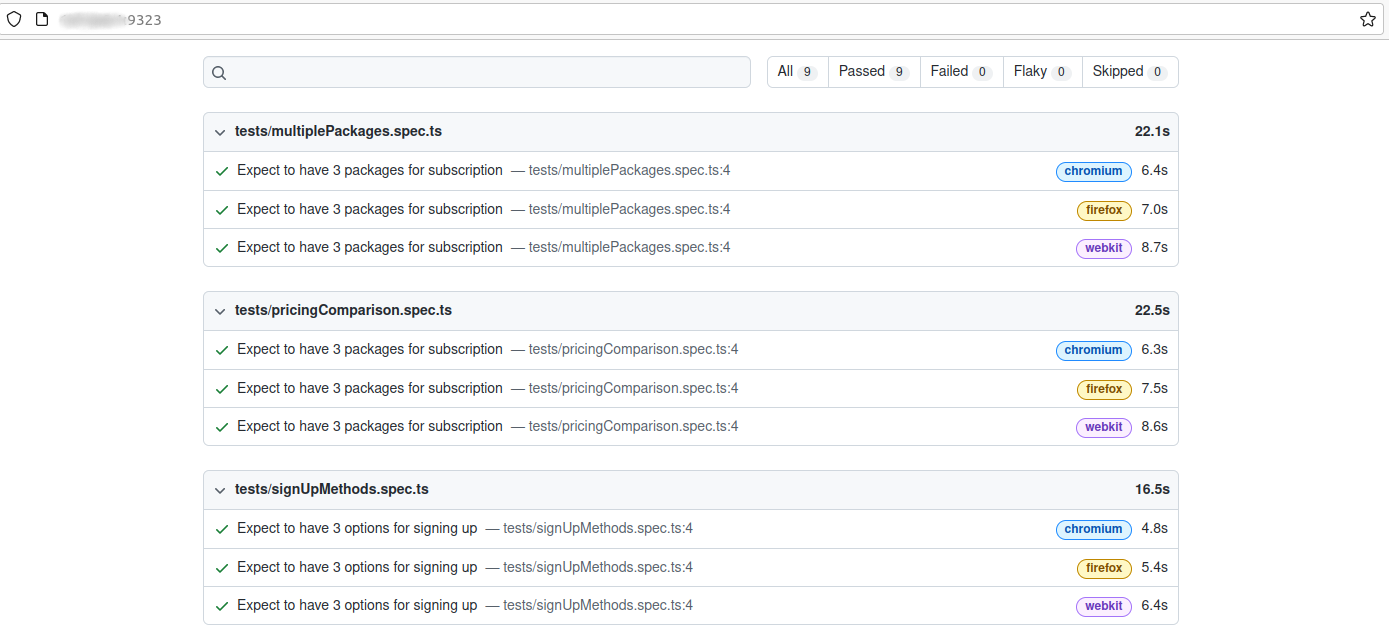
点击报告名称以查看详细信息。
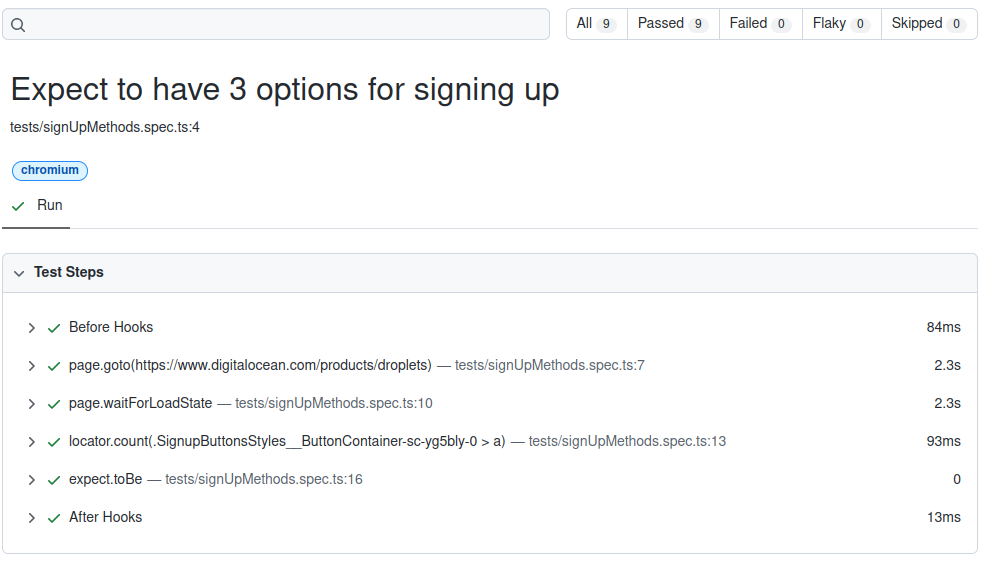
在详细信息部分,测试执行步骤默认会包括Before Hooks(前置钩子)和After Hooks(后置钩子)步骤。Before Hooks部分通常用于初始设置,例如登录到控制台或读取测试数据。在测试执行之后,After Hooks部分通常会清理测试环境中的测试数据。每个步骤都有详细的说明,包括使用page.goto()访问URL,使用page.waitForLoadState()等待页面加载,使用locator.count()计算注册方法的数量,并使用expect.toBe验证值是否匹配。
在这个步骤中,您运行了所有三个测试,检查了它们的通过状态,并在CLI和HTML格式下查看了测试结果。接下来,您将使用Docker自动化这些测试。
第四步 — 使用Docker部署测试
在实施测试自动化时,您可能会遇到环境问题。一些测试在测试工程师的本地机器上正常运行,但在集成到CI/CD流程中时失败,这是由于环境兼容性问题造成的。为了避免这个问题,您可以使用Docker容器来运行自动化测试,本步骤将为您设置。如果使用Docker在本地环境中测试运行正常,那么在CI/CD流程中避免兼容问题的可能性很高。
首先,您需要打开 package.json 文件,然后更新该文件以添加之后在 Docker 中运行所需的测试脚本。
- nano package.json
将下面的内容添加到package.json文件中的scripts部分中:
package.json 文件
...
"scripts": {
"test": "playwright test --browser=all",
"test-html-report": "playwright test --browser=all --reporter=html",
"test-json-report": "PLAYWRIGHT_JSON_OUTPUT_NAME=results.json playwright test --browser=chromium --reporter=json"
},
当您需要在HTML中显示报告器运行测试时,将使用这些脚本运行自定义测试,而不是输入完整命令。现在您可以运行以下命令:
这是文章《如何使用Playwright和Docker运行端到端测试》的第8部分(共10部分)。
内容片段:
- npm run test-html-report
取而代之的是完整的命令:
- npx playwright test --browser=all --reporter=html
你现在的package.json文件将会是这样:
{
"name": "playwright-docker",
"version": "1.0.0",
"description": "一个使用Playwright进行端到端测试并结合Docker部署的项目",
"main": "index.js",
"scripts": {
"test": "playwright test --browser=all",
"test-html-report": "playwright test --browser=all --reporter=html",
"test-json-report": "PLAYWRIGHT_JSON_OUTPUT_NAME=results.json playwright test --browser=chromium --reporter=json"
},
"author": "",
"license": "ISC",
"devDependencies": {
"@playwright/test": "^1.22.2",
"@types/node": "^17.0.35",
"playwright": "^1.22.1",
"toml": "^3.0.0",
"typescript": "^4.6.4"
}
}
保存并关闭文件。
接下来,在当前目录下创建并打开一个Dockerfile文件:
- nano Dockerfile
然后将以下内容添加到其中:
Dockerfile-构建文件
这是文章《如何使用Playwright和Docker运行端到端测试》的第9部分(共10部分)。
# 获取Node版本16的基础镜像
FROM node:16
# 获取最新版本的Playwright
FROM mcr.microsoft.com/playwright:focal
# 设置应用程序的工作目录
WORKDIR /app
# 设置环境变量PATH到node_modules/.bin
ENV PATH /app/node_modules/.bin:$PATH
# 复制所需文件到Docker镜像的/app文件夹
COPY package.json /app/
COPY tests/ /app/tests/
COPY tsconfig.json /app/
COPY config.toml /app/
# 获取运行Playwright所需的库
RUN apt-get update && apt-get -y install libnss3 libatk-bridge2.0-0 libdrm-dev libxkbcommon-dev libgbm-dev libasound-dev libatspi2.0-0 libxshmfence-dev
# 在Node环境中安装依赖
RUN npm install
首先,您需要获取Node版本16和Playwright版本focal的基础镜像,并将它们添加到您的Docker镜像中。测试运行需要Node和Playwright。
然后,在容器中设置项目目录名。这里是WORKDIR。将WORKDIR /app设置为将所有文件放置在容器内的/app目录中。
您可以使用ENV PATH来设置Docker容器的环境路径。在此示例中,您将其设置为node_modules目录。
接着,您将所有必要的文件复制到Docker镜像的/app目录中。
由于Playwright运行需要一些依赖项,您还需要在Docker镜像中安装这些依赖项。
保存并关闭文件。
接下来,您将为自动化项目构建镜像。
- docker build -t playwright-docker .
Docker会在当前目录中找到Dockerfile,并按照其中的指令构建镜像。使用-t标记为Docker镜像打上playwright-docker的标签。通过使用“.”告诉Docker在当前目录中寻找Dockerfile。您可以查阅Docker产品文档以了解更多有关构建Docker镜像的内容。
构建的输出(简化版)将类似于以下内容:
输出发送构建上下文到Docker守护进程 76.61MB
...
添加了6个包,并在6秒内审计了7个包
发现0个漏洞
移除中间容器 87520d179fd1
---> 433ae116d06a
成功构建 433ae116d06a
成功标记 playwright-docker:latest
由于依赖冲突或初始设置过程中缺少依赖,这些测试可能无法在Windows或macOS上正确运行,但使用Docker来运行测试应该可以解决这些环境配置问题。通过Docker,您的基础镜像包含了所有所需的依赖项。只要安装了Docker,这些测试就可以在不同的操作系统上运行。
检查Docker镜像是否成功创建。
- docker image ls
结果应该类似于这个:
输出REPOSITORY TAG IMAGE ID CREATED SIZE
playwright-docker latest 433ae116d06a 5 minutes ago 1.92GB
mcr.microsoft.com/playwright focal bb9872cfd272 2 days ago 1.76GB
node 16 c6b745e900c7 6 days ago 907MB
您可以看到playwright-docker(测试镜像)、微软Playwright和Node镜像。您还可以从Docker安装先决条件中获取Ubuntu和hello-world镜像。
现在,使用docker run命令在您的Docker容器中运行测试命令。
- docker run -it playwright-docker:latest npm run test
在此示例中,docker run将使用指定的命令运行playwright-docker:latest Docker镜像。docker run首先会启动Docker容器,然后执行所需的命令。您可以在Docker产品文档中了解更多信息。
结果将如下所示:
输出
playwright-docker@1.0.0 test
playwright test --browser=all
运行9个测试,使用2个工作进程
✓ [chromium] › tests/pricingComparison.spec.ts:4:1 › 预期有4个定价选项 (7秒)
✓ [chromium] › tests/multiplePackages.spec.ts:4:1 › 预期订阅有2个套餐 (8秒)
✓ [chromium] › tests/signUpMethods.spec.ts:4:1 › 预期有3个注册选项 (8秒)
✓ [firefox] › tests/multiplePackages.spec.ts:4:1 › 预期订阅有2个套餐 (9秒)
✓ [firefox] › tests/pricingComparison.spec.ts:4:1 › 预期有4个定价选项 (8秒)
✓ [firefox] › tests/signUpMethods.spec.ts:4:1 › 预期有3个注册选项 (5秒)
✓ [webkit] › tests/multiplePackages.spec.ts:4:1 › 预期订阅有2个套餐 (8秒)
✓ [webkit] › tests/pricingComparison.spec.ts:4:1 › 预期有4个定价选项 (10秒)
✓ [webkit] › tests/signUpMethods.spec.ts:4:1 › 预期有3个注册选项 (7秒)
9个测试通过 (41秒)
测试现在已在Docker环境中成功运行。您可以安全地将代码更新到远程存储库,系统管理员可以将自动化测试集成到CI/CD流程中。
您还可以在该存储库中查看为本文创建的文件。
结论
现在您已经学会了如何使用Playwright进行端到端测试,并使用Docker部署这些测试。要了解更多关于Playwright的信息,请访问Playwright文档。
您可以阅读有关Docker生态系统的内容,以了解更多关于Docker的信息。Docker产品文档还提供了一些编写Dockerfile的最佳实践和Dockerfile参考指南。为了继续使用Docker进行工作,您可以尝试其他Docker教程。


