Remote Desktop Protocol on Ubuntu 22.04 by utilizing xrdp.
As part of the Write for Donations program, the author chose the COVID-19 Relief Fund as the recipient for their donation.
The following passage is requesting paraphrasing of the term “Introduction.”
Microsoft developed Remote Desktop Protocol (RDP) as a network protocol to enable users in accessing and engaging with the graphical user interface of a distant Windows server. RDP employs the client-server model, wherein an RDP client is installed on a local machine, and an RDP server is installed on the remote server.
Xrdp, an open-source implementation of the RDP server, allows you to access and interact with the graphical user interface of a remote Linux server, similar to how RDP is commonly used for Windows remote connections.
You will learn how to set up an RDP server using xrdp on an Ubuntu 22.04 server in this tutorial. Additionally, you will be able to access it from your local machine using an RDP client, enabling you to connect to a remote Linux server through an RDP connection.
Info
Requirements
In order to finish this tutorial, you will require:
- One Ubuntu 22.04 server with a non-root user with sudo privileges, a firewall, and at least 1GB of RAM, which you can set up by following the Ubuntu 22.04 initial server setup guide.
- A local computer with an RDP client installed. A list of available RDP clients for different operating systems is provided below:On Windows, you can use the default Remote Desktop Connection application.
On macOS, you can use the Microsoft Remote Desktop application.
On Linux, you can use FreeRDP, or Remmina.
First step: Installing a Desktop Environment on Ubuntu.
You will need to install and set up a desktop environment on your Ubuntu server in order to access a graphical user interface. By default, an Ubuntu server only provides a terminal environment.
You will choose and install the Xfce desktop environment from the available Ubuntu options. Xfce provides a lightweight and user-friendly desktop environment for Linux-based systems.
First, establish a connection to your server using SSH and then execute the following command to refresh the list of available packages:
- sudo apt update
Afterward, make sure to install the xfce and xfce-goodies packages onto your server.
- sudo apt install xfce4 xfce4-goodies -y
You will receive a prompt to select a display manager, which is a software that handles graphical login mechanisms and user sessions. You have the freedom to choose any option from the list of display managers available, but for this tutorial, gdm3 will be utilized.
Once the desktop environment is installed, proceed with the installation of xrdp on your server.
To proceed, install xrdp on Ubuntu in the second step.
You will be installing xrdp on your Ubuntu server, which is an open-source implementation of the RDP server enabling RDP connections for Linux-based servers.
To install xrdp, simply execute the given command in the terminal.
- sudo apt install xrdp -y
Once xrdp is successfully installed, you can check its status by using the systemctl command.
- sudo systemctl status xrdp
This command will display the active status (running).
● xrdp.service – xrdp daemon Loaded: loaded (/lib/systemd/system/xrdp.service; enabled; vendor preset: enabled) Active: **active (running)** since Sun 2022-08-07 13:00:44 UTC; 26s ago Docs: man:xrdp(8) man:xrdp.ini(5) Main PID: 17904 (xrdp) Tasks: 1 (limit: 1131) Memory: 1016.0K CGroup: /system.slice/xrdp.service └─17904 /usr/sbin/xrdp
If xrdp is not running, you might need to manually start the service by using this command.
- sudo systemctl start xrdp
Once you have executed the command mentioned above, double-check the status again to make sure that xrdp is running properly.
After successfully installing xrdp on your server, the next step involves examining the xrdp configuration to enable remote client connections.
Step 3 involves setting up xrdp and making firewall updates.
In this stage, you’ll examine the initial setup of xrdp located in /etc/xrdp/xrdp.ini and incorporate a configuration for an RDP connection. Additionally, you’ll modify the firewall settings.
xrdp.ini is the initial setup file for configuring RDP connections to the xrdp server. This file can be altered and personalized to fulfill the specific needs of RDP connections.
Please open the file using either the nano text editor or any other editor you prefer.
- sudo nano /etc/xrdp/xrdp.ini
The configuration file includes various sections.
- Globals defines some global configuration settings for xrdp.
- Logging defines logging subsystem parameters for logs.
- Channels defines multiple channel parameters that RDP supports.
- Session types defines multiple supported session types by xrdp. Every session type configuration is defined as a separate section under its session type name enclosed in square brackets, such as [Xorg] and [XVnc]. There is no [Sessions types] heading in the file; instead, it is written as a comment.
Go to the Session types section in the configuration file where you can see a list of supported session types along with their parameters.
… ; ; Session types ; ; Some session types such as Xorg, X11rdp, and Xvnc start a display server. ; Startup command-line parameters for the display server are configured ; in sesman.ini. See and configure also sesman.ini. [Xorg] name=Xorg lib=libxup.so username=ask password=ask ip=127.0.0.1 port=-1 code=20 [Xvnc] name=Xvnc lib=libvnc.so username=ask password=ask ip=127.0.0.1 port=-1 #xserverbpp=24 #delay_ms=2000 [vnc-any] … [neutrinordp-any] … …
The default setting for the username and password parameters is set to “ask”, which requires the user to enter their credentials when connecting via RDP. If needed, parameters like name, username, and password can be adjusted. However, the default configuration is sufficient for the initial RDP connection to the server.
Please save and close the file once you have completed your work.
If you are currently not in your user’s home directory, please proceed to navigate to it.
- cd ~
Afterward, you should generate a .xsession file in /home/sammy and incorporate xfce4-session as the session manager to utilize during login.
- echo “xfce4-session” | tee .xsession
One possible paraphrase of the given text could be:
By writing the string “xfce4-session” in the file called .xsession, tee ensures that xfce4-session is utilized as the session manager when a graphical login request is made. When you install xfce as your desktop environment, xfce4-session automatically functions as its session manager. Failure to include this information in the .xsession file will result in the absence of a chosen session manager, causing the RDP session to be unable to connect to the graphical display.
You can initiate the restart process of the xrdp server.
- sudo systemctl restart xrdp
Afterwards, you will need to set up your firewall to permit remote connections from your public IP address on port 3389. The Remote Desktop Protocol (RDP) utilizes TCP/IP port 3389. To be able to utilize RDP for accessing the remote server, it is necessary to enable port 3389 in your firewall.
To begin with, locate the public IP address for your local device.
- curl ifconfig.me
To execute this command, make use of the Windows Command Prompt on your Windows system.
By using the “curl” command, you can send a request to ifconfig.me and receive your public IP address as the output.
… your_local_ip
Afterwards, enable access to your remote server’s RDP port 3389 by substituting “your_local_ip” with the result of the previous command.
- sudo ufw allow from your_local_ip/32 to any port 3389
Check the condition of your UFW firewall.
- sudo ufw status
The result should have a similar appearance to the following.
Status: Active To Action From — —— —- OpenSSH ALLOW Anywhere 3389 ALLOW your_local_ip OpenSSH (v6) ALLOW Anywhere (v6) …
Now that you have activated port 3389 to allow connections from your public IP, you can proceed to check the Remote Desktop Protocol (RDP) connection between your local machine and the remote server.
Step 4 involves the process of evaluating the RDP connection.
You will now run a test on the RDP connection from your own computer. The paragraphs below outline steps to test the connection on Windows, macOS, and Linux devices.
Testing the Windows RDP connection.
To examine the connection using the Windows Remote Desktop Connection client, initially open the Remote Desktop Connection application.
Please input the username and public IP address of your remote server in the provided text boxes for Computer and User name. To enter the username, you may have to click on the downward arrow under Show Options.
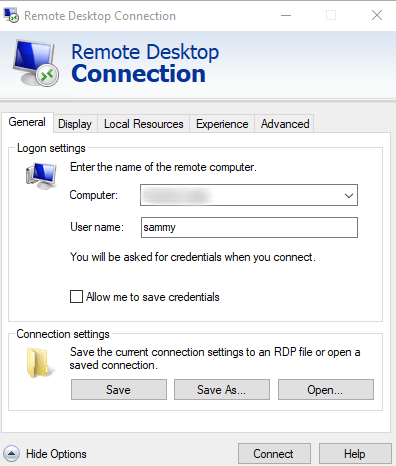
Click on the Connect button. In case you get a notification stating that the Remote Desktop cannot establish a connection with the remote computer, make sure to verify if you have enabled the Remote Desktop option in your system settings.
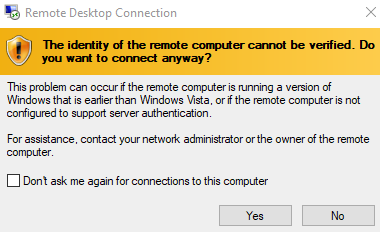
If you see the identity verification popup, click on Yes.
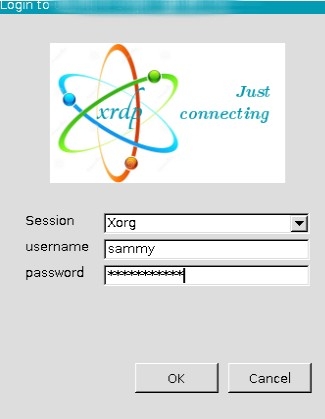
Next, input the username (sammy) and the password you generated for the sammy user when setting up the server initially. Click on the Ok button.
After logging in, you will have the capability to reach your Ubuntu Desktop interface.
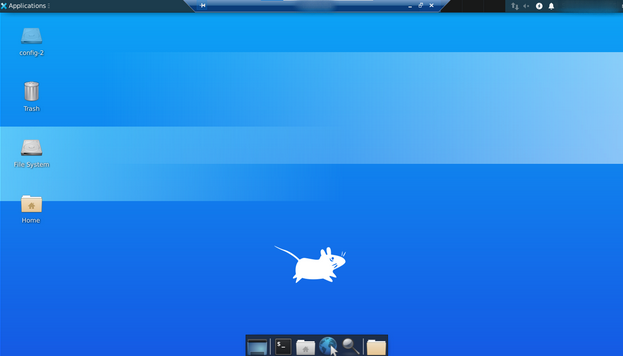
After successfully establishing an RDP connection, you have linked your local machine to the remote Ubuntu server. Once you are done utilizing the graphical desktop, feel free to close it using the exit button.
Performing a trial of the RDP connection on macOS
To examine the connectivity using the macOS’ Remote Desktop Connection client, initiate the Microsoft Remote Desktop Connection application.
Click on “Add PC”, then input your remote server’s public IP address in the provided box.
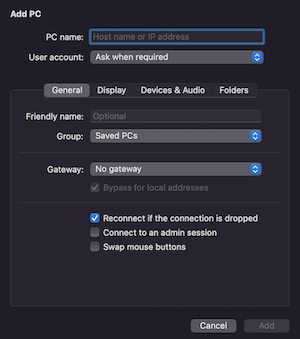
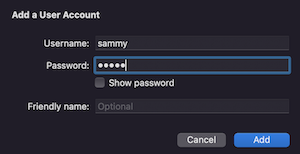
When you are setting up the connection, you have the option to include a user account.
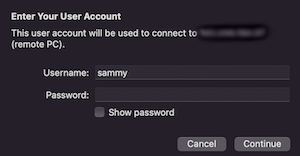
If you don’t include a user during the setup process, you will receive a request to enter your login details.
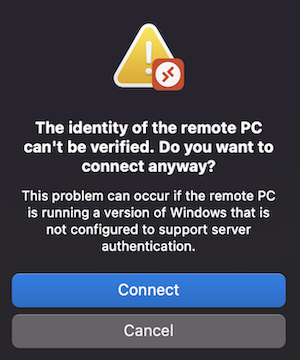
Click on Yes to skip the popup for identity verification.
After successfully signing in, you will be able to reach your Ubuntu remote desktop. Closing it is as simple as clicking on the exit button after you are done with your graphical desktop.
Checking the RDP Connection on Linux
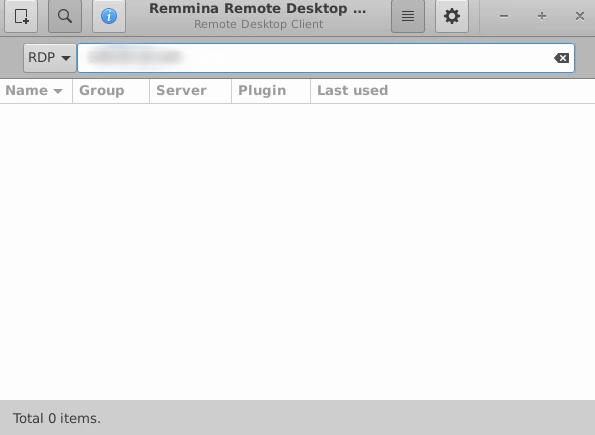
To evaluate the RDP connection on a Linux machine, make sure you have an RDP client. Begin by installing the remmina RDP client specifically designed for Ubuntu.
- sudo apt install remmina
If prompted, choose “y” to complete the installation process. This command utilizes apt to install Remmina, an open-source remote desktop client, on your Ubuntu system. For installation on different Linux distributions, you can refer to the Remmina documentation.
After installation, open the remmina application on your Linux device and input the public IP of your remote server into the designated box. Hit the Enter key on your keyboard to establish a connection with your remote desktop.
Next, input the username of your remote server (in this tutorial, it is sammy) along with the user’s password that you generated during the initial setup of the server. Click on the Ok button.

To regain access to the remote desktop, you may have to re-enter your user’s password.
After successfully logging in, you should be able to enter into your Ubuntu Desktop interface.
After successfully establishing an RDP connection, you are now connected to your remote Ubuntu server from your local machine. Once you have completed your tasks on the graphical desktop, you can simply click on the exit button to close the connection.
After confirming the successful remote connection, you can employ this sequence whenever you require the graphical interface for your Linux server.
In summary,
In this article, you set up xrdp to establish an RDP connection from your local machine to a graphical desktop on your remote Ubuntu server.
You now have the option to configure a VNC connection for your Linux server using the step-by-step guide on How to Install and Configure VNC on Ubuntu 20.04. VNC provides an alternative method for remotely connecting to a Linux desktop.
more tutorials
Using Telnet Commands in Linux/Unix(Opens in a new browser tab)
Common errors that occur when using Nginx for connections.(Opens in a new browser tab)
Python 3 installing on Rocky Linux 9(Opens in a new browser tab)
JSch library to execute shell commands on a Unix(Opens in a new browser tab)
Installation of Arch Linux(Opens in a new browser tab)

