Common errors that occur when using Nginx for connections.
In the beginning of the text
Nginx is a widely used web server that can host numerous large and high-traffic websites on the internet. Troubleshooting Nginx connection errors can be challenging due to the various potential causes and solutions involved. Additionally, there are often limited clues to guide you in resolving the error. As these errors pertain to the failure in establishing a connection with Nginx from the outset, they usually manifest at the browser level rather than as a specific error related to Nginx. In reality, many typical Nginx errors are related to connection aspects like ports or firewalls.
The examples provided in this manual were tried on an Ubuntu 22.04 server; however, they should work for most Nginx installations. Many of these issues can be resolved using Nginx’s standardized configuration file, although there may be slight variations in directories and paths.
In this guide, you will discover the significance of a browser connection error on your Nginx web server, along with the different measures you can undertake to pinpoint the problem and resolve it effectively, restoring your server to full functionality.
Examining the Error Log of your Nginx Server
The errors and solutions provided in this tutorial cover common scenarios, yet they may not include every possibility. Syntax errors in Nginx can disrupt the structure of valid statements, so the listed errors serve as general indications of how Nginx reacts. It is important to note that errors can often lead to additional issues, and a single error may be a symptom of a larger problem or a distinct issue. Keep in mind that your specific situation and configuration may differ.
Kindly be informed that you can constantly consult the Nginx error log to observe a continuous compilation of errors.
- sudo cat /var/log/nginx/error.log
Resolving the Error Message: “This website is unreachable.”
While browsing the internet, you have probably come across a webpage displaying a message such as “The site cannot be accessed.” This problem can be caused by various factors, but this guide will primarily address common errors faced by users configuring Nginx. Occasionally, simply refreshing your browser can resolve the issue. However, when dealing with your own web server, there might be additional factors affecting the connection on the server’s backend.
Here’s a sample of the error message that your web browser might display.
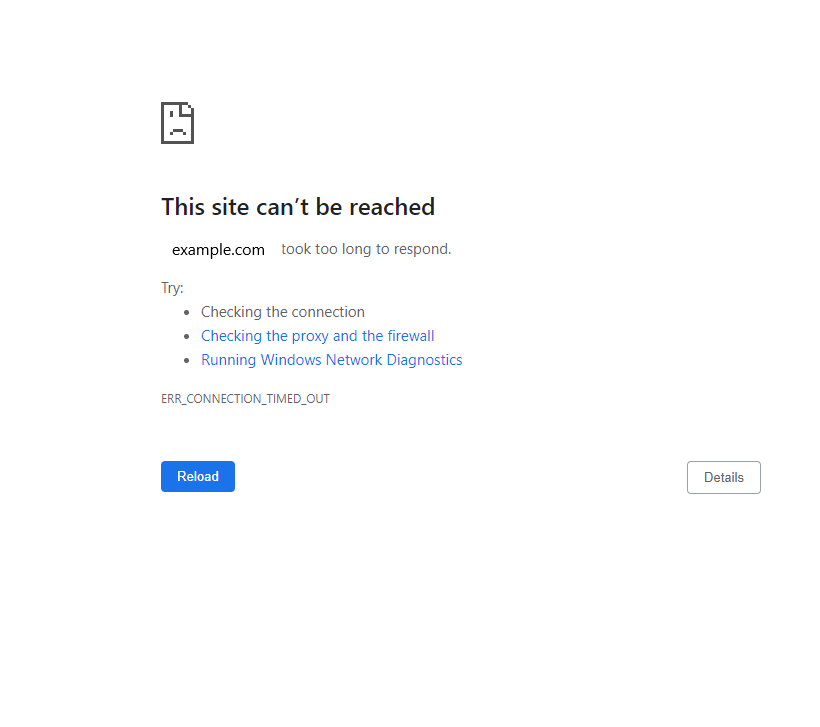
Let’s talk about what the error indicates regarding your web server before we proceed. Essentially, the error message states that the example.com address is not responding within the expected time, leading to the reference of ERR_CONNECTION_TIMED_OUT at the end. It is important to note that this error is related to the browser and not directly connected to your Nginx server. It suggests that this error could be the reason behind the inability to establish a connection with your server. Additionally, the suggested solutions provided here are from a standpoint of the end user utilizing the client-side.
Once again, in this situation, you are the one managing your own web server without accessing any particular website online. To effectively identify the issue, you will need to assess and rule out potential causes by examining your Nginx configuration.
As you are utilizing Nginx, you can investigate potential causes of this error by executing specific commands and inspecting your firewall as well as configuration setup.
Making sure your Nginx Web Server is currently functioning.
To begin, you can ensure that Nginx is functioning properly on your system and that there were no problems during installation. You can do this by using the systemd init system to verify the status of the Nginx service currently running on your machine.
- systemctl status nginx
If your Nginx web server is functioning correctly, you will receive the subsequent output.
● nginx.service - A high performance web server and a reverse proxy server
     Loaded: loaded (/lib/systemd/system/nginx.service; enabled; preset: enable>
     Active: active (running) since Thu 2022-11-03 16:37:22 UTC; 1 week 4 days >
       Docs: man:nginx(8)
   Main PID: 3253 (nginx)
      Tasks: 2 (limit: 1116)
     Memory: 3.7M
        CPU: 1.250s
     CGroup: /system.slice/nginx.service
             ├─3253 "nginx: master process /usr/sbin/nginx -g daemon on; master>
             └─3254 "nginx: worker process"
In the result, there is a line indicating the status of the web server, showing if it is currently operational. In this case, it is successfully running. If it were not, this line would display as inactive (dead).
Note
Once you have ensured that your Nginx service is running, you can enter your server address into the browser once more as http://example.com to check if the connection problem still exists. In case you are unsure about your IP address, you can utilize the icanhazip.com tool to find your IP address.
- curl -4 icanhazip.com
If your website is still inaccessible at this stage, the next course of action would be examining your firewall configurations.
Checking and fine-tuning your firewall configurations
To ensure your web server’s connection, you should confirm that your firewall settings are correctly arranged to receive requests through the designated port. If they are not, you will need to modify your firewall settings to permit connections through the port. By default, an Nginx web server is programmed to accept any incoming requests on port 80. However, if SSL certificates are implemented, it will also receive secure connections on port 443. For the sake of this tutorial, we will concentrate on the default port 80.
In this instance, we are utilizing Ubuntu 22.04 and the UFW (Uncomplicated Firewall). Please note that the process may vary based on your individual distribution. To start, verify the current settings of your firewall. Remember that you must execute the next command as a root user. We suggest utilizing a user with sudo privileges for this purpose.
- sudo ufw status
Status: active

To                         Action      From
--                         ------      ----
OpenSSH                    ALLOW       Anywhere
OpenSSH (v6)               ALLOW       Anywhere (v6)
The given output displays the existing open port connections on this device. Regrettably, port 80 is not included in the list, so it must be included to enable access to Nginx. If you are unsure about the available application configurations, you can execute the command ufw app list.
- sudo ufw app list
Available applications:
  Nginx Full
  Nginx HTTP
  Nginx HTTPS
  OpenSSH
Once Nginx has been installed successfully, it presents a range of Nginx profiles to choose from for configuration. This provides a brief summary of the meaning behind each of these profiles.
- Nginx Full: opens both ports 80 (normal, unencrypted traffic) and 443 (TLS/SSL encrypted traffic)
- Nginx HTTP: opens only port 80
- Nginx HTTPS: opens only port 443
To configure your connection correctly, you simply have to open port 80. In order to do this, you can use the following command to add the Nginx HTTP application.
- sudo ufw allow ‘Nginx HTTP’
Note
If the command is successful, it will provide an output saying that the Rule has been added. To confirm whether the Nginx HTTP application has been added to the list, you can recheck the status by using sudo ufw status.
Status: active

To                         Action      From
--                         ------      ----
OpenSSH                    ALLOW       Anywhere
Nginx HTTP                 ALLOW       Anywhere
OpenSSH (v6)               ALLOW       Anywhere (v6)
Nginx HTTP (v6)            ALLOW       Anywhere (v6)
The current output displays the inclusion of the Nginx HTTP application, with port 80 open for receiving connections.
Checking the validity of your Nginx Configuration File
Before you test your web browser, it is advisable to verify your configuration settings to confirm that your server domain block is configured to listen on port 80. It is crucial to correctly set the port and IP address in your Nginx configuration and ensure that the corresponding port is open in your firewall. If any part is absent, the connection will not be successful.
To access your Nginx configuration file, you may choose any text editor you prefer. For instance, we will use nano as an example.
- sudo nano /etc/nginx/sites-available/example.com
After opening the file, the initial few lines consist of the listen instruction.
server {
       listen 80;
         listen [::]:80;

       root /var/www/example.com/html;
        index index.html index.htm index.nginx-debian.html;

        server_name example.com www.example.com;

        location / {
                try_files $uri $uri/ =404;
        }
}
The listen directive determines which port the server can receive requests from. The listen [::] specifies the IPv6 addresses. Optionally, you can provide your IP address information along with the listen directive. However, in this example, the connection to the domain is defined by the root path and server_name directives. It is important to ensure that the domain or IP address information in the configuration file is correct for it to function correctly. Therefore, carefully verify that the root and server_name directives accurately represent the domain you intend to connect to.
Once you have verified that the listen directive is correctly configured for port 80, you can proceed to save and close the file. In case you are using nano, you may accomplish this by pressing CTRL + X, followed by Y, and finally ENTER.
In order to guarantee that your configuration file is devoid of any syntax errors, execute the following command.
- sudo nginx -t
If you have modified your configuration file and there were no syntax errors, remember to restart Nginx using sudo systemctl restart nginx to activate your changes.
Once you have completed this task, launch your web browser and go to http://example.com. If you see the web page displayed below, it indicates that your firewall settings have been successfully adjusted to allow requests on port 80.
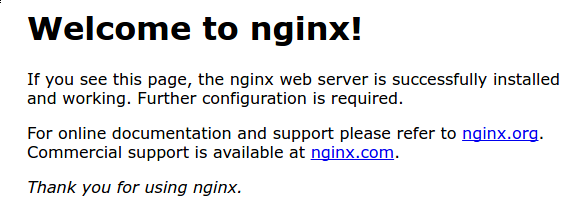
This webpage provides confirmation that your Nginx web server is installed and functioning correctly.
In summary
You have gained knowledge on how to confirm the activity of your Nginx service and address any firewall or port issues that could be the cause of the “This site cannot be reached” error when utilizing an Nginx web server. For further information about Nginx, you can visit our labeled Community page or proceed with discovering the installation process of Nginx on Ubuntu 22.04.
more tutorials
Interview Questions for Web Services – SOAP, RESTful(Opens in a new browser tab)
Server Configurations Frequently Used for Your Web Application(Opens in a new browser tab)
Python HTTP requests such as GET and POST methods.(Opens in a new browser tab)
Addition Assignment Operator mean in Java(Opens in a new browser tab)

