Ubuntu 20.04でOpenLiteSpeed Webサーバーをインストールの方法
はじめに
OpenLiteSpeedは最適化されたオープンソースのウェブサーバーであり、サイトの管理と提供に使用できます。OpenLiteSpeedには、Apache互換のリライトルール、組み込みのウェブベースの管理インターフェース、そしてサーバー向けに最適化されたカスタマイズされたPHP処理など、便利な機能があります。
このチュートリアルでは、Ubuntu 20.04 サーバーに OpenLiteSpeed をインストールおよび設定します。
前提条件
このチュートリアルを完了するには、sudoが有効化されたルートユーザーではない非ルートユーザーと、有効にされたufwファイアウォールを持つUbuntu 20.04サーバーが必要です。これは、Ubuntu 20.04の初期サーバーセットアップの手順に従って設定することができます。
ステップ1 – OpenLiteSpeedのインストール
OpenLiteSpeedを利用する前に、インストールする必要があります。OpenLiteSpeedは、Ubuntuの標準的なaptコマンドを使用して、サーバーをダウンロードしてインストールするためのソフトウェアリポジトリを提供しています。
最初にパッケージマネージャのキャッシュを更新します。
- sudo apt update
その後、未処理のアップグレードをインストールしてください。
- sudo apt upgrade
もし求められたら、パスワードを入力し、Yでインストールを確認してください。
このリポジトリをUbuntuシステムで利用するために、開発者のソフトウェアの署名キーをダウンロードして追加してください。
- sudo wget -O – https://rpms.litespeedtech.com/debian/enable_lst_debian_repo.sh | sudo bash
wgetは、OpenLitespeedのサーバーにあるシェルスクリプトを取得し、それによってUbuntuのaptパッケージマネージャーにLitespeedリポジトリを追加するための必要な手順を自動的に実行します。シェルスクリプトの内容は、|パイプを介して新しいbashシェルに渡されます。
このコマンドの出力は次のようになります。
–2022-10-01 13:12:00– https://rpms.litespeedtech.com/debian/enable_lst_debian_repo.sh Resolving rpms.litespeedtech.com (rpms.litespeedtech.com)… 52.55.120.73 Connecting to rpms.litespeedtech.com (rpms.litespeedtech.com)|52.55.120.73|:443… connected. HTTP request sent, awaiting response… 200 OK Length: 3457 (3.4K) [application/x-sh] Saving to: ‘STDOUT’ – 0%[ ] 0 –.-KB/s detecting OS type : detected OS: ubuntu – 20.04 now enable the LiteSpeed Debian Repo – 100%[==================================>] 3.38K –.-KB/s in 0s 2022-10-01 13:12:01 (136 MB/s) – written to stdout [3457/3457] register LiteSpeed GPG key –2022-10-01 13:12:01– http://rpms.litespeedtech.com/debian/lst_debian_repo.gpg Resolving rpms.litespeedtech.com (rpms.litespeedtech.com)… 52.55.120.73 Connecting to rpms.litespeedtech.com (rpms.litespeedtech.com)|52.55.120.73|:80… connected. HTTP request sent, awaiting response… 200 OK Length: 1198 (1.2K) [application/octet-stream] Saving to: ‘/etc/apt/trusted.gpg.d/lst_debian_repo.gpg’ /etc/apt/trusted.gpg.d/l 100%[==================================>] 1.17K –.-KB/s in 0s 2022-10-01 13:12:02 (101 MB/s) – ‘/etc/apt/trusted.gpg.d/lst_debian_repo.gpg’ saved [1198/1198] –2022-10-01 13:12:02– http://rpms.litespeedtech.com/debian/lst_repo.gpg Resolving rpms.litespeedtech.com (rpms.litespeedtech.com)… 52.55.120.73 Connecting to rpms.litespeedtech.com (rpms.litespeedtech.com)|52.55.120.73|:80… connected. HTTP request sent, awaiting response… 200 OK Length: 2336 (2.3K) [application/octet-stream] Saving to: ‘/etc/apt/trusted.gpg.d/lst_repo.gpg’ /etc/apt/trusted.gpg.d/l 100%[==================================>] 2.28K –.-KB/s in 0s 2022-10-01 13:12:02 (312 MB/s) – ‘/etc/apt/trusted.gpg.d/lst_repo.gpg’ saved [2336/2336] update the repo Hit:1 http://mirrors.digitalocean.com/ubuntu focal InRelease Hit:2 http://mirrors.digitalocean.com/ubuntu focal-updates InRelease Hit:3 https://repos-droplet.digitalocean.com/apt/droplet-agent main InRelease Hit:4 http://mirrors.digitalocean.com/ubuntu focal-backports InRelease Hit:5 http://security.ubuntu.com/ubuntu focal-security InRelease Ign:6 http://rpms.litespeedtech.com/debian focal InRelease Hit:7 https://repos.insights.digitalocean.com/apt/do-agent main InRelease Get:8 http://rpms.litespeedtech.com/debian focal Release [1652 B] Get:9 http://rpms.litespeedtech.com/debian focal Release.gpg [836 B] Get:10 http://rpms.litespeedtech.com/debian focal/main amd64 Packages [19.0 kB] Fetched 21.5 kB in 1s (14.8 kB/s) Reading package lists… Done All done, congratulations and enjoy !
オープンライトスピードサーバーと対応するLS-PHPインタプリターをインストールするには、以下のコマンドを実行してください。
- sudo apt install openlitespeed lsphp81
求められたら、パスワードを入力し、それからYでインストールを確認してください。
このコマンドは、OpenlitespeedサーバーパッケージとLSPHP 8.1をインストールします。LiteSpeed PHP(LSPHP)は、LiteSpeed Server Application Programming Interface(LSAPI)と統合されたPHPインタプリタです。
OpenLiteSpeed サーバーがインストールされたので、デフォルトの管理者アカウントを更新して安全性を確保します。
ステップ2 – 管理者パスワードの設定
サーバーのテストを行う前に、OpenLiteSpeedの新しい管理パスワードを設定します。OpenLiteSpeedが提供するスクリプトを実行することで、これを行うことができます。
- sudo /usr/local/lsws/admin/misc/admpass.sh
管理ユーザーのユーザー名を提供するように求められます。新しいユーザー名を選択せずにENTERキーを押すと、デフォルトのadminが使用されます。お好きな管理ユーザー名を使用してください。次に、アカウントの新しいパスワードを作成して確認するよう求められます。お好きな管理パスワードを入力し、再びENTERキーを押してください。スクリプトは更新の成功を確認します。
Administrator’s username/password is updated successfully!
現在、管理者アカウントの確保が完了しました。次に、サーバーが正常に稼働しているかをテストします。
ステップ3: サーバーに接続します。
このステップでは、サーバーに接続します。
インストール後、OpenLiteSpeedは自動的に起動するはずです。systemctl statusコマンドで起動しているか確認できます。
- sudo systemctl status lsws
このコマンドは、以下の出力を表示します。
● lshttpd.service – OpenLiteSpeed HTTP Server Loaded: loaded (/etc/systemd/system/lshttpd.service; enabled; vendor preset: enabled) Active: active (running) since Sat 2022-10-01 13:22:01 UTC; 5min ago Process: 5805 ExecStart=/usr/local/lsws/bin/lswsctrl start (code=exited, status=0/SUCCESS) Main PID: 5843 (litespeed) CGroup: /system.slice/lshttpd.service ├─5843 openlitespeed (lshttpd – main) ├─5852 openlitespeed (lscgid) └─5881 openlitespeed (lshttpd – #01) Oct 01 13:21:58 ubuntu-s-1vcpu-1gb-blr1-01 systemd[1]: Starting OpenLiteSpeed HTTP Server… Oct 01 13:21:59 ubuntu-s-1vcpu-1gb-blr1-01 lswsctrl[5805]: [OK] litespeed: pid=5843. Oct 01 13:22:01 ubuntu-s-1vcpu-1gb-blr1-01 systemd[1]: Started OpenLiteSpeed HTTP Server.
アクティブ(実行中)メッセージは、OpenLiteSpeedが実行中であることを示しています。
もしサーバーが起動していない場合、systemctlを使ってサーバーを起動することができます。
- sudo systemctl start lsws
systemctl startコマンドを実行すると、以下の出力が表示されます。
[OK] litespeed: pid=5137.
サーバーは現在稼働しています。サービス出力を終了するには、CTRL+Cを押してください。
ブラウザでそれを訪れる前に、ファイアウォールのいくつかのポートを開く必要があります。これはufwコマンドで実現できます。
- sudo ufw allow 8088,7080,443,80/tcp
最初のポート、8088はOpenLiteSpeedの例のサイトのデフォルトポートです。 ufwで許可した後、一般の人でもアクセスできるようになります。ウェブブラウザで、サーバーのドメイン名またはIPアドレスに移動し、「:8088」と入力してポートを指定してください。
http://server_domain_or_IP:8088
ブラウザがデフォルトのOpenLiteSpeedウェブページを読み込みます。以下の画像と一致するでしょう。
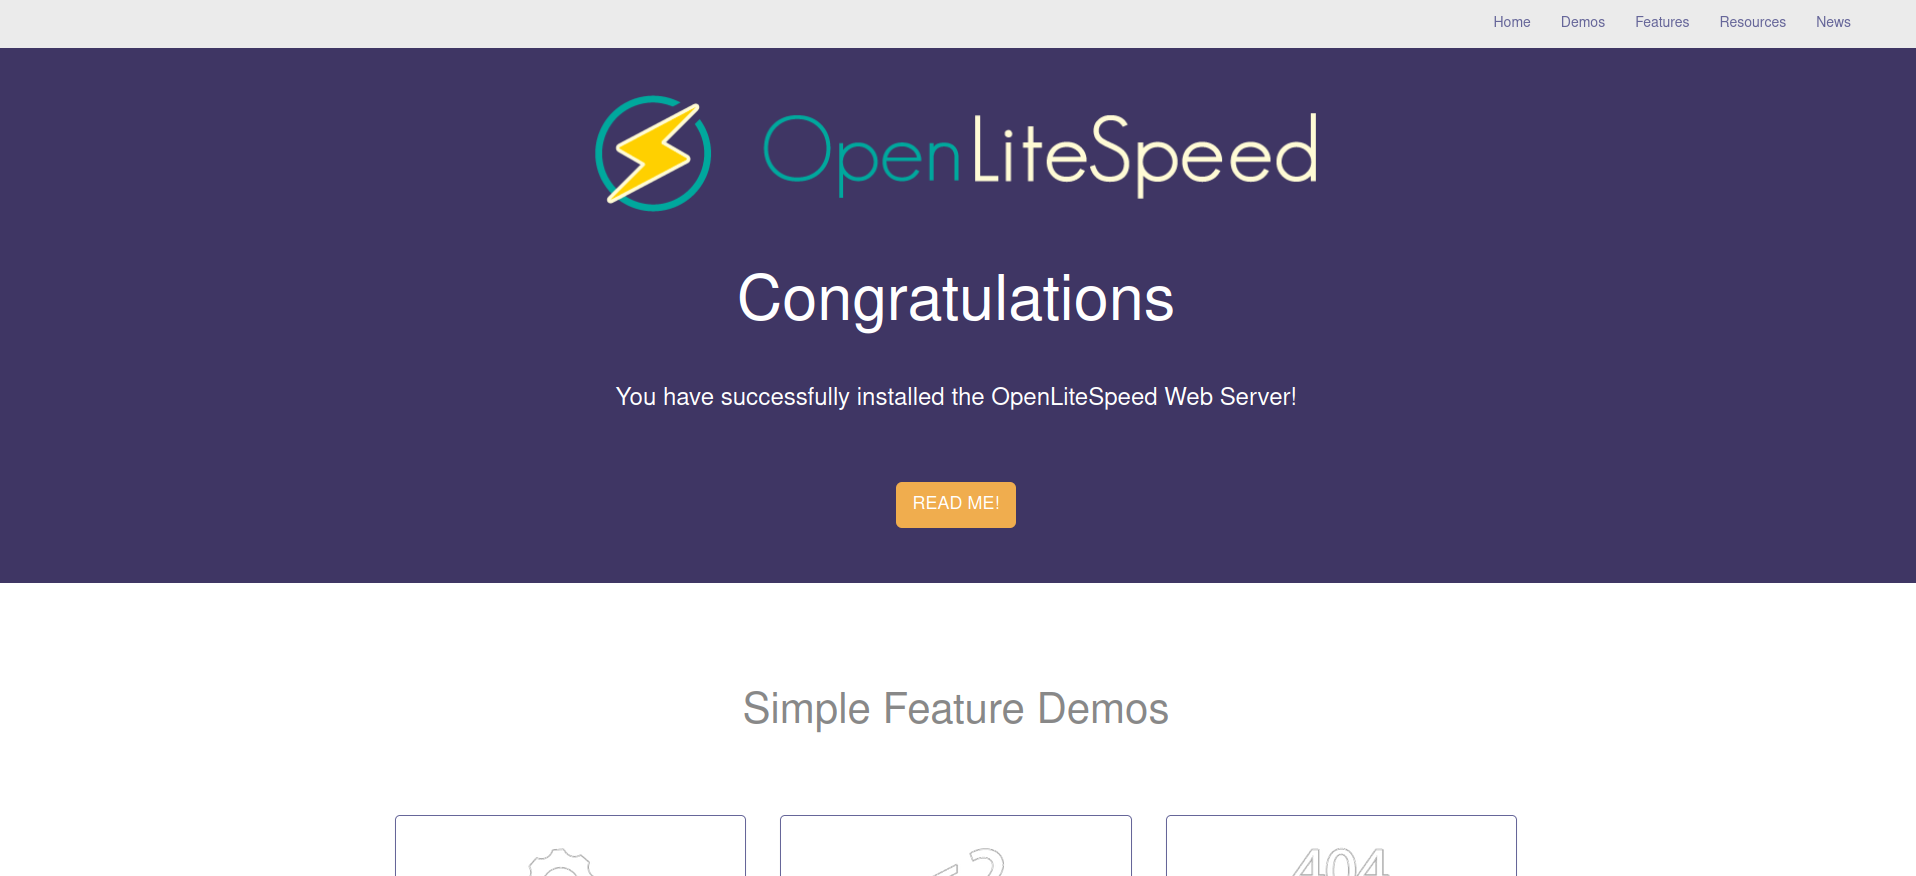
ページの下部にあるリンクは、サーバーのさまざまな機能を示しています。これらのリンクをクリックすると、既にインストールされて正しく設定されていることに気づくかもしれません。例えば、利用可能な例のCGIスクリプト、稼働中のカスタマイズされたPHPインスタンス、設定されたカスタムエラーページや認証ゲートなどがあります。
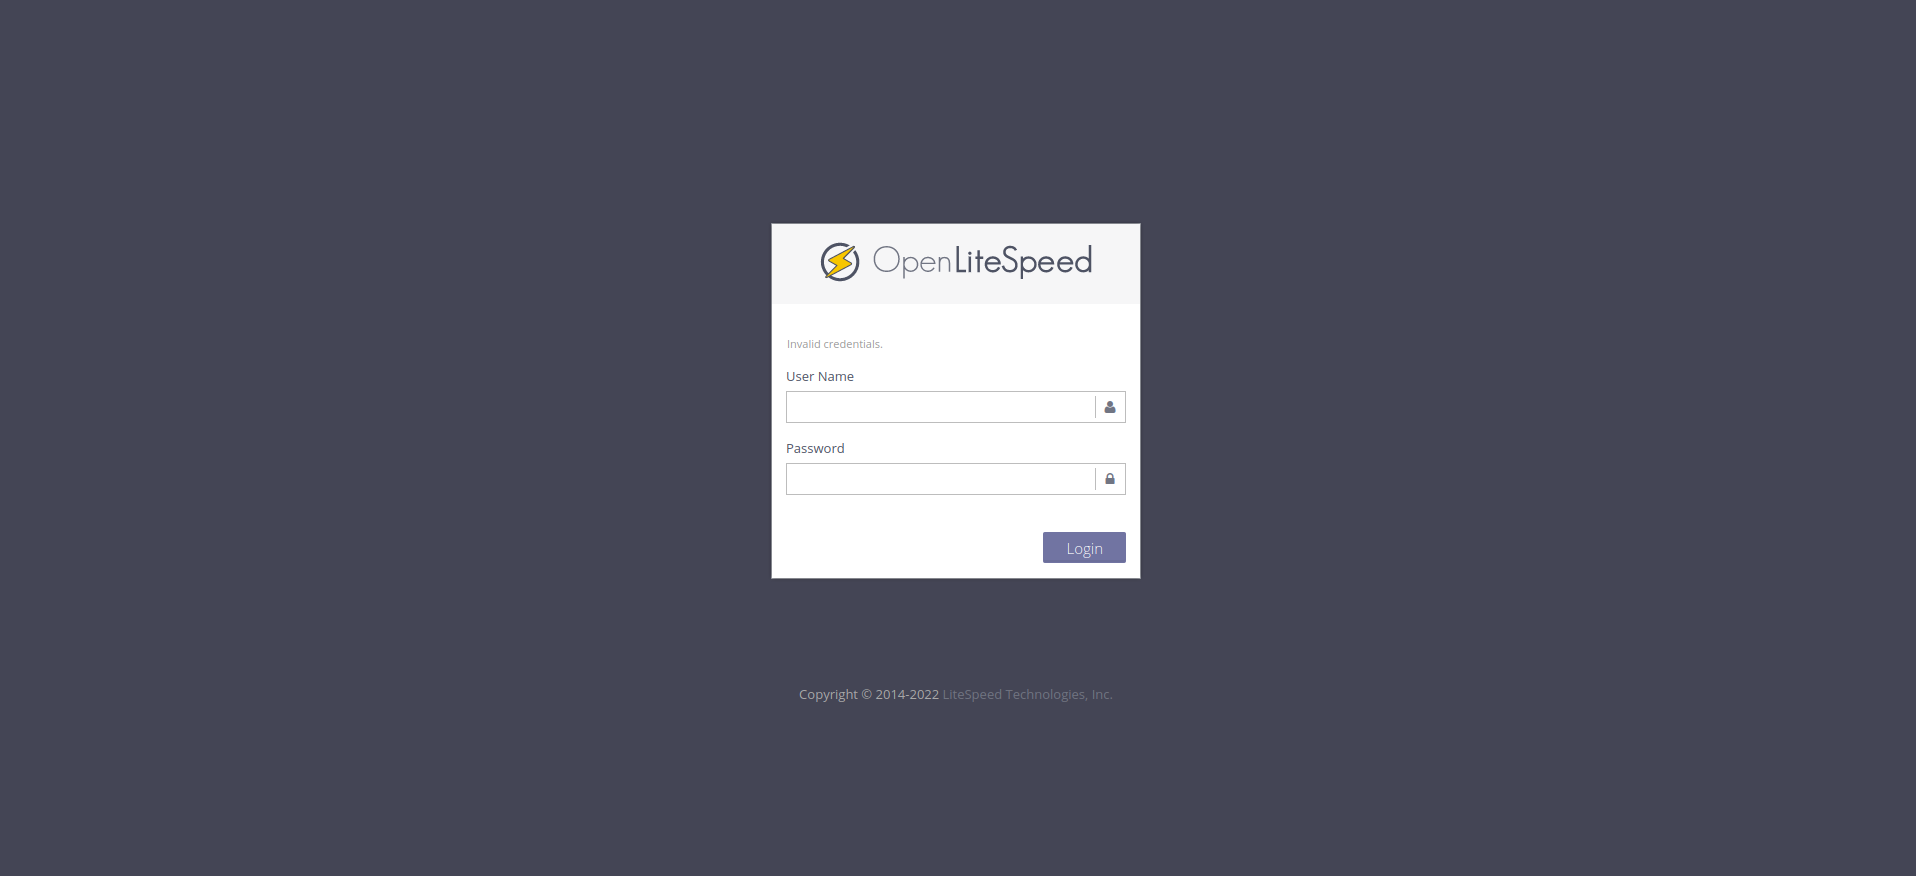
デフォルトのサイトに満足したら、管理インターフェースに進むことができます。ウェブブラウザで、HTTPSを使用してサーバのドメイン名またはIPアドレスに移動し、ポート番号7080を指定します。
https://server_domain_or_IP:7080
おそらく、サーバーのSSL証明書の検証ができないと警告されるページが表示されるでしょう。これは自己署名の証明書なので、このメッセージは予期されます。サイトに進むために、利用可能なオプションをクリックしてください。Chromeの場合、[詳細設定]をクリックしてから[続行]をクリックする必要があります。
以前のステップでadmpass.shスクリプトで選択した管理ユーザー名とパスワードを入力するよう指示されます。
認証が完了すると、OpenLiteSpeedの管理インターフェースが表示されます。
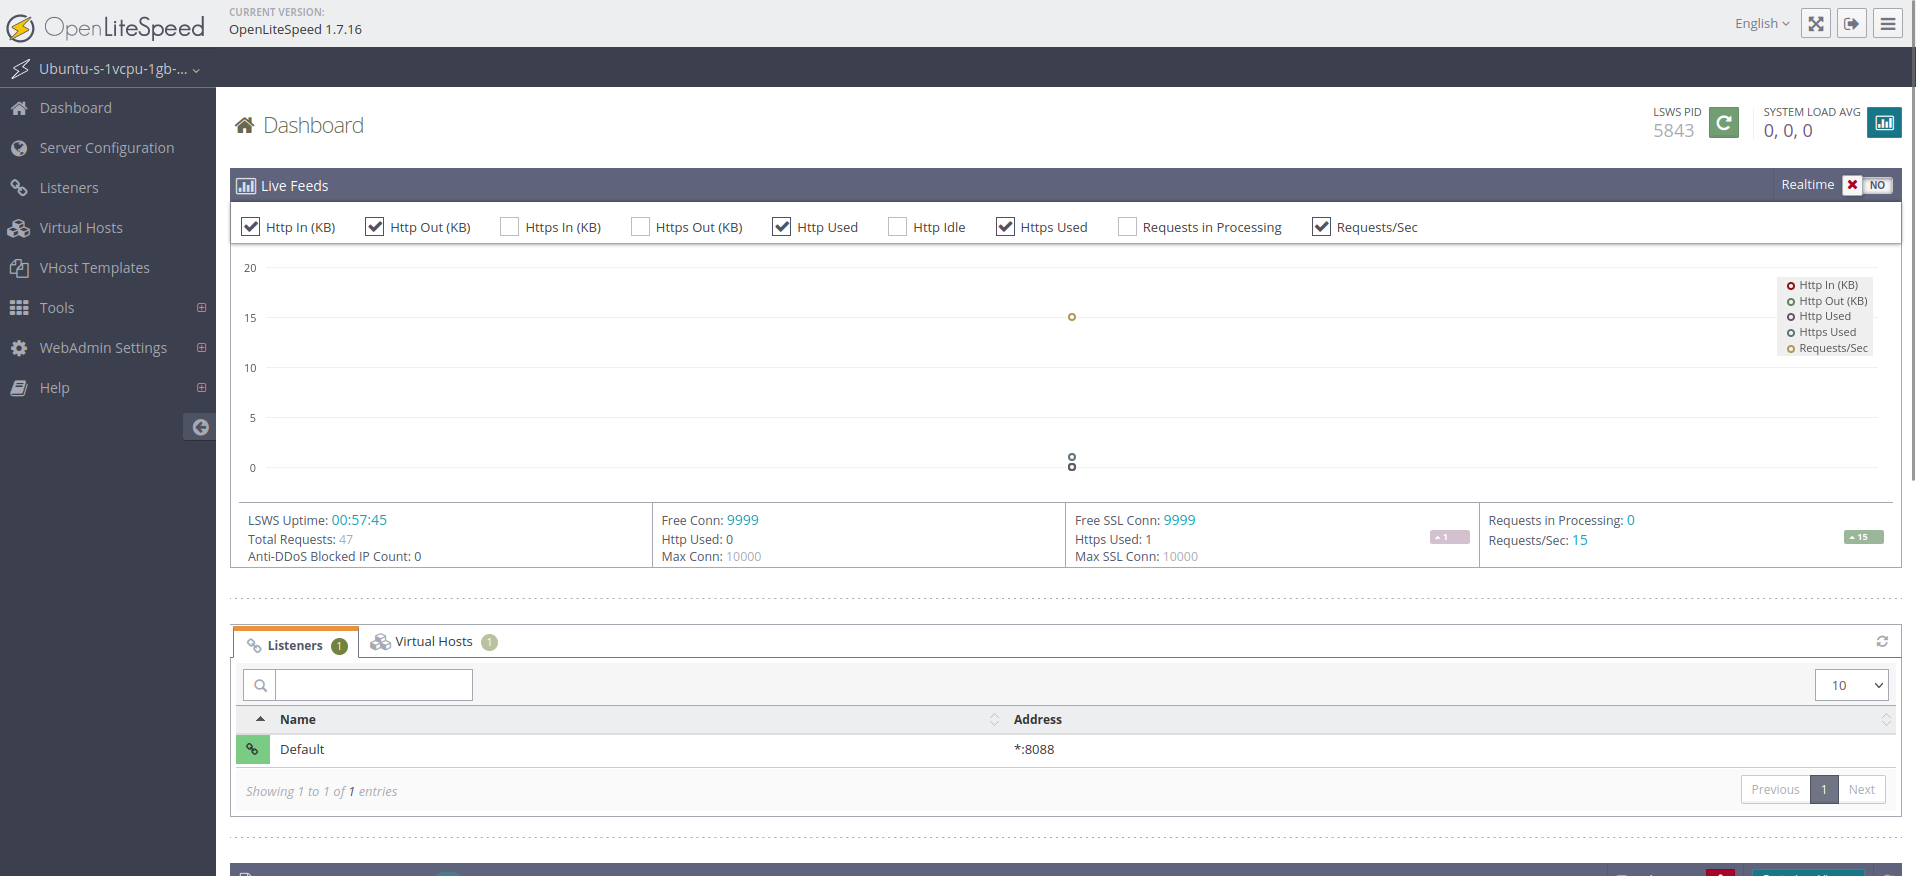
ウェブサーバーのほとんどの設定は、このダッシュボードを通じて行われます。
この手順では、新たに開かれたポートを通じてサーバーに接続しました。次に、デフォルトページで使用されているポートを更新します。
ステップ4 – デフォルトページのポートを変更する
ウェブインターフェイスを介してオプションを設定する方法を示すために、デフォルトサイトが使用するポートを8088から従来のHTTPポート(80)に変更します。
サイドナビゲーションバーのオプションのリストから、「リスナー」を選択して開始してください。利用可能なすべてのリスナーの一覧が表示されます。
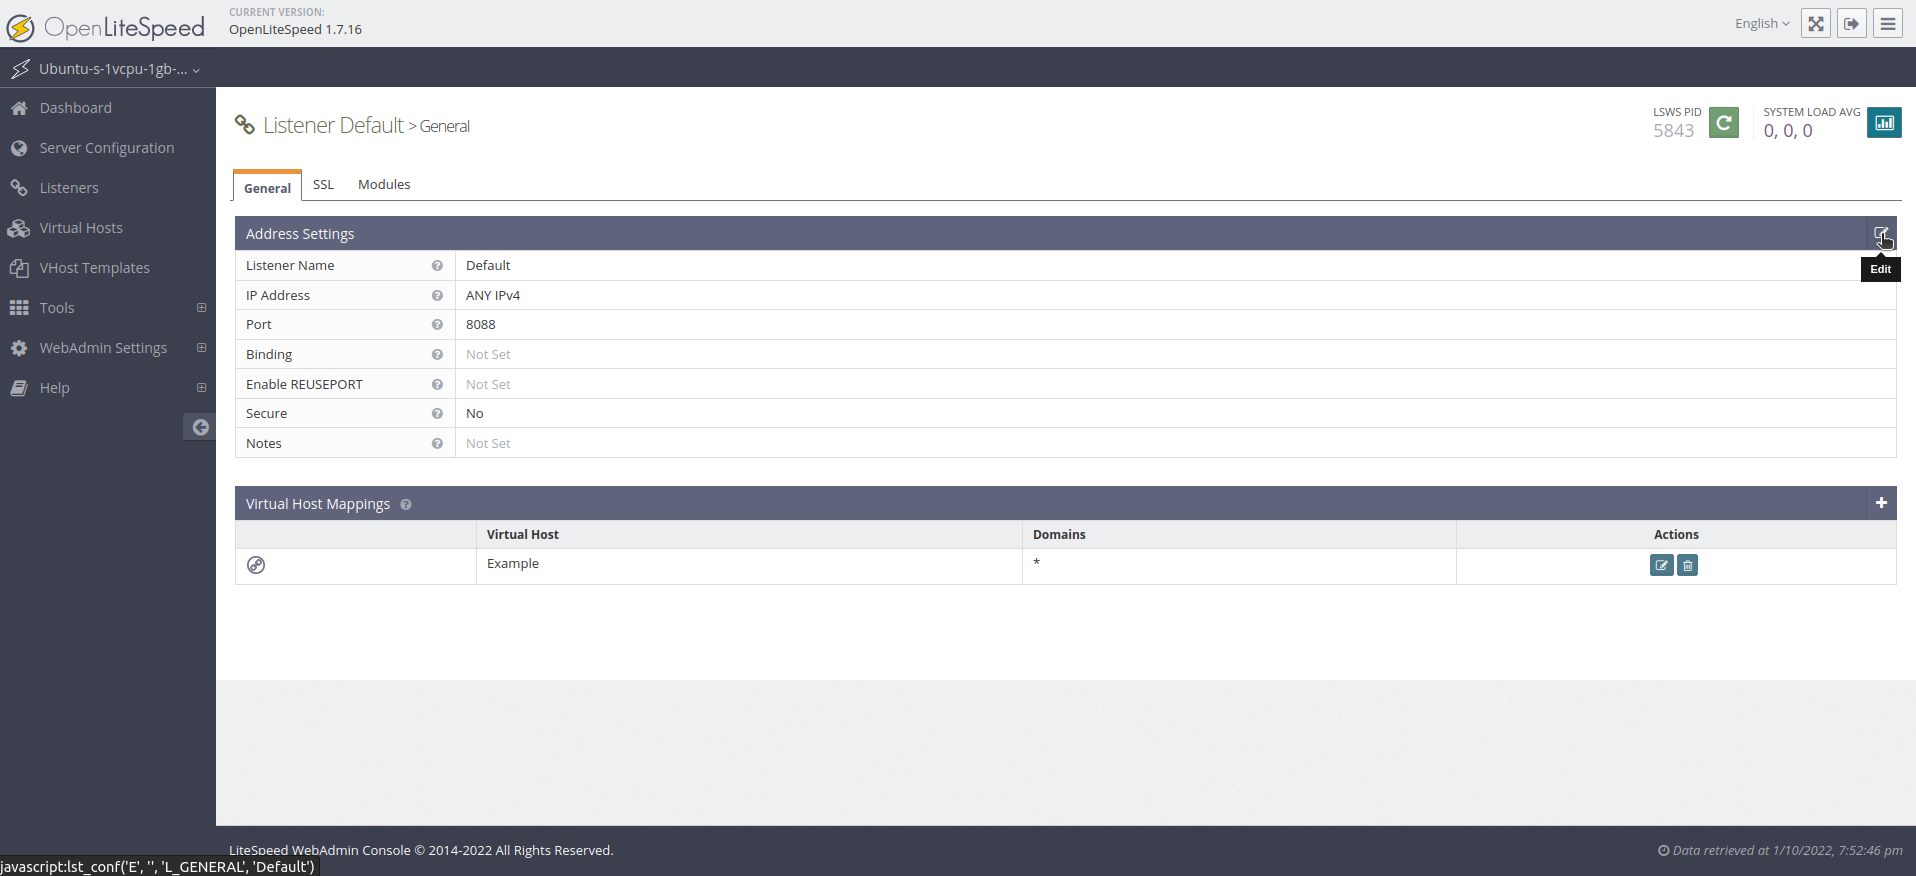
このリストから、デフォルトのリスナーに対して表示ボタンである拡大鏡をクリックしてください。
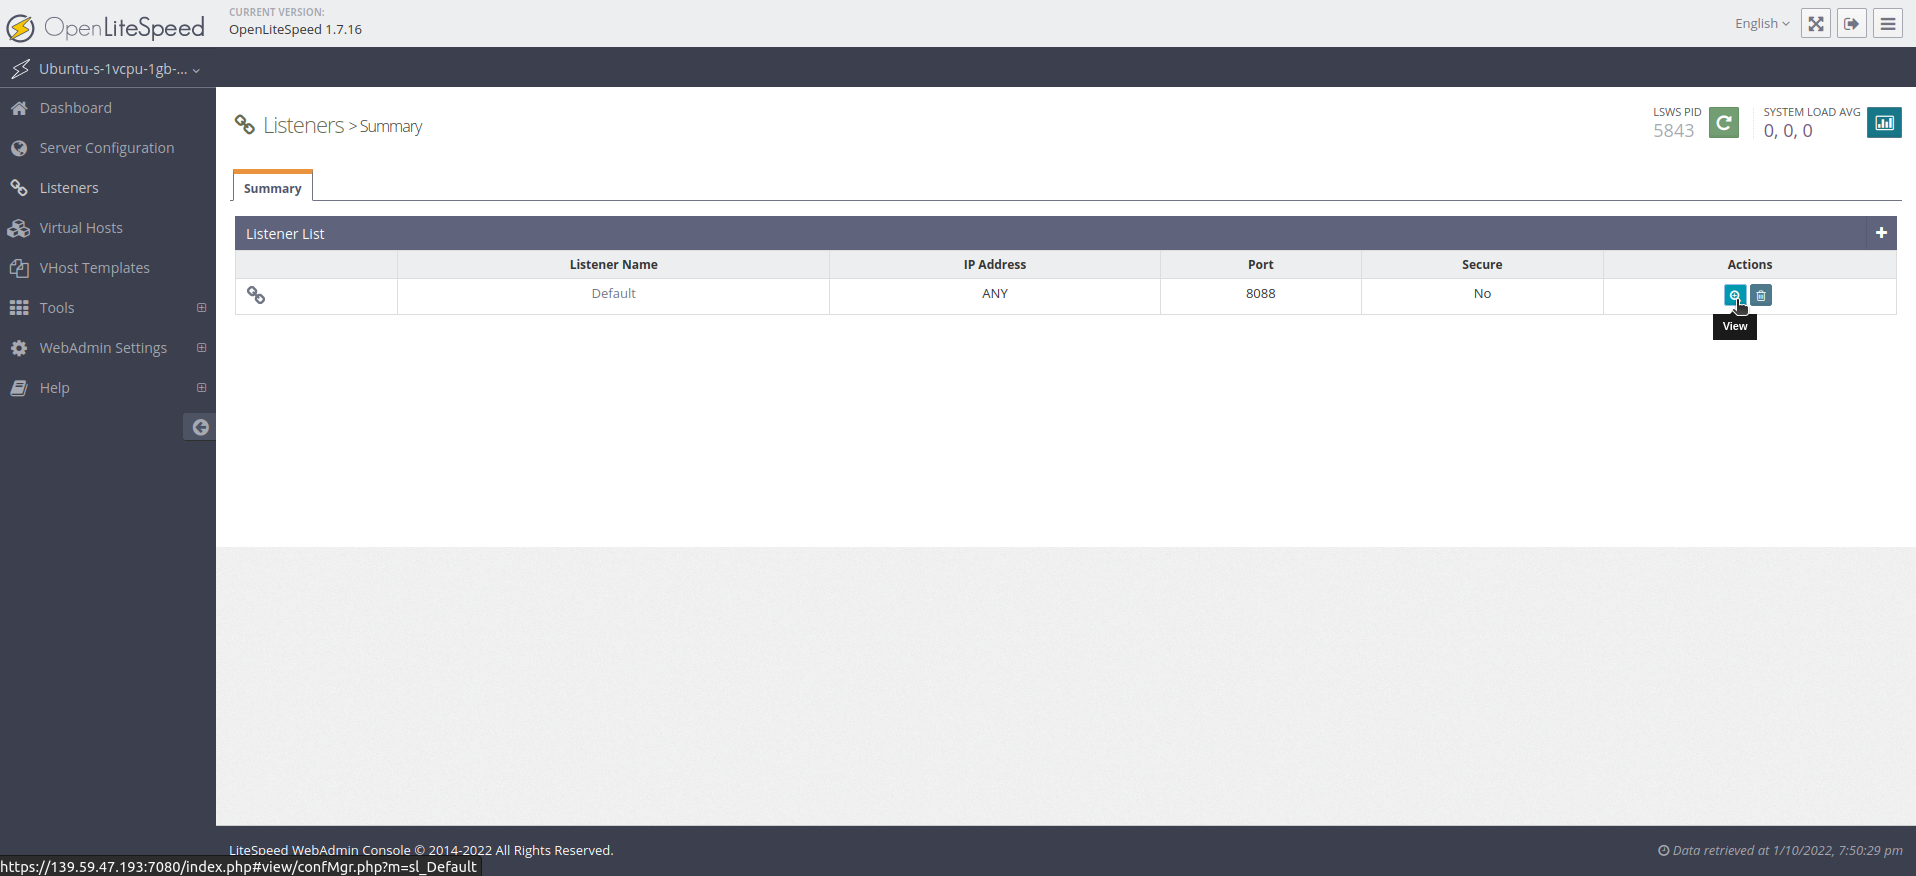
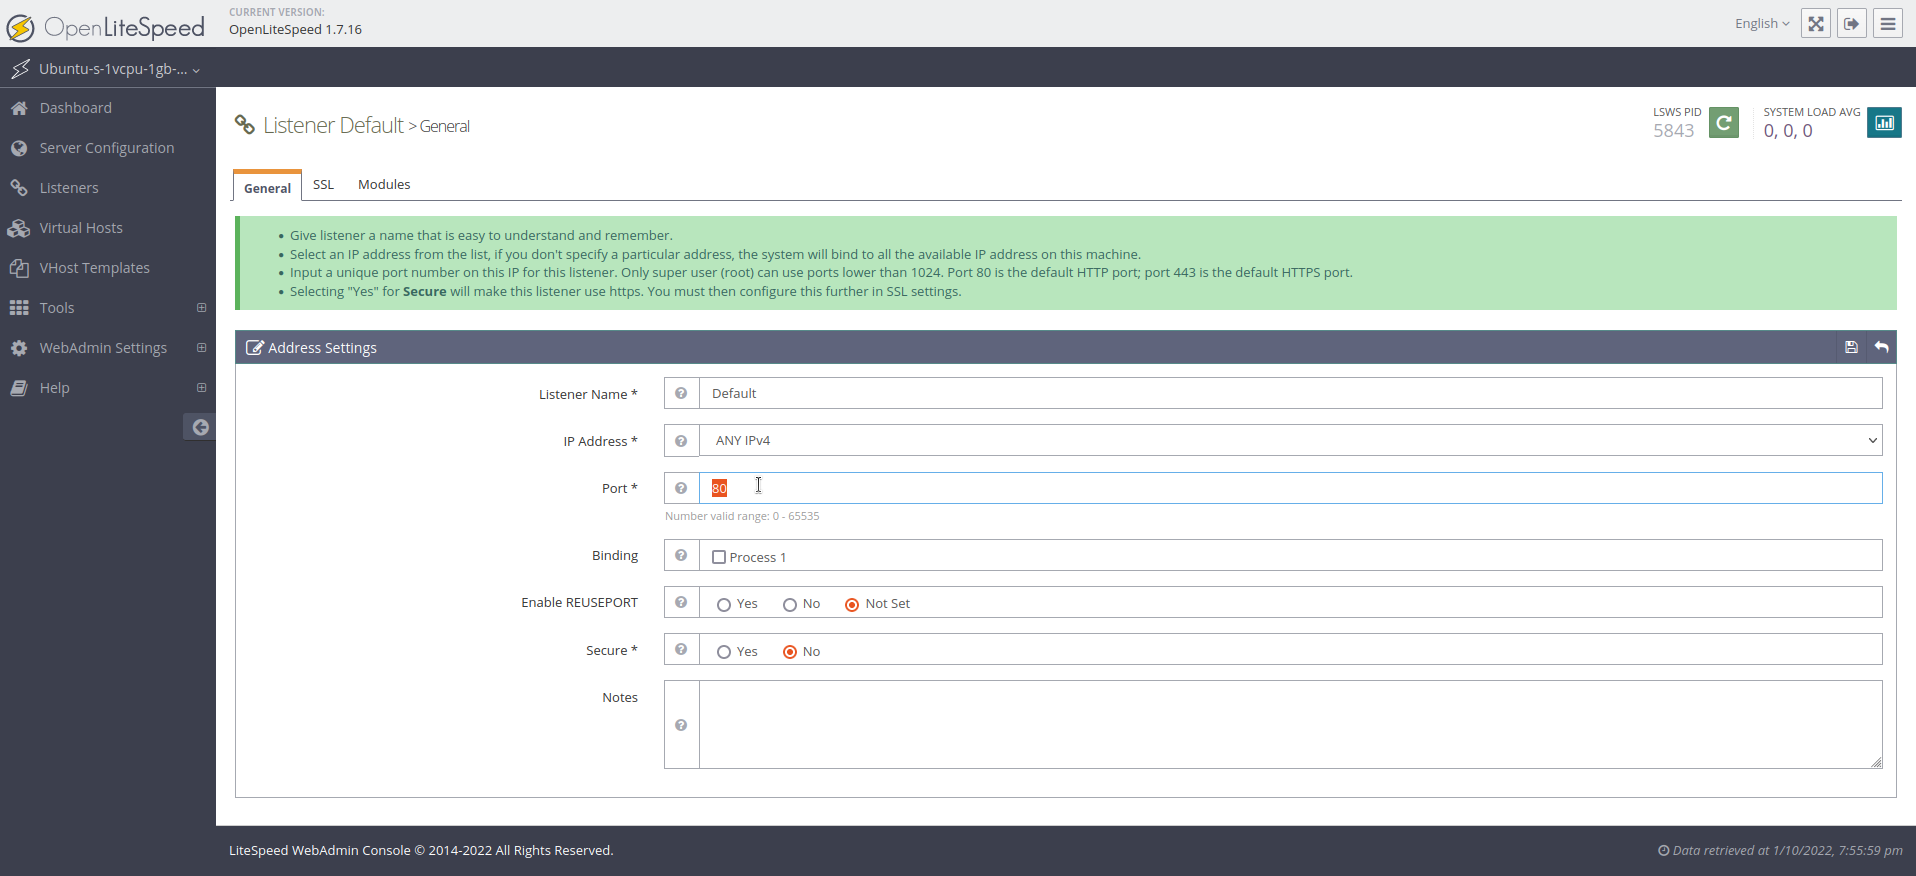
このアクションを実行すると、デフォルトリスナーに関する詳細なページが表示されます。アドレス設定テーブルの右上隅にある編集ボタン(ペンと紙のシンボル)をクリックして、値を変更してください。
このボタンを押すと、新しい画面が開きます。ポート8088をポート80に変更し、保存ボタン(フロッピーディスクのシンボル)をクリックしてください。
修正を保存した後、サーバーを再起動する必要があります。OpenLiteSpeedを再起動する「Graceful Restart」アクションの矢印アイコンをクリックしてください。
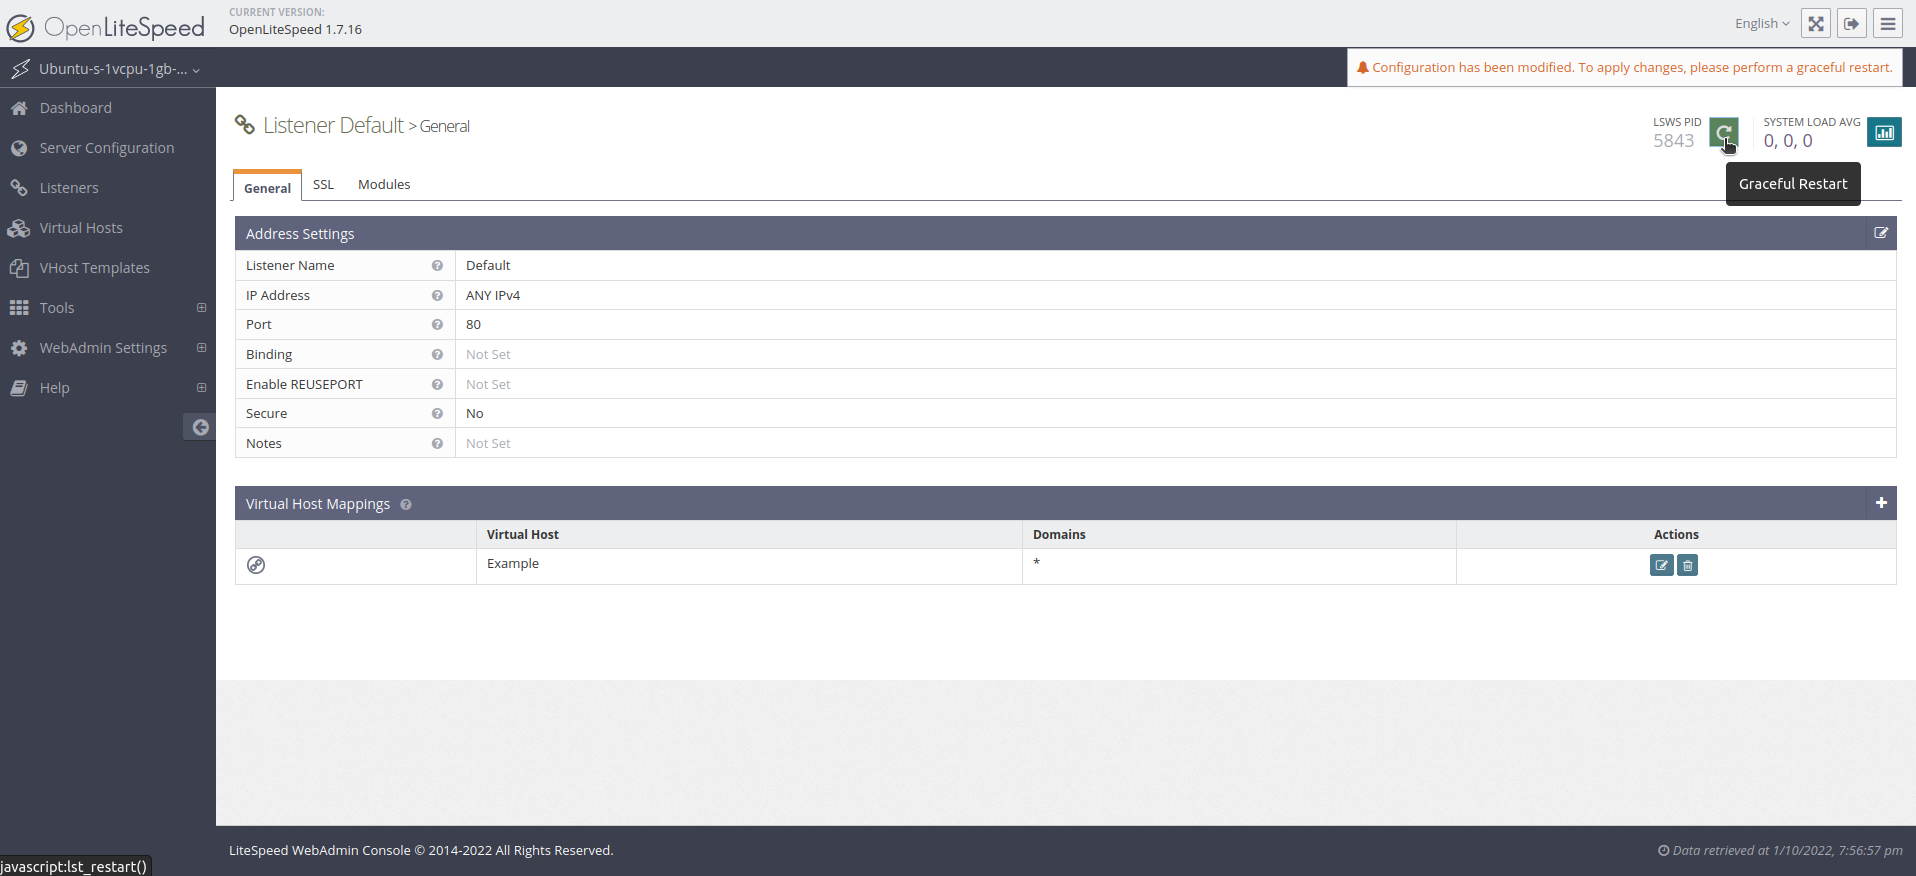
もしLiteSpeedの再起動を求められたら、Goボタンを押してください。
デフォルトのウェブページは、ポート8088ではなくポート80でブラウザからアクセスできるようになりました。ポート番号を指定せずにサーバーのドメイン名またはIPアドレスにアクセスすると、サイトが表示されます。
あなたは今、ウェブサイトで表示したい任意のHTML、CSS、JS、またはその他のファイルを、/usr/local/lsws/Example/htmlというディレクトリに追加することができます。
結論
OpenLiteSpeedは、主に管理者のウェブインターフェースを介して完全な機能を備えたウェブサーバーです。
以下の情報を使用して、インターフェースを設定し続けることができます。
- Everything associated with OpenLiteSpeed will be found under the /usr/local/lsws directory.
- The document root (where your files will be served from) for the default virtual host is located at /usr/local/lsws/Example/html. The configuration and logs for this virtual host can be found under the /usr/local/lsws/Example directory.
- You can create new virtual hosts for different sites using the admin interface. However, all the directories that you reference when setting up your configuration must be created ahead of time. OpenLiteSpeed is not able to create the directories.
- You can set up virtual host templates for virtual hosts that share the same general format.
- You might consider using the default virtual host’s directory structure and configuration as a starting point for new configurations.
- The admin interface has a built-in tooltip help system for almost all fields. There is also a Help menu option in the navigation menu that links to the server documentation. Consult these sources of information during configuration if you need more help.
- To secure your OpenLiteSpeed installation with HTTPS, see the official documentation on SSL Setup.
現時点では、Ubuntu 20.04 サーバー上で OpenLiteSpeed と PHP がインストールされ、実行されています。OpenLiteSpeed は優れたパフォーマンス、ウェブベースの設定インターフェース、およびスクリプト処理のための事前設定オプションを提供しています。

