Spring Data JPA(スプリングデータJPA)
Spring Data JPAは、Spring Dataファミリーの一部です。Spring Dataを使用すると、非関係データベースやマップリデュースフレームワーク、クラウドサービスなどの新しいデータアクセス方法、および高度なリレーショナルデータベースのサポートを使用したSpringのアプリケーションの作成が容易になります。この記事では、Spring Data JPAについて説明します。また、Spring Data JPAのサンプルアプリケーションも紹介します。
スプリングデータJPA
Spring Data JPAが提供するいくつかのクールな機能は次のとおりです:
-
- SpringとJPAで作成されたリポジトリの作成とサポートを行います。
-
- QueryDSLとJPAのクエリのサポートを行います。
-
- ドメインクラスの監査を行います。
-
- バッチローディング、ソート、動的クエリのサポートを行います。
-
- エンティティのXMLマッピングをサポートします。
- CrudRepositoryを使用して、一般的なCRUD操作のコードサイズを削減します。
Spring Data JPAを使用するタイミングはいつですか?
もしもCRUD操作に主に使われるJPAベースのリポジトリ層を迅速に作成する必要があり、抽象的なDAOやインターフェースの実装を作りたくない場合、Spring Data JPAは良い選択肢だと言えると思います。
Spring Data JPAの例
私たちのSpring Data JPAの例では、Postgresqlのデータベースに接続するRESTful webサービスを作成します。基本的なCRUD操作を実装し、既に作成したサンプルデータに取り組む予定です。
春のJAP例のサンプルデータ
以下のクエリを使用して、PostgreSQLデータベースにテーブルを作成し、いくつかのテストデータを追加してください。
create table people (
id serial not null primary key,
first_name varchar(20) not null,
last_name varchar(20) not null,
age integer not null
);

insert into people (id, first_name, last_name, age) values
(1, 'Vlad', 'Boyarskiy', 21),
(2,'Oksi', ' Bahatskaya', 30),
(3,'Vadim', ' Vadimich', 32);
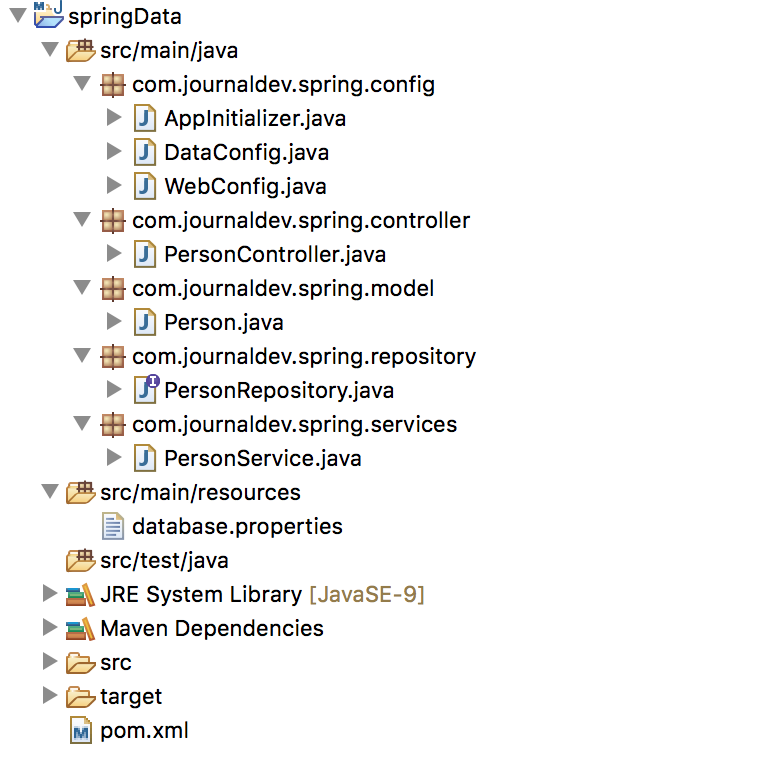
Spring Data JPAのMavenプロジェクトの構造
Spring Data JPAのMaven依存関係
私たちのSpring Data JPAのサンプルプロジェクトには、以下の依存関係を追加する必要があります。
-
- postgresql: ポストグレSQLのJavaドライバー。
-
- spring-core、spring-context: Spring Frameworkのコアの依存関係。
-
- spring-webmvc、jackson-databind: Spring RESTアプリケーション用。
- spring-data-jpa、hibernate-entitymanager: Spring Data JPAとHibernateのサポート用。
以下は最終的なpom.xmlビルドファイルの内容です。
<project xmlns="https://maven.apache.org/POM/4.0.0" xmlns:xsi="https://www.w3.org/2001/XMLSchema-instance"
	xsi:schemaLocation="https://maven.apache.org/POM/4.0.0 https://maven.apache.org/maven-v4_0_0.xsd">
	<modelVersion>4.0.0</modelVersion>
	<groupId>com.scdev</groupId>
	<artifactId>springData</artifactId>
	<packaging>war</packaging>
	<version>1.0-SNAPSHOT</version>
	<name>Spring Data JPA Maven Webapp</name>
	<url>https://maven.apache.org</url>
	<properties>
		<spring.framework>4.3.0.RELEASE</spring.framework>
		<postgres.version>42.1.4</postgres.version>
		<serializer.version>2.8.1</serializer.version>
		<spring.data>1.3.4.RELEASE</spring.data>
		<hibernate.manager>4.2.5.Final</hibernate.manager>
	</properties>
	<dependencies>
		<dependency>
			<groupId>org.springframework</groupId>
			<artifactId>spring-webmvc</artifactId>
			<version>${spring.framework}</version>
		</dependency>
		<dependency>
			<groupId>org.postgresql</groupId>
			<artifactId>postgresql</artifactId>
			<version>${postgres.version}</version>
		</dependency>
		<dependency>
			<groupId>org.springframework</groupId>
			<artifactId>spring-core</artifactId>
			<version>${spring.framework}</version>
		</dependency>
		<dependency>
			<groupId>org.springframework</groupId>
			<artifactId>spring-context</artifactId>
			<version>${spring.framework}</version>
		</dependency>
		<dependency>
			<groupId>junit</groupId>
			<artifactId>junit</artifactId>
			<version>3.8.1</version>
			<scope>test</scope>
		</dependency>
		<dependency>
			<groupId>org.springframework.data</groupId>
			<artifactId>spring-data-jpa</artifactId>
			<version>${spring.data}</version>
		</dependency>

		<dependency>
			<groupId>org.hibernate</groupId>
			<artifactId>hibernate-entitymanager</artifactId>
			<version>${hibernate.manager}</version>
		</dependency>
		<dependency>
			<groupId>javax.servlet</groupId>
			<artifactId>servlet-api</artifactId>
			<version>2.5</version>
			<scope>provided</scope>
		</dependency>
		<dependency>
			<groupId>com.fasterxml.jackson.core</groupId>
			<artifactId>jackson-databind</artifactId>
			<version>${serializer.version}</version>
		</dependency>
	</dependencies>

	<build>
		<finalName>${project.artifactId}</finalName>
	</build>
</project>
春の設定クラス
package com.scdev.spring.config;

import java.util.Properties;

import javax.sql.DataSource;

import org.hibernate.ejb.HibernatePersistence;
import org.springframework.beans.factory.annotation.Autowired;
import org.springframework.context.annotation.Bean;
import org.springframework.context.annotation.Configuration;
import org.springframework.context.annotation.PropertySource;
import org.springframework.core.env.Environment;
import org.springframework.data.jpa.repository.config.EnableJpaRepositories;
import org.springframework.jdbc.datasource.DriverManagerDataSource;
import org.springframework.orm.jpa.JpaTransactionManager;
import org.springframework.orm.jpa.LocalContainerEntityManagerFactoryBean;
import org.springframework.transaction.annotation.EnableTransactionManagement;

@Configuration
@EnableTransactionManagement
@EnableJpaRepositories("com.scdev.spring.repository")
@PropertySource("classpath:database.properties")
public class DataConfig {

	private final String PROPERTY_DRIVER = "driver";
	private final String PROPERTY_URL = "url";
	private final String PROPERTY_USERNAME = "user";
	private final String PROPERTY_PASSWORD = "password";
	private final String PROPERTY_SHOW_SQL = "hibernate.show_sql";
	private final String PROPERTY_DIALECT = "hibernate.dialect";

	@Autowired
	Environment environment;

	@Bean
	LocalContainerEntityManagerFactoryBean entityManagerFactory() {
		LocalContainerEntityManagerFactoryBean lfb = new LocalContainerEntityManagerFactoryBean();
		lfb.setDataSource(dataSource());
		lfb.setPersistenceProviderClass(HibernatePersistence.class);
		lfb.setPackagesToScan("com.scdev.spring.model");
		lfb.setJpaProperties(hibernateProps());
		return lfb;
	}

	@Bean
	DataSource dataSource() {
		DriverManagerDataSource ds = new DriverManagerDataSource();
		ds.setUrl(environment.getProperty(PROPERTY_URL));
		ds.setUsername(environment.getProperty(PROPERTY_USERNAME));
		ds.setPassword(environment.getProperty(PROPERTY_PASSWORD));
		ds.setDriverClassName(environment.getProperty(PROPERTY_DRIVER));
		return ds;
	}

	Properties hibernateProps() {
		Properties properties = new Properties();
		properties.setProperty(PROPERTY_DIALECT, environment.getProperty(PROPERTY_DIALECT));
		properties.setProperty(PROPERTY_SHOW_SQL, environment.getProperty(PROPERTY_SHOW_SQL));
		return properties;
	}

	@Bean
	JpaTransactionManager transactionManager() {
		JpaTransactionManager transactionManager = new JpaTransactionManager();
		transactionManager.setEntityManagerFactory(entityManagerFactory().getObject());
		return transactionManager;
	}
}
- @Configuration: this spring annotation says that it is configuration class.
- @EnableTransactionManagement: this annotation allows users to use transaction management in application.
- @EnableJpaRepositories(“com.scdev.spring.repository”): indicates where the repositories classes are present.
- @PropertySource(“classpath:database.properties”): says that we have property file in our classpath. The values from this file will be injected into environment variable. The contents of the database.properties file are shown below.
driver=org.postgresql.Driver
url=jdbc:postgresql://127.0.0.1:5432/postgres
user=postgres
password=postgreshibernate.dialect=org.hibernate.dialect.PostgreSQL82Dialect
hibernate.show_sql=true - For using Spring Data, first of all we have to configure DataSource bean. Then we need to configure LocalContainerEntityManagerFactoryBean bean. We need this bean to control the entities. In this beans, you must specify the persistence provider i.e. HibernatePersistence in our case.
- The next step is to configure bean for transaction management. In our example it’s JpaTransactionManager. Note that without configuring transaction manager we can’t use @Transactional annotation.
Web.xmlファイルを使用せずに、アプリケーションをウェブアプリケーションとして設定するためのAppInitializerクラスとWebConfigクラスがあります。
モデルクラス
package com.scdev.spring.model;

import javax.persistence.Column;
import javax.persistence.Entity;
import javax.persistence.GeneratedValue;
import javax.persistence.GenerationType;
import javax.persistence.Id;
import javax.persistence.Table;

@Entity
@Table(name = "people")
public class Person {

	@Id
	@GeneratedValue(strategy = GenerationType.IDENTITY)
	private Long id;

	@Column(name = "age")
	private Integer age;
	@Column(name = "first_name")
	private String firstName;
	@Column(name = "last_name")
	private String lastName;

	public Person() {
	}

	public Long getId() {
		return id;
	}

	public void setId(Long id) {
		this.id = id;
	}

	public Integer getAge() {
		return age;
	}

	public void setAge(Integer age) {
		this.age = age;
	}

	public String getFirstName() {
		return firstName;
	}

	public void setFirstName(String firstName) {
		this.firstName = firstName;
	}

	public String getLastName() {
		return lastName;
	}

	public void setLastName(String lastName) {
		this.lastName = lastName;
	}

	@Override
	public String toString() {
		return "Person{" + "id=" + id + ", age=" + age + ", firstName='" + firstName + '\'' + ", lastName='" + lastName
				+ '\'' + '}';
	}
}
ここでは、いくつかの新しい注釈があります。もっと詳しく話しましょう。
- @Entity: This annotation allows entity manager to use this class and puts it in context.
- @Table(name = “people”): associates a class with a table in the database.
- @Id: says that this field is the primary key.
- @GeneratedValue(strategy = GenerationType.IDENTITY): Defines the strategy for generating the primary key.
- @Column(name = “age”): denotes a column in the database with which this field will be associated.
スプリングデータJPAリポジトリ
次のステップはJPAリポジトリを作成することです。
package com.scdev.spring.repository;

import org.springframework.data.repository.CrudRepository;

import com.scdev.spring.model.Person;

import java.util.List;

public interface PersonRepository<P> extends CrudRepository<Person, Long> {
    List<Person> findByFirstName(String firstName);
}
CrudRepositoryを継承することにより、自分で実装する必要なく、多くのメソッドを呼び出すことができます。これらのメソッドのいくつかは以下の通りです。
- save
- findOne
- exists
- findAll
- count
- delete
- deleteAll
私たちは独自のメソッドを定義することもできます。これらのメソッド名は、「find」や「order」といった特別なキーワードを使う必要があります。Spring Data JPAの開発者は、必要なオプションの大半を考慮しています。例えば、findByFirstName(String firstName)メソッドは、テーブルのエントリーの中から、フィールドのfirst_nameがfirstNameに等しいものを全て返します。これはSpring Data JPAの最も重要な機能の一つであり、大量の冗長なコードを減らす効果があります。また、これらのSpringのメソッドは、既に多くのプロジェクトでの使用によって十分にテストされているため、エラーの可能性も少なくなります。
春のサービスクラス
私たちのSpring Data JPAのコードが準備できたので、次のステップはサービスクラスを作成し、データベーステーブルと連携するためのメソッドを定義することです。
package com.scdev.spring.services;

import java.util.List;

import org.springframework.beans.factory.annotation.Autowired;
import org.springframework.stereotype.Service;
import org.springframework.transaction.annotation.Transactional;

import com.scdev.spring.model.Person;
import com.scdev.spring.repository.PersonRepository;

@Service
public class PersonService {

	@Autowired
	PersonRepository<Person> personRepository;

	@Transactional
	public List<Person> getAllPersons() {
		return (List<Person>) personRepository.findAll();
	}

	@Transactional
	public List<Person> findByName(String name) {
		return personRepository.findByFirstName(name);
	}

	@Transactional
	public Person getById(Long id) {
		return personRepository.findOne(id);
	}

	@Transactional
	public void deletePerson(Long personId) {
		personRepository.delete(personId);
	}

	@Transactional
	public boolean addPerson(Person person) {
		return personRepository.save(person) != null;
	}

	@Transactional
	public boolean updatePerson(Person person) {
		return personRepository.save(person) != null;
	}
}
@Transactionalのアノテーションは、そのメソッドがトランザクション内で実行されることを示しています。Springはトランザクション管理を担当します。
スプリングのコントローラークラス
最後のステップは、コントローラークラスを作成して、外部の世界にAPIを公開することです。
package com.scdev.spring.controller;

import java.util.List;

import org.springframework.beans.factory.annotation.Autowired;
import org.springframework.http.HttpStatus;
import org.springframework.web.bind.annotation.PathVariable;
import org.springframework.web.bind.annotation.RequestBody;
import org.springframework.web.bind.annotation.RequestMapping;
import org.springframework.web.bind.annotation.RequestMethod;
import org.springframework.web.bind.annotation.ResponseBody;
import org.springframework.web.bind.annotation.RestController;

import com.scdev.spring.model.Person;
import com.scdev.spring.services.PersonService;

@RestController
public class PersonController {

	@Autowired
	PersonService personService;

	@RequestMapping(value = "/person/{id}", method = RequestMethod.GET)
	public @ResponseBody Person getAllUsers(@PathVariable Long id) {
		return personService.getById(id);
	}

	@RequestMapping(value = "/personByName/{name}", method = RequestMethod.GET)
	public List<Person> getPersoneByName(@PathVariable String name) {
		return personService.findByName(name);
	}

	@RequestMapping(value = "/person", method = RequestMethod.GET)
	public List<Person> getAll() {
		return personService.getAllPersons();
	}

	@RequestMapping(value = "/person/{id}", method = RequestMethod.DELETE)
	public HttpStatus deletePersnone(@PathVariable Long id) {
		personService.deletePerson(id);
		return HttpStatus.NO_CONTENT;
	}

	@RequestMapping(value = "/person", method = RequestMethod.POST)
	public HttpStatus insertPersone(@RequestBody Person person) {
		return personService.addPerson(person) ? HttpStatus.CREATED : HttpStatus.BAD_REQUEST;
	}

	@RequestMapping(value = "/person", method = RequestMethod.PUT)
	public HttpStatus updatePerson(@RequestBody Person person) {
		return personService.updatePerson(person) ? HttpStatus.ACCEPTED : HttpStatus.BAD_REQUEST;
	}
}
Spring Data JPAのテスト
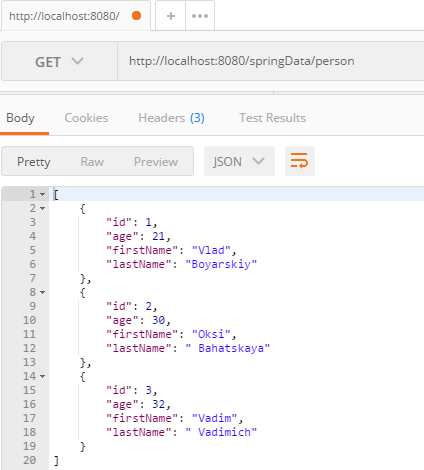
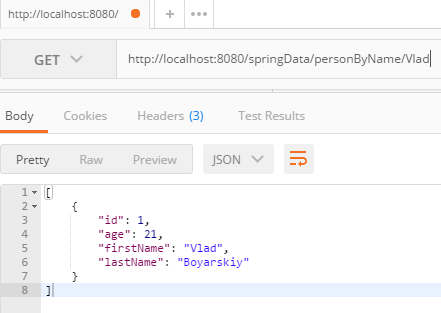
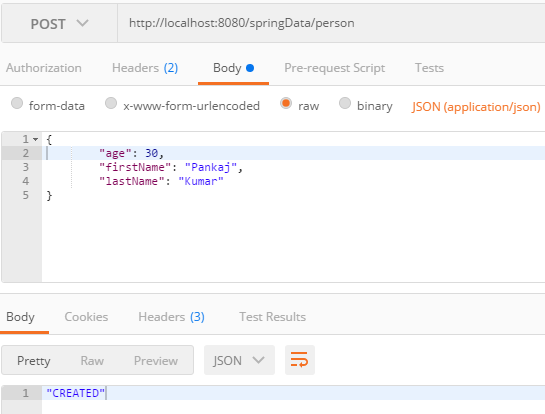
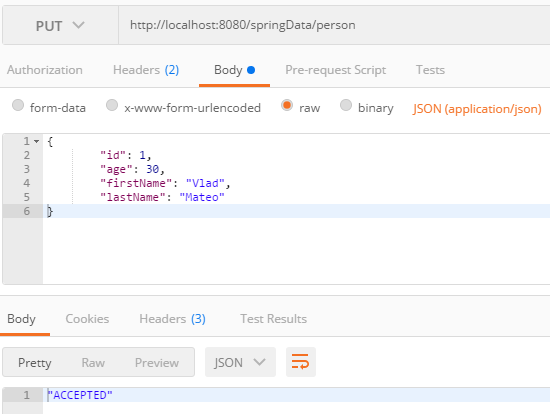
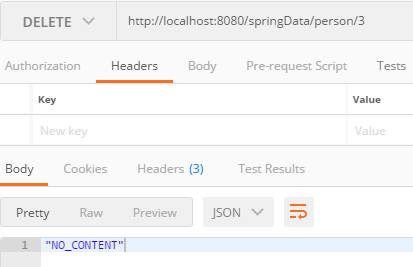
好きなServletコンテナ(例:Tomcat)にプロジェクトをビルドして展開してください。以下の画像は、いくつかのAPI呼び出しに対するレスポンスを示しています。
Spring Data JPAの全てを読み取る。
Spring Data JPAで名前で検索する
Spring Data JPA の作成
Spring Data JPAのアップデート
Spring Data JPAの削除
「Spring Data JPAのサンプルプロジェクトをダウンロードしてください。」
参考: 公式ウェブサイト

