PHP-FPMをNGINXと設定の方法
PHP-FPM(FastCGIプロセスマネージャー)は、高トラフィックのあるサイトに有用ないくつかの追加機能を備えた、PHPのFastCGI実装の代替手法です。NGINXでPHPページを処理する際には、PHP-FPMが優先され、SUPHPやmod_phpのような従来のCGIベースの手法よりも高速です。PHP-FPMを使用する最大の利点は、他のPHP実行方法と比べて、かなり少ないメモリとCPUを使用することです。その主な理由は、PHPをデーモン化し、バックグラウンドプロセスに変換しながら、PHPリクエストを管理するためのCLIスクリプトを提供することです。
PHP-FPM NGINXの設定条件の前提事項
- You can open a SSH session to your Ubuntu 18.04 system using root or a sudo enabled user.
- You have already installed NGINX and PHP in your Ubuntu 18.04 system.
NGINX PHP-FPMの設定手順
- Install PHP-FPM
- Configure PHP-FPM Pool
- Configure NGINX for PHP-FPM
- Test NGINX PHP-FPM Configuration
1. PHP-FPMをインストールする
nginxは、独自のPHPスクリプトを実行する方法を知りません。それはPHP-FPMのようなPHPモジュールが必要で、効率的にPHPスクリプトを管理するために使用されます。一方、PHP-FPMは独自のプロセスを作成してNGINXの環境外で実行されます。したがって、ユーザーがPHPページをリクエストすると、nginxサーバーはFastCGIを使用してリクエストをPHP-FPMサービスに渡します。Ubuntu 18.04でのphp-fpmのインストールは、PHPとそのバージョンに依存します。サーバーにFPMをインストールする前に、インストールされたPHPのドキュメントを確認してください。最新のPHP 7.3が既にインストールされていると仮定すると、以下のapt-getコマンドを使用してFPMをインストールできます。
# apt-get install php7.3-fpm
インストールが完了すると、FPMサービスは自動的に開始されます。次のsystemdコマンドを使用して確認できます。
# systemctl status php7.3-fpm
● php7.3-fpm.service - The PHP 7.3 FastCGI Process Manager
   Loaded: loaded (/lib/systemd/system/php7.3-fpm.service; enabled; vendor preset: enabled)
   Active: active (running) since Sun 2019-02-17 06:29:31 UTC; 30s ago
     Docs: man:php-fpm7.3(8)
 Main PID: 32210 (php-fpm7.3)
   Status: "Processes active: 0, idle: 2, Requests: 0, slow: 0, Traffic: 0req/sec"
    Tasks: 3 (limit: 1152)
   CGroup: /system.slice/php7.3-fpm.service
           ├─32210 php-fpm: master process (/etc/php/7.3/fpm/php-fpm.conf)
           ├─32235 php-fpm: pool www
           └─32236 php-fpm: pool www
2. PHP-FPMプールを設定する
php-fpmサービスは、デフォルトのプールを作成し、その構成(www.conf)は/etc/php/7.3/fpm/pool.dフォルダにあります。デフォルトのプールは要件に応じてカスタマイズすることができます。ただし、各FPMプロセスにリソース割り当てをより良く制御するために、別々のプールを作成するのが一般的な慣行です。さらに、FPMプールを分離すると、独自のマスタープロセスを作成することでそれぞれが独立して実行することが可能になります。つまり、各PHPアプリケーションはPHP-FPMを使用して独自のキャッシュ設定を構成することができます。1つのプールの構成を変更しても、他のFPMプールを開始または停止する必要はありません。このようなプールを効果的に実行するために、別のユーザーを使用してFPMプールを作成しましょう。まず、このプールに独占的な権限を持つ新しいユーザーを作成してください。
# groupadd wordpress_user
# useradd -g wordpress_user wordpress_user
お気に入りのテキストエディタ(例:vi)を使用して、FPMの設定ディレクトリに移動し、設定ファイルを作成してください。
# cd /etc/php/7.3/fpm/pool.d
# vi wordpress_pool.conf
[wordpress_site]
user = wordpress_user
group = wordpress_user
listen = /var/run/php7.2-fpm-wordpress-site.sock
listen.owner = www-data
listen.group = www-data
php_admin_value[disable_functions] = exec,passthru,shell_exec,system
php_admin_flag[allow_url_fopen] = off
; Choose how the process manager will control the number of child processes.
pm = dynamic
pm.max_children = 75
pm.start_servers = 10
pm.min_spare_servers = 5
pm.max_spare_servers = 20
pm.process_idle_timeout = 10s
上記のFPMの設定オプションとその値は以下に記載されています。
- [wordpress_site]: The name of the pool and must be unique across all pool names.
- user and group: The user and group under which the pool will run.
- listen: The name of the socket file for this pool.
- listen.owner and listen.group: Must match to the user and group on which NGINX is running. In our case it is www-data.
- php_admin_value: Allows to set custom php configuration values.
- php_admin_flag: Allows to set PHP boolean flags.
- pm: The process manager settings and the value is Dynamic means the number of child processes are set dynamically based on the following directives.
- pm.max_children: The maximum number of children that can be alive at the same time.
- pm.start_servers: The number of children created on startup.
- pm.min_spare_servers: The minimum number of children in ‘idle’ state (waiting to process). If the number of idle processes is less than this number then some children will be created.
- pm.max_spare_servers: The maximum number of children in idle state (waiting to process). If the number of idle processes is greater than this number then some children will be killed.
- pm.process_idle_timeout: The desired maximum number of idle server processes. Used only when pm value is set to dynamic.
Apart from above settings, it is also possible to pass few system environmental variable to php-fpm service using something like env[‘PHP_FOO’] = $bar. For example, adding the following options in the above configuration file will set the hostname and temporary folder location to the PHP environment.
...
...
env[HOSTNAME] = $HOSTNAME
env[TMP] = /tmp
...
...
また、上記のプール設定ファイルにおけるプロセスマネージャの設定は動的に設定されています。要件に最も適した設定を選んでください。プロセスマネージャの他の設定オプションは次の通りです:- スタティック:一定数のPHPプロセスが維持されます。
- ondemand: No children are created at startup. Children will be forked when new requests are received in the server.
上記の設定ファイルの作成が終わったら、新しい設定を適用するためにfpmサービスを再起動してください。
# systemctl start php7.3-fpm
FPMプールは、PHPページをすぐに提供するために作成されます。上記のFPM設定ファイルを指定して、別々のsystemdサービスを作成することもできます。これにより、他のプールに影響を与えずに、このプールの開始と停止が可能になります。
3. PHP-FPM用にNGINXを設定します。
以上のFPMプールを利用するために、NGINXのサーバーブロックを作成してください。そのために、NGINXの設定ファイルを編集し、phpのlocationブロック内でプールのソケットファイルのパスをfastcgi_passオプションで指定してください。
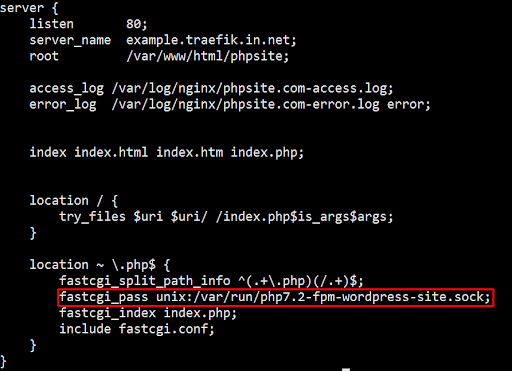
server {
         listen       80;
         server_name  example.scdev.com;
         root         /var/www/html/wordpress;

         access_log /var/log/nginx/example.scdev.com-access.log;
         error_log  /var/log/nginx/example.scdev.com-error.log error;
         index index.html index.htm index.php;

         location / {
                      try_files $uri $uri/ /index.php$is_args$args;
         }

         location ~ \.php$ {
            fastcgi_split_path_info ^(.+\.php)(/.+)$;
            fastcgi_pass unix:/var/run/php7.2-fpm-wordpress-site.sock;
            fastcgi_index index.php;
            include fastcgi.conf;
    }
}
上記の設定が構文的に正しいことを確認し、NGINXを再起動してください。
# nginx-t
# systemctl restart nginx
4. PHP-FPM NGINX設定のテストを行う
上記のNGINXの設定ファイルが新しく作成したFPMプールを使用しているかどうかをテストするために、Webルート内にphp infoファイルを作成してください。上記のNGINXの設定ファイルでは、Webルートとして/var/www/html/wordpressを使用しています。環境に合わせてこの値を調整してください。
# cd /var/www/html/wordpress
# echo "<?php echo phpinfo();?>" > info.php
PHP情報ページの作成が完了したら、お気に入りのウェブブラウザでそれを開いてください。$_SERVER[‘USER’]と$_SERVER[‘HOME’]の値が、以前にFPM設定ファイルで設定したwordpress_userと/home/wordpress_userを指していることが分かります。これにより、NGINXが目的のFPMプールを使用してPHPページを提供していることが確認されます。

要約
この記事では、php-fpmをインストールし、異なるユーザーやアプリケーション用に別々のプールを設定する方法を学びました。また、NGINXサーバーブロックを設定してPHP-FPMサービスに接続する方法も学びました。PHP-FPMは信頼性、セキュリティ、拡張性、速度を提供し、多くのパフォーマンスチューニングオプションも提供しています。デフォルトのPHP-FPMプールを複数のリソースプールに分割することで、サーバーセキュリティを向上させ、サーバーリソースを最適に割り当てることができます!

