C++における二次元配列
はじめに
C++における2次元配列は、多次元配列の最も単純な形態です。これは、配列の配列として視覚化することができます。以下のイメージは、2次元配列を表しています。
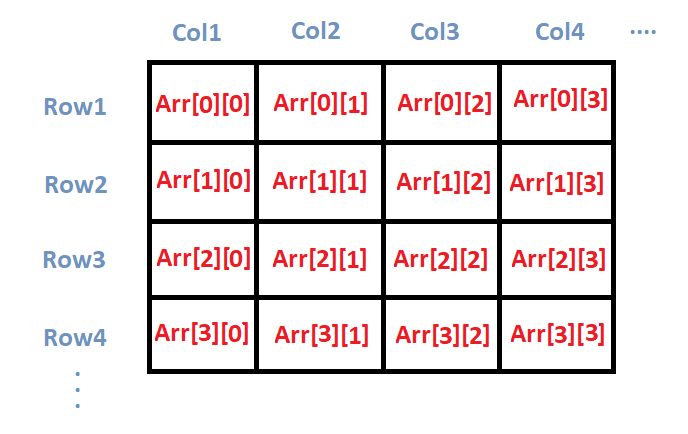
次のセクションでは、2次元配列の初期化方法について説明します。2次元配列は、整数、文字、浮動小数点数など、初期化に応じてどんな型でも使用することができると呼ばれています。
C++において2次元配列を初期化する。
では、C++で二次元配列を初期化する方法はどうすればいいのでしょうか?これほど簡単です:
int arr[4][2] = {
{1234, 56},
{1212, 33},
{1434, 80},
{1312, 78}
} ;
ですので、ご覧の通り、私たちは2次元配列「arr」を初期化します。この配列は4行2列の配列です。配列の各要素は、再び整数の配列です。
以下の方法でも2D配列を初期化することができます。
int arr[4][2] = {1234, 56, 1212, 33, 1434, 80, 1312, 78};
この場合も、arrは4行2列の2次元配列です。
C++において2次元配列を出力する
2次元配列の初期化が完了しましたが、それを実際に印刷せずに正しく行われたかを確認することはできません。
また、多くの場合、ある操作を行った結果の2次元配列を出力する必要があります。では、その方法はどのようになるのでしょうか?
以下のコードは、それを行う方法を示しています。
#include<iostream>
using namespace std;
main( )
{
	int arr[4][2] = {
		{ 10, 11 },
		{ 20, 21 },
		{ 30, 31 },
		{ 40, 41 }
		} ;

	int i,j;

	cout<<"Printing a 2D Array:\n";
	for(i=0;i<4;i++)
	{
		for(j=0;j<2;j++)
		{
			cout<<"\t"<<arr[i][j];
		}
		cout<<endl;
	}
}
出力:
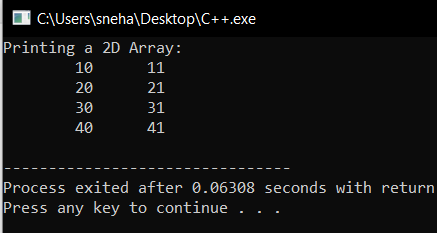
上記のコードにおいて、
- We firstly initialize a 2D array, arr[4][2] with certain values,
- After that, we try to print the respective array using two for loops,
- the outer for loop iterates over the rows, while the inner one iterates over the columns of the 2D array,
- So, for each iteration of the outer loop, i increases and takes us to the next 1D array. Also, the inner loop traverses over the whole 1D array at a time,
- And accordingly, we print the individual element arr[ i ][ j ].
二次元配列の要素をユーザーからの入力として受け取る
前には、事前に定義された値で2次元配列を初期化する方法を見ました。しかし、ユーザーの入力でも作成することができます。どのようにするか見てみましょう。
#include<iostream>
using namespace std;
main( )
{
      int  s[2][2];
      int  i, j;
      cout<<"\n2D Array Input:\n";
	  for(i=0;i<2;i++)
	  {
	  	for(j=0;j<2;j++)
	  	{
	  		cout<<"\ns["<<i<<"]["<<j<<"]=  ";
	  		cin>>s[i][j];
		}
	  }

	  cout<<"\nThe 2-D Array is:\n";
      for(i=0;i<2;i++)
	  {
	  	for(j=0;j<2;j++)
	  	{
	  		cout<<"\t"<<s[i][j];
		}
		cout<<endl;
	  }
}
出力:
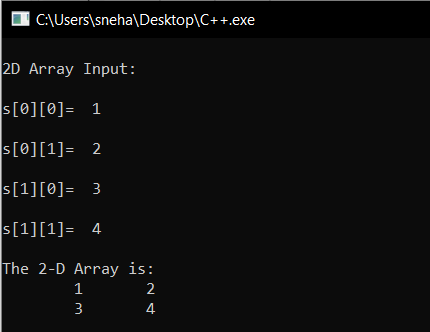
上記のコードでは、2X2の2次元配列sを宣言します。2つの入れ子のforループを使用して、配列の各要素をトラバースしながら対応するユーザーの入力を取得します。この方法で、配列全体が埋められ、結果を確認するために同じ配列を表示します。
C++を使用した二次元配列を使った行列の加算
例として、2D配列を使用して行列の足し算を行い、結果を出力する方法を見てみましょう。
#include<iostream>
using namespace std;
main()
{
      int  m1[5][5], m2[5][5], m3[5][5];
      int  i, j, r, c;

      cout<<"Enter the no.of rows of the matrices to be added(max 5):";
      cin>>r;
      cout<<"Enter the no.of columns of the matrices to be added(max 5):";
      cin>>c;

      cout<<"\n1st Matrix Input:\n";
	  for(i=0;i<r;i++)
	  {
	  	for(j=0;j<c;j++)
	  	{
	  		cout<<"\nmatrix1["<<i<<"]["<<j<<"]=  ";
	  		cin>>m1[i][j];
		}
	  }

	  cout<<"\n2nd Matrix Input:\n";
	  for(i=0;i<r;i++)
	  {
	  	for(j=0;j<c;j++)
	  	{
	  		cout<<"\nmatrix2["<<i<<"]["<<j<<"]=  ";
	  		cin>>m2[i][j];
		}
	  }

	  cout<<"\nAdding Matrices...\n";

	  for(i=0;i<r;i++)
	  {
	  	for(j=0;j<c;j++)
	  	{
	  		m3[i][j]=m1[i][j]+m2[i][j];
		}
	  }

	  cout<<"\nThe resultant Matrix is:\n";

	  for(i=0;i<r;i++)
	  {
	  	for(j=0;j<c;j++)
	  	{
	  		cout<<"\t"<<m3[i][j];
		}
		cout<<endl;
	  }

}
出力:
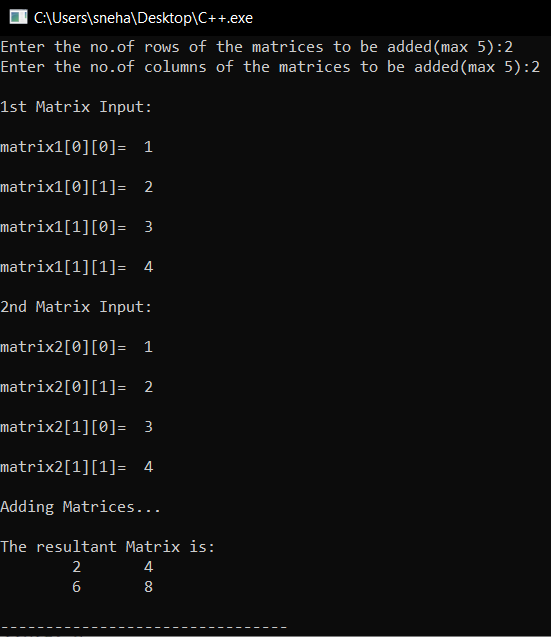
ここで
- We take two matrices m1 and m2 with a maximum of 5 rows and 5 columns. And another matrix m3 in which we are going to store the result,
- As user inputs, we took the number of rows and columns for both the matrices. Since we are performing matrix addition, the number of rows and columns should be the same for both the matrices,
- After that, we take both the matrices as user inputs, again using nested for loops,
- At this point, we have both the matrices m1 and m2,
- then we traverse through the m3 matrix, using two for loops and update the respective elements m3[ i ][ j ] by the value of m1[i][j]+m2[i][j]. In this way, by the end of the outer for loop, we get our desired matrix,
- At last, we print out the resultant matrix m3.
C++における2次元配列へのポインタ
もし整数へのポインターや浮動小数点数へのポインターや文字へのポインターがあれば、配列へのポインターも持てないのでしょうか?確かに持つことができます。以下のプログラムは、それを構築して使用する方法を示しています。
#include<iostream>
using namespace std;
/* Usage of pointer to an array */
main( )
{
      int  s[5][2] = {
           {1, 2},
           {1, 2},
           {1, 2},
           {1, 2}
           } ;

      int (*p)[2] ;
      int  i, j;
      for (i = 0 ; i <= 3 ; i++)
      {
      		p=&s[i];
      		cout<<"Row"<<i<<":";
            for (j = 0; j <= 1; j++)
                cout<<"\t"<<*(*p+j);
            cout<<endl;
      }

}
出力:
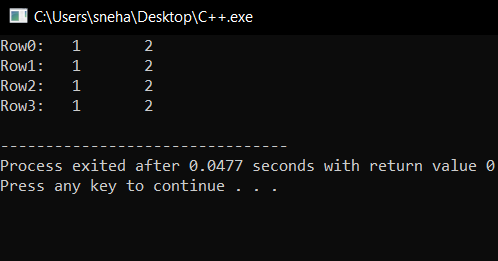
ここでは
- In the above code, we try to print a 2D array using pointers,
- As we earlier did, at first we initialize the 2D array, s[5][2]. And also a pointer (*p)[2], where p is a pointer which stores the address of an array with 2 elements,
- As we already said, we can break down a 2D array as an array of arrays. So in this case, s is actually an array with 5 elements, which further are actually arrays with 2 elements for each row.
- We use a for loop to traverse over these 5 elements of the array, s. For each iteration, we assign p with the address of s[i],
- Further, the inner for loop prints out the individual elements of the array s[i] using the pointer p. Here, (*p + j) gives us the address of the individual element s[i][j], so using *(*p+j) we can access the corresponding value.
2次元配列を関数に渡すということ
このセクションでは、どの関数にも2次元配列を渡してその要素にアクセスする方法を学びます。以下のコードでは、配列aをshow()関数とprint()関数に渡して、渡された2次元配列を出力します。
#include<iostream>
using namespace std;

void show(int (*q)[4], int  row, int  col)
{
	int  i, j ;
	for(i=0;i<row;i++)
	{
		for(j=0;j<col;j++)
    		cout<<"\t"<<*(*(q + i)+j);
		cout<<"\n";
	}
    cout<<"\n";
}

void print(int  q[][4], int row, int col)
{
    int  i, j;
    for(i=0;i<row;i++)
    {
	 for(j=0;j<col;j++)
   	    	cout<<"\t"<<q[i][j];
   	 cout<<"\n";
	}
   cout<<"\n";
}

int main()
{
  int  a[3][4] = { 10, 11, 12, 13, 14, 15, 16, 17, 18, 19, 20, 21} ;

  show (a, 3, 4);
  print (a, 3, 4);
  return 0;
}
出力:
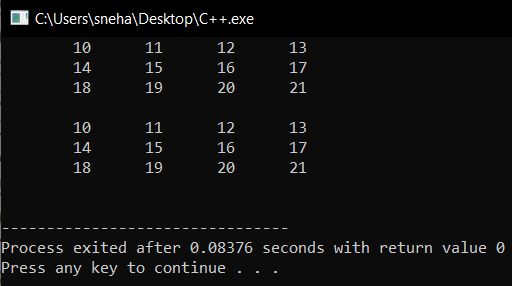
ここで
- In the show( ) function we have defined q to be a pointer to an array of 4 integers through the declaration int (*q)[4],
- q holds the base address of the zeroth 1-D array
- This address is then assigned to q, an int pointer, and then using this pointer all elements of the zeroth 1D array are accessed.
- Next time through the loop when i takes a value 1, the expression q+i fetches the address of the first 1-D array. This is because q is a pointer to the zeroth 1-D array and adding 1 to it would give us the address of the next 1-D array. This address is once again assigned to q and using it all elements of the next 1-D array are accessed
- In the second function print(), the declaration of q looks like this: int q[][4] ,
- This is same as int (*q )[4], where q is a pointer to an array of 4 integers. The only advantage is that we can now use the more familiar expression q[i][j] to access array elements. We could have used the same expression in show() as well but for better understanding of the use of pointers, we use pointers to access each element.
結論は
この記事では、C++における二次元配列について話し合いました。さまざまな操作を行う方法や行列の足し算での応用についても触れました。その他の質問はコメント欄をご利用ください。
【参考文献】
- https://en.wikipedia.org/wiki/Array_data_structure
- /community/tutorials/arrays-in-c

