React Application Component Testing Integrate with Playwright
Testing is essential to ensure that a software product functions as intended. In the past, QA teams would manually conduct numerous end-to-end tests for web applications. However, a significant amount of effort is required from QA teams in terms of preparing testing data, implementing tests, and maintaining them. Additionally, these tests can be unreliable due to the need for integration between various services, third-party dependencies, and databases. These challenges emphasize the importance of component testing for web applications, which is now receiving more attention from software developers and QA engineers. Component testing allows them to test the graphical user interface (GUI) at an early stage and significantly reduces the time and effort required to implement, create, execute, and maintain tests over time.
Playwright, a versatile tool for end-to-end testing and browser interaction, has recently introduced support for component testing. This feature allows developers to write tests for the graphical user interface (GUI) without having to wait for the backend services to be finished or create numerous mock APIs in mock servers for integration. Moreover, Playwright provides capabilities for component testing with popular web frameworks like React, a JavaScript library for creating user interfaces. It is also compatible with major browsers such as Chromium, Firefox, and WebKit-based browsers. Additionally, Playwright offers support for multiple client languages including Java, Python, C#, and Node.js, enabling developers to write tests using their preferred language.
In this guide, you will incorporate Playwright into your React application to perform component testing. You will create a weather app using React and subsequently utilize Playwright to develop and execute component tests to guarantee the accurate functionality of the components.
What is required before starting a specific activity or course.
In order to participate in this tutorial, you will require the following items.
- An Ubuntu 20.04 server with a sudo-enabled, non-root user and at least 2GB of RAM. To get started, follow our Initial Server Setup Guide for Ubuntu 20.04.
- Node.js version 16 or greater set up on your server. To install Node.js, follow Option 2 of our tutorial How To Install Node.js on Ubuntu 20.04 to ensure you are installing the correct version.
- Git installed on the server. Read our tutorial How To Install Git on Ubuntu 20.04 to install Git if it is not already installed.
- Familiarity with front-end development using JavaScript with React.
- Knowledge of end-to-end testing, unit testing, and API testing.
In the first step, we will employ React to launch a Weather application.
You will need to deploy the React-based weather app in this step. The app utilizes OpenWeather’s free version of APIs to retrieve current weather data in any city.
To install the app on your server, initially create a fresh folder to contain the application’s code, and subsequently switch to the recently formed directory. Remember to substitute “Projects” with the directory name of your choice.
mkdir Projects
cd Projects
Afterwards, duplicate the application code from GitHub.
git clone https://github.com/do-community/react-component-testing-demo.git
Afterward, navigate to the react-component-testing-demo folder and utilize the git checkout command to switch to the app branch.
cd react-component-testing-demo
git checkout app
Afterwards, proceed to install the necessary components for the weather application.
npm install
Once the installation is finished, proceed to open your application.
npm run start
The output will be shown on the console.
Compiled successfully! You can now view demo-playwright-component-testing in the browser. Local: http://localhost:3000/demo-playwright-component-testing On Your Network: http://192.168.1.7:3000/demo-playwright-component-testing Note that the development build is not optimized.
Note
Open a new terminal and run the following command:
ssh -L 3000:localhost:3000 your_non_root_user@your_server_ip
Once you are connected to the server, open your local machine’s web browser and navigate to http://localhost:3000/demo-playwright-component-testing. Keep the second terminal open for the duration of this tutorial.
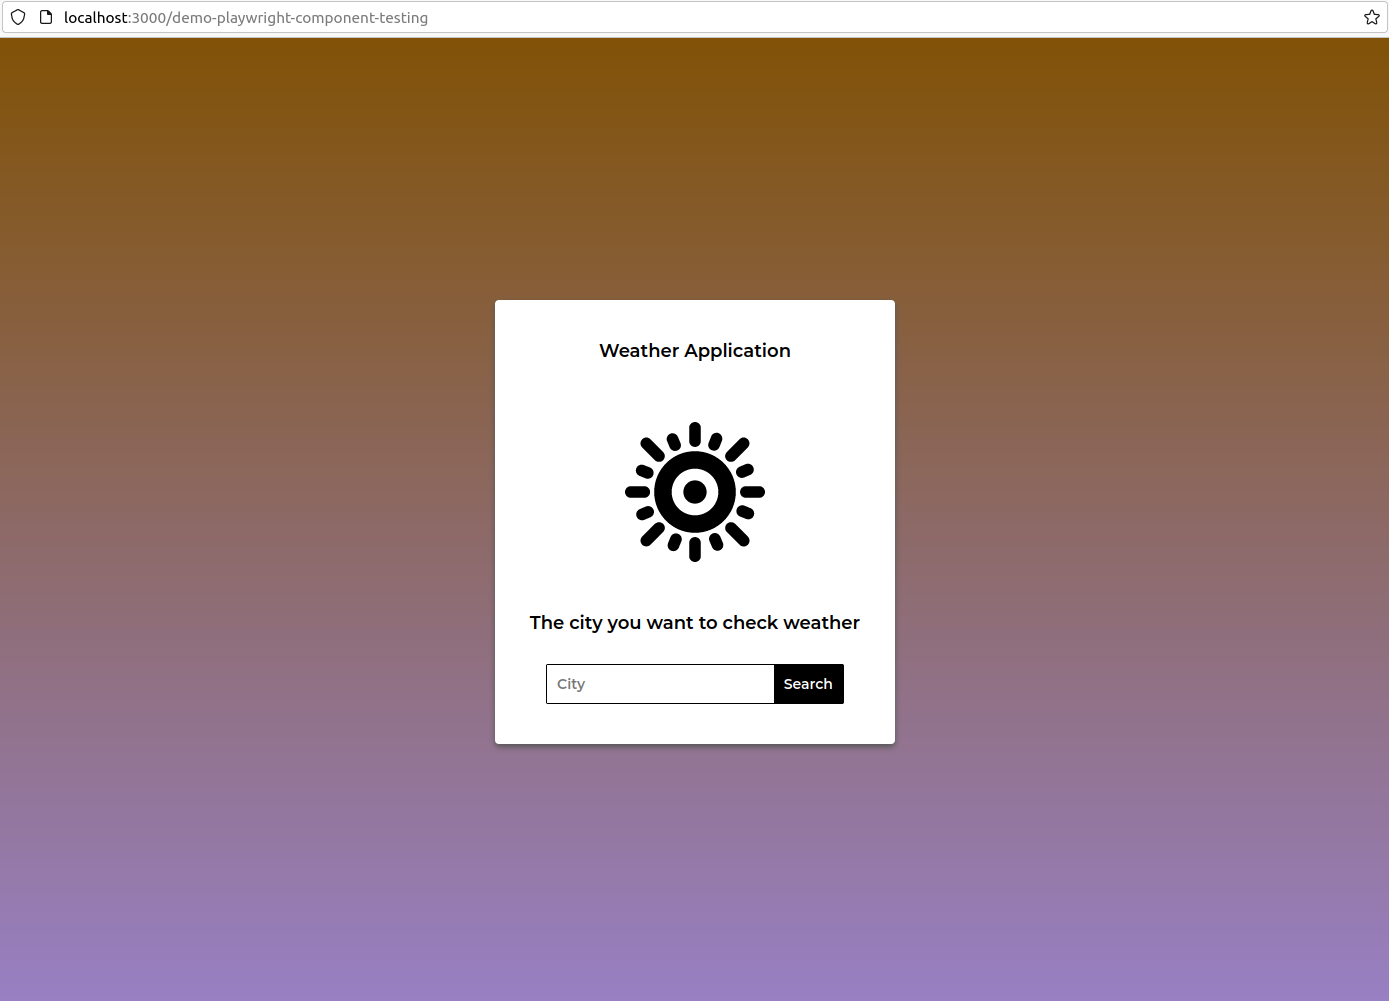
When you launch the application, your browser will automatically open the homepage of the app. On this page, you will see a City search box where you can enter the name of the city for which you wish to check the weather.
Enter “Hanoi” into the search bar, and the application will show you the present weather conditions in Hanoi, Vietnam.
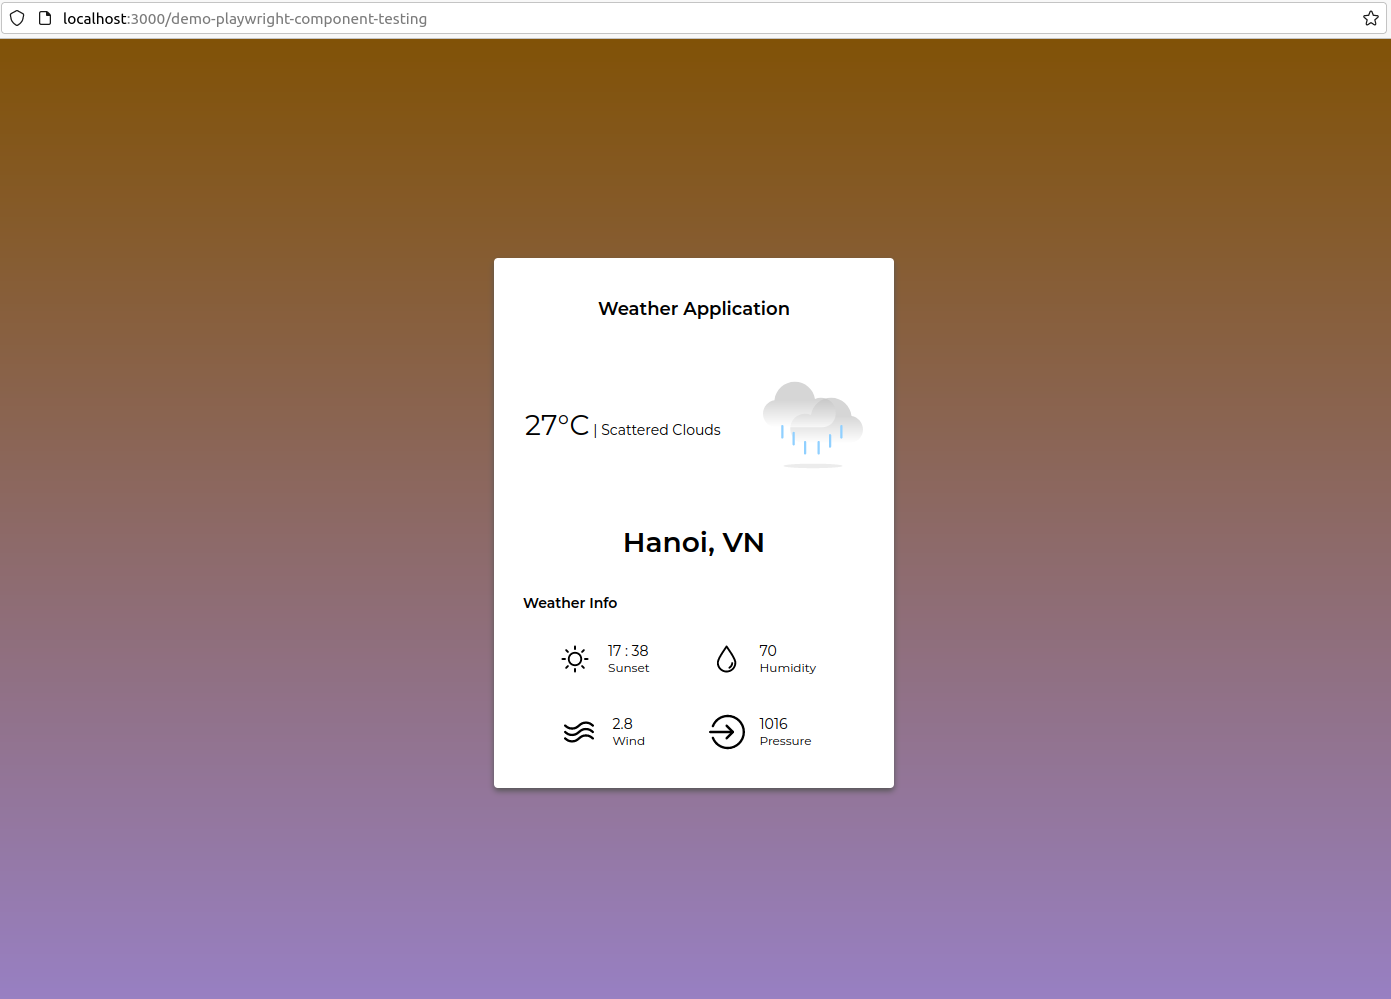
Based on the findings, when the search was conducted, Hanoi, Vietnam experienced a temperature of 27°C and had scattered clouds. The sun set at 17:38, the humidity level was at 70%, the wind speed measured 2.8 meters per second (m/s), and the atmospheric pressure stood at 1,016 hectopascals (hPa).
After the successful deployment of the application, you are required to install the necessary test dependencies.
The next step is to install the dependencies required for testing.
During this step, you will be installing the necessary test dependencies in order to enable component testing with Playwright in Step 3.
Start by executing the given command.
npm init playwright@latest -- --ct
By executing this command, you can start the process of generating code that enables you to develop tests with Playwright. Depending on your preference of TypeScript or JavaScript and whether you are using the React or Vue framework, the automatically generated code will vary.
In your console, you will receive the subsequent output.
Need to install the following packages: create-playwright@1.17.123 Ok to proceed? (y)
To continue, simply press Y and hit Enter. Afterward, you will have the opportunity to select between TypeScript or JavaScript for your project.
Getting started with writing end-to-end tests with Playwright: Initializing project in ‘.’ ? Do you want to use TypeScript or JavaScript? … TypeScript ▸ JavaScript
Opt for JavaScript as it will be utilized for component testing in Step 3. The result will subsequently prompt you to select the framework of your preference.
? Which framework do you use? (experimental) … ▸ react vue svelte
Select react as it is the framework utilized by the weather application. The result will prompt you about the preference to install Playwright browsers.
? Install Playwright browsers (can be done manually via ‘npx playwright install’)? (Y/n) ‣ true
Select option Y to install them automatically and avoid the need for manual installation later on.
Afterwards, you will be prompted to choose whether you wish to install the necessary dependencies for the operating system.
Install Playwright operating system dependencies (requires sudo / root – can be done manually via ‘sudo npx playwright install-deps’)? (y/N) ‣ yes
Select option Y to avoid having to manually install the dependencies. It is important to keep in mind that you will be prompted to enter the user password for the current machine in order to successfully install the required system dependencies.
Now all the required dependencies will be downloaded and three browsers, namely Chromium, Firefox, and WebKit, will be installed. Furthermore, a new folder called playwright will be created, containing the necessary index.html and index.js files to render the components during testing. Additionally, a fresh configuration file named playwright-ct.config.js will be generated for executing component testing. You have the option to modify this configuration file to alter the behavior of the component test, like specifying if it should exclusively run in the Chromium browser.
Note
“scripts”: {
“start”: “react-scripts start”,
“test-ct”: “playwright test -c playwright-ct.config.js”
},
You have completed the process of establishing the required dependencies for component testing. The subsequent step involves creating a test for either of the two weather app components.
In step 3, we will proceed to compose the CityComponent’s test.
There are two parts in the weather app: CityComponent and WeatherInfoComponent. Now, you will create the script for testing the CityComponent. In this script, you will write two tests for the CityComponent. The first one will verify if the city input box allows inputting text. The second test will ensure that the fetchWeather method is executed when the Search button is clicked.
To start, go to the src folder.
cd src
Next, establish the tests directory for stashing your test cases.
mkdir tests
Afterwards, go to the directory that was recently created.
cd tests
Create a new test file named CityComponent.spec.jsx using your preferred code editor in the “tests” directory.
nano CityComponent.spec.jsx
Every test framework includes a specific format for the test files so that the test runner can locate and run them. In the case of Playwright, the framework will search for files with the *.spec.* extension and recognize them as test files.
The .jsx file extension is a combination of JavaScript XML. It permits the inclusion of HTML tags within a JavaScript file. By incorporating the CityComponent tag, you can mount the CityComponent into your test.
Now, it’s time to start constructing the CityComponent.spec.jsx file that you have recently created. Include the subsequent code in your file:
import { test, expect } from '@playwright/experimental-ct-react';
import { CityComponent } from '../modules/CityComponent';
You are using the @playwright/experimental-ct-react library to import the test and expect methods to perform component testing in Playwright. Additionally, you import the CityComponent to mount it in your test at a later stage.
By using the second import command, you are including the file CityComponent into the src/modules directory. This particular file contains the necessary code for the search page. This page enables users to provide a city name and then retrieve the weather information for that city.
Afterward, incorporate the subsequent code into your CityComponent.spec.jsx file.
One possible paraphrase could be:
– “The specification file for CityComponent, located at src/tests/CityComponent.spec.jsx.”
...

const cityLocator = '[placeholder="City"]'
const searchButtonLocator = '[type="submit"]'

const cityName = 'Hanoi'
To interact with a specific UI element in Playwright, you must have the corresponding UI locator. In this case, two constant variables called cityLocator and searchButtonLocator are defined. The constant keyword indicates that these variables cannot be altered once their initial values have been assigned. The CSS locators [placeholder=”City”] and [type=”submit”] specifically identify the text input and search button within the CityComponent.
In the third line of code, a new variable called cityName is being created to store the name of the city you wish to search for. In this instance, the city you are searching for is Hanoi.
Afterwards, you will include the initial test code block in your CityComponent.spec.jsx file, which will verify if the cityField is capable of accepting text inputs. Append the provided code to your file.
– CityComponent.spec.jsx file located in the src/tests directory.
...

test('cityField accepts text input', async ({ mount }) => {
    const cityComponent = await mount(<CityComponent /> );
    const cityField = cityComponent.locator(cityLocator)

    await cityField.fill(cityName)

    await expect(cityField).toHaveValue(cityName)
});
Within the code block for testing, you are including the mount method as an argument in the async function. This mount method is acquired from the experimental-ct-react package that you installed through npm init playwright@latest — –ct during Step 2. With the help of the mount method, you can attach your React component to the application, enabling you to perform the desired test on the attached component.
By including the async keyword in the test block test(‘cityField accepts text input’, async ({ mount }) => { ..}), you are instructing Playwright to execute this test asynchronously. By using the asynchronous method, you no longer have to wait for each line of code to execute in a sequential manner; instead, the code runs concurrently. This will enhance the efficiency of your test, enabling it to run at a quicker pace.
Afterwards, you define the cityComponent by including the CityComponent tag in the mount method. As the React framework operates asynchronously, it is essential to precede the mounting of CityComponent with the await keyword. By utilizing the await keyword, Playwright will pause until the CityComponent has completed executing its code before assigning the resulting value to the cityComponent variable.
Afterwards, you can locate the cityField by utilizing the cityLocator variable that you have set up.
At last, the cityName value is assigned to the cityField and then verified if it matches the value of cityName. By employing the await keyword in this step, it guarantees that the cityField is populated with the cityName value prior to validating its equivalence.
Now, you need to include your second test code block into your CityComponent.spec.jsx file. This block will verify if the Search button triggers the fetchWeather method. Simply include the given code in your file.
...

test('Click on `Search` button executes fetchWeather prop', async ({ mount }) => {
    let isCalled = false
    const cityComponent = await mount(
        <CityComponent
        fetchWeather={() => isCalled = true}
        />
    );

    await cityComponent.locator(cityLocator).fill(cityName)
    await cityComponent.locator(searchButtonLocator).click()

    expect(isCalled).toBeTruthy()
});
In this second test block, similar to the first test block, you include the mount method as a parameter in the async function. By appending the async keyword to the test block test(‘Click on Search button executes fetchWeather prop’, async ({ mount }), you are instructing Playwright to execute this test in an asynchronous manner.
First, within the test function, a new variable called isCalled is created to determine if the fetchWeather method was called later on. The use of the let keyword allows for defining and modifying the variable’s value, in contrast to the const keyword that restricts modification of the variable value.
Natively paraphrased version: Next, you create the cityComponent and link it with the mount method to incorporate the real CityComponent. Within the CityComponent tag, you include the fetchWeather={() => isCalled = true} line. This implies that whenever the fetchWeather method is invoked, the value of isCalled will be set to true.
Afterwards, you enter the cityName in the city text input and proceed to simulate the user’s action of clicking on the Search button on the UI page by utilizing the click method.
In the end, you verify the status of the isCalled variable by using the toBeTruthy method.
At this stage, your file will consist of the subsequent code.
Here is one option for paraphrasing the given text natively:
– CityComponent.spec.jsx file located in the src/tests directory.
import { test, expect } from '@playwright/experimental-ct-react';
import { CityComponent } from '../modules/CityComponent';

const cityLocator = '[placeholder="City"]'
const searchButtonLocator = '[type="submit"]'

const cityName = 'Hanoi'

test('cityField accepts text input', async ({ mount }) => {
    const cityComponent = await mount(<CityComponent /> );
    const cityField = cityComponent.locator(cityLocator)

    await cityField.fill(cityName)

    await expect(cityField).toHaveValue(cityName)
});

test('Click on `Search` button executes fetchWeather prop', async ({ mount }) => {
    let isCalled = false
    const cityComponent = await mount(
        <CityComponent
        fetchWeather={() => isCalled = true}
        />
    );

    await cityComponent.locator(cityLocator).fill(cityName)
    await cityComponent.locator(searchButtonLocator).click()

    expect(isCalled).toBeTruthy()
});
Please save and close your file. In case you are using nano, save and exit can be achieved by pressing CTRL+X.
Now, you have finished writing the script for the component test of the CityComponent. It consists of two test blocks: one to verify if the city input box accepts Hanoi as an input and another to test if the Search button triggers the fetchWeather method after being clicked. Next, you will proceed to write the component test for the second component of the weather app, WeatherInfoComponent.
In the fourth step, we proceed with creating the component test for the WeatherInfoComponent.
For this next step, you will create the test for WeatherInfoComponent, which is the second component of the weather app you are currently testing. This test verifies if the weatherComponent displays the text Hanoi correctly after receiving Hanoi as the input for weatherInfo.
To begin with, generate and access a fresh test file called WeatherInfoComponent.spec.jsx within the tests directory.
nano WeatherInfoComponent.spec.jsx
Include the provided content into the WeatherInfoComponent.spec.jsx file.
“WeatherInfoComponent.spec.jsx located in the src/tests directory.”
import { test, expect } from '@playwright/experimental-ct-react';
import { WeatherComponent } from '../modules/WeatherInfoComponent';
You are bringing in the test and expect functions from the @playwright/experimental-ct-react library, enabling you to execute component tests using Playwright.
After that, you incorporate the WeatherComponent into your test by importing the WeatherInfoComponent. The WeatherInfoComponent file fills the result page, where the weather information of the city entered by users is displayed. This file is placed within the src/modules directory.
Afterwards, incorporate the subsequent code block into your test file WeatherInfoComponent.spec.jsx.
...

test('WeatherInfo accepts name and value', async ({ mount }) => {
    const weatherInfo = {"coord":{"lon":105.8412,"lat":21.0245},"weather":[{"id":800,"main":"Clear","description":"clear sky","icon":"01n"}],"base":"stations","main":{"temp":302.15,"feels_like":301.35,"temp_min":302.15,"temp_max":302.15,"pressure":1003,"humidity":35,"sea_level":1003,"grnd_level":1002},"visibility":10000,"wind":{"speed":2.71,"deg":73,"gust":3.29},"clouds":{"all":0},"dt":1673694125,"sys":{"type":1,"id":9308,"country":"VN","sunrise":1673652961,"sunset":1673692464},"timezone":25200,"id":1581130,"name":"Hanoi","cod":200}
    const weatherComponent = await mount(<WeatherComponent
    weather={(weatherInfo)}
    /> );
    await expect(weatherComponent).toContainText('Hanoi')
});
In this scenario, you create a constant variable called weatherInfo. Being constant means that you cannot alter its value once it is assigned an initial value. Here, weatherInfo holds the JSON-formatted weather data for Hanoi.
Next, you create a constant called weatherComponent which obtains its value from WeatherComponent.
As the React framework executes code in an asynchronous manner, it is necessary to employ the “await” keyword when mounting the WeatherComponent. This instructs your code to pause until React successfully finishes building the WeatherComponent, after which it can be mounted.
In the end, when you await expect(weatherComponent).toContainText(‘Hanoi’), you are verifying if the weatherComponent variable includes the text Hanoi. Including await is necessary here because Playwright operates tasks concurrently as well. By using await, you ensure that the weatherComponent variable obtains the value from WeatherComponent before confirming if it contains the text Hanoi.
The WeatherInfoComponent.spec.jsx file will include these lines of code.
import { test, expect } from '@playwright/experimental-ct-react';
import { WeatherComponent } from '../modules/WeatherInfoComponent';


test('WeatherInfo accepts name and value', async ({ mount }) => {
    const weatherInfo = {"coord":{"lon":105.8412,"lat":21.0245},"weather":[{"id":800,"main":"Clear","description":"clear sky","icon":"01n"}],"base":"stations","main":{"temp":302.15,"feels_like":301.35,"temp_min":302.15,"temp_max":302.15,"pressure":1003,"humidity":35,"sea_level":1003,"grnd_level":1002},"visibility":10000,"wind":{"speed":2.71,"deg":73,"gust":3.29},"clouds":{"all":0},"dt":1673694125,"sys":{"type":1,"id":9308,"country":"VN","sunrise":1673652961,"sunset":1673692464},"timezone":25200,"id":1581130,"name":"Hanoi","cod":200}
    const weatherComponent = await mount(<WeatherComponent
    weather={(weatherInfo)}
    /> );
    await expect(weatherComponent).toContainText('Hanoi')
});
To save and close your file, use the keyboard shortcut CTRL+X.
Once you have completed writing the test for WeatherInfoComponent, proceed by checking the CityComponent and WeatherInfoComponent tests on all three installed browsers.
Step 5 involves executing the Component Tests.
In this stage, you will execute the CityComponent and WeatherInfoComponent evaluations on all three browsers that are currently installed—Chromium, Firefox, and WebKit. This is done to verify the seamless functionality of both components on these browsers.
To begin, go to the main directory of the project:
cd ../..
Once you run the command, you will find yourself in the react-component-testing-demo folder. Next, execute the tests by running the given command.
npm run test-ct
The playwright will execute the two test files on each of the three browsers – Chromium, Firefox, and WebKit. The outcomes will be comparable to the subsequent output:
Running 9 tests using 2 workers

vite v3.2.5 building for production...
✓ 89 modules transformed.
playwright/.cache/playwright/index.html      0.32 KiB
playwright/.cache/assets/index.2b5442e2.js   313.68 KiB / gzip: 81.07 KiB

  9 passed (12s)

To open last HTML report run:

  npx playwright show-report
To display the report in a graphical user interface (GUI) format, execute the given command.
npx playwright show-report
Note
To access the test report on your local machine, open a new terminal and enter the following command:
ssh -L 9223:localhost:9223 your_non_root_user@your_server_ip
The summary of the test report will be shown on your web browser.
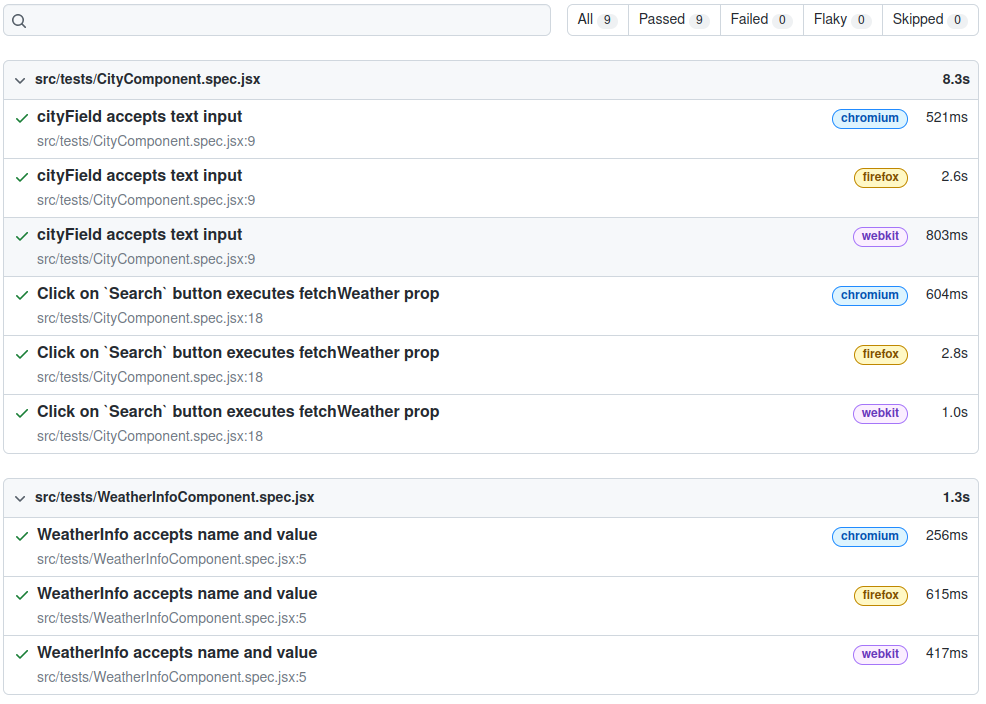
The test report is divided into three separate tests: Firstly, the cityField allows text input. Secondly, when the Search button is clicked, it triggers the execution of the fetchWeather function. Lastly, the WeatherInfo component accepts a name and value, and each test shows the total time taken to run as well as the individual durations for each browser’s test.
By selecting each test, such as cityField, which accepts text input, you will receive the time details and code lines for each step in the test.
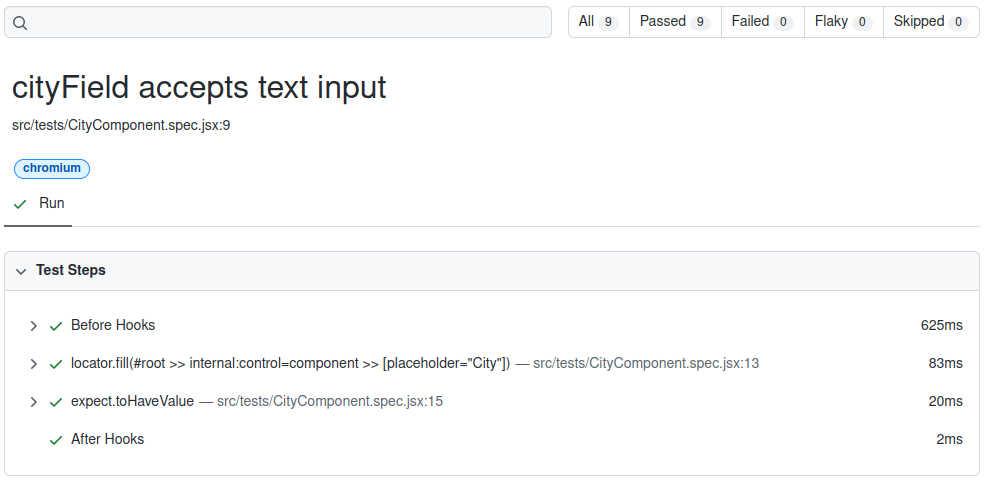
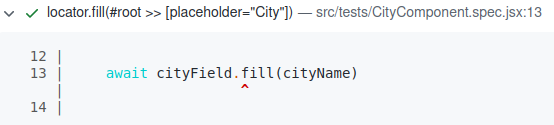
The findings show that the CityComponent test, which verifies the ability of the City input box to accept text as input, passed on Chromium. The test execution steps in the details section will include default steps for Before Hooks and After Hooks. Typically, the Before Hooks section is utilized for initial setup, like logging into the console or accessing test data. On the other hand, the After Hooks section usually takes care of cleaning test data in the test environment after the execution of the test.
In the test implementation, the locator.fill() line demonstrates the method of locating the element. Specifically, the element is located by employing the CSS selector with the attribute value [placeholder=”City”].
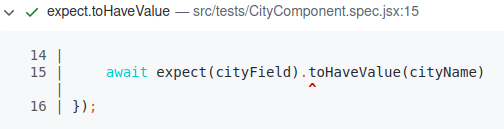
The expect.toHaveValue line demonstrates the expected assertion of the test. In this particular test, it is expected that the cityField will contain the value cityName.
Please note that the paraphrased option below is optimized for naturalness and clarity rather than preserving the exact structure of the original sentence.
You have successfully completed the implementation and execution of the CityComponent and WeatherInfoComponent tests for your weather application. Additionally, you have thoroughly examined the test report to confirm the compatibility of these two components with Chromium, Firefox, and WebKit. You can access the complete source code for both the application and the tests on the main branch of the GitHub repository.
In summary
You have successfully utilized Playwright for implementing component testing on a weather app developed with React. To begin, you installed the essential testing dependencies for the CityComponent and WeatherInfoComponent of the weather app. Subsequently, you created and executed the component tests for these two components. Lastly, you examined the test report presented in a graphical user interface format to confirm the desired functionality of the components.
For more information about component testing and the various features it supports, you can explore the Playwright documentation.
more other tutorials
Installation of Arch Linux(Opens in a new browser tab)
one-click installation feature of Ruby on Rails on Silicon Cloud.(Opens in a new browser tab)
QR code generator in Java using zxing.(Opens in a new browser tab)
Java thread ensuring Java code is thread-safe(Opens in a new browser tab)

