A guide on creating a Ruby on Rails application on Ubuntu 22.04.
In the beginning
Rails is a Ruby-based framework for web applications that follows a specific approach to development. It assumes that by establishing conventions, developers can work more efficiently towards a shared objective. In this context, Rails provides guidelines for managing routing, stateful data, asset handling, and other essential functionalities required by most web applications.
Rails adheres to the model-view-controller (MVC) architectural design, which effectively segregates the application’s logic in models from the routing and presentation of application data. Through this arrangement, coupled with other practices that facilitate code extraction into helpers and partials, Rails ensures that application code is not needlessly duplicated.
You will construct a Rails app in this tutorial that allows users to share details about sharks and their actions. This endeavor will initiate an upcoming development of applications.
What is required before taking this course?
In order to proceed with this tutorial, you will require the following:
- A local machine or development server running Ubuntu 22.04. Your development machine should have a non-root user with administrative privileges and a firewall configured with ufw. For instructions on how to set this up, read our Initial Server Setup with Ubuntu 22.04 tutorial.
- Node.js and npm installed on your local machine or development server. This tutorial uses Node.js version 18.13.0 and npm version 8.19.3. For guidance on installing Node.js and npm on Ubuntu 22.04, follow the instructions in the Option 2 —Installing Using a PPA section of How To Install Node.js on Ubuntu 22.04.
- Ruby, rbenv, and Rails installed on your local machine or development server, following Steps 1-4 in How To Install Ruby on Rails with rbenv on Ubuntu 22.04. This tutorial uses Ruby 3.2.0, rbenv 1.2.0-52, and Rails 7.0.4.
Once you have successfully installed Node.js, Ruby, rbenv, and Rails, you are all set to proceed with installing a database for your application.
First, you need to install SQLite3.
In order to create the Rails shark application, it is necessary to have a database where user data can be stored. By default, Rails is set up to use SQLite, which is usually a suitable option during the development phase. Considering that the application data does not require advanced programmatic customization, SQLite will fulfill the requirements of the application efficiently.
To begin, within your terminal, refresh your package index by updating.
- sudo apt update
Afterwards, proceed to installing the packages sqlite3 and libsqlite3-dev.
- sudo apt install sqlite3 libsqlite3-dev
This will install SQLite along with the necessary development files.
To ensure successful installation, you can verify the version.
- sqlite3 –version
3.37.2 2022-01-06 13:25:41 872ba256cbf61d9290b571c0e6d82a20c224ca3ad82971edc46b29818d5dalt1
After successfully installing SQLite, you’re all set to start developing your application.
Step 2 involves the creation of a fresh Rails project.
Once the database is installed, you can utilize the rails new command to create a new Rails project and gain access to some of the default boilerplate code that Rails provides.
To initiate a project named sharkapp, utilize the subsequent command:
- rails new sharkapp
The result showcases the various elements Rails generates for your fresh project. The subsequent result emphasizes notable files, folders, and actions.
create . . . create Gemfile . . . create app . . . create app/controllers/application_controller.rb . . . create app/models/application_record.rb . . . create app/views/layouts/application.html.erb . . . create config create config/routes.rb create config/application.rb . . . create config/environments create config/environments/development.rb create config/environments/production.rb create config/environments/test.rb . . . create config/database.yml create db create db/seeds.rb . . . run bundle install . . . Bundle complete! 15 Gemfile dependencies, 69 gems now installed. Use `bundle info [gemname]` to see where a bundled gem is installed. . . .
Below is a concise overview of the files and directories generated by Rails:
- Gemfile: This file lists the gem dependencies for your application. A gem is a Ruby software package, and a Gemfile allows you to manage your project’s software needs.
- app: The app directory is where your main application code lives. This includes the models, controllers, views, assets, helpers, and mailers that make up the application itself. Rails gives you some application-level boilerplate for the MVC model to start out in files like app/models/application_record.rb, app/controllers/application_controller.rb, and app/views/layouts/application.html.erb.
- config: This directory contains your application’s configuration settings:config/routes.rb: Your application’s route declarations live in this file.
config/application.rb: General settings for your application components are located in this file. - config/environments: This directory is where configuration settings for your environments live. Rails includes three environments by default: development, production, and test.
- config/database.yml: Database configuration settings live in this file, which is broken into four sections: default, development, production, and test. Thanks to the Gemfile that came with the rails new command, which included the sqlite3 gem, the config/database.yml file has its adapter parameter set to sqlite3, specifying that you will use a SQLite database with this application.
- db: This folder includes a directory for database migrations called migrate, along with the schema.rb and seeds.rb files. schema.db contains information about your database, while seeds.rb is where you can place seed data for the database.
In the end, Rails executes the bundle install command to install the dependencies specified in your Gemfile.
After setting up everything, go to the new sharkapp directory.
- cd sharkapp
To confirm the functionality of your application, go to the sharkapp directory and initiate the Rails server using the command “rails server”. If you are operating on your personal computer, execute the given code to commence the server.
- rails server
By default, Rails is set to connect with localhost. This implies that you can access your application by simply typing localhost:3000 in your browser.
Before proceeding with your work on a development server, make sure that connections are permitted on port 3000.
- sudo ufw allow 3000
Now, initiate the server by using the –binding flag to associate it with your server’s IP address.
- rails server –binding=your_server_ip
To access the default Rails landing page, open your browser and go to http://your_server_ip:3000.
Once you are prepared, you can halt the server by using the CTRL+C key combination in your terminal.
Once you have developed and set up your application, you are prepared to begin customizing it using the Rails default structure, resulting in a distinct and personalized application.
Step 3 involves providing a framework for the application.
To develop the shark application, you must set up a model to handle the application’s data, views to facilitate user interaction with that data, and a controller to facilitate communication between the model and the views. Use the “rails generate scaffold” command to build these components. This command will generate a model, a database migration to modify the database structure, a controller, a complete set of views to handle the Create, Read, Update, and Delete (CRUD) operations for the application, as well as templates for partials, helpers, and tests.
The generated scaffold command handles various tasks in the background. It specifies the model name and the fields to be included in the database table. Rails utilizes Active Record to manage associations between application data in the form of objects represented by models and the application database. These models are Ruby classes that inherit the ActiveRecord::Base class. As a result, you can interact with your model class just like any other Ruby class. Additionally, you can access methods from Active Record. Active Record guarantees that each class corresponds to a table in the database, and each instance of the class corresponds to a row in that table.
To create a Shark model, controller, and corresponding views, execute the given command.
- rails generate scaffold Shark name:string facts:text
The options “name” and “facts” in this command specify the fields you want to include in your database table and the type of data they should be able to hold. Both options allow you to input your desired information, with the “facts” option providing a larger capacity for characters.
Upon executing this command, the output displays a comprehensive list of the various files that are produced.
invoke active_record create db/migrate/20190804181822_create_sharks.rb create app/models/shark.rb . . . invoke resource_route route resources :sharks invoke scaffold_controller create app/controllers/sharks_controller.rb invoke erb create app/views/sharks create app/views/sharks/index.html.erb create app/views/sharks/edit.html.erb create app/views/sharks/show.html.erb create app/views/sharks/new.html.erb create app/views/sharks/_form.html.erb . . .
Rails generated a model named “shark.rb” under the app/models directory and also created a corresponding database migration file called “20190804181822_create_sharks.rb” under the db/migrate directory. Please note that the timestamp on your migration file will be different from the example provided.
It generated a controller called sharks_controller.rb, along with the views for the CRUD actions of your application. These views are located in the sharks folder within app/views. One of these views is a partial, _form.html.erb, which contains shared code used in multiple views.
At last, Rails incorporated a fresh resourceful route, namely resources :sharks, into config/routes.rb. This allows the Rails router to align incoming HTTP requests with the sharks controller and its linked views.
Even though Rails has done a significant amount of the work in constructing the application code, it is valuable to explore certain files for a deeper comprehension of the processes taking place.
To comprehend the controller file, input the subsequent command in your terminal.
- cat app/controllers/sharks_controller.rb
class SharksController < ApplicationController before_action :set_shark, only: %i[ show edit update destroy ] # GET /sharks or /sharks.json def index @sharks = Shark.all end # GET /sharks/1 or /sharks/1.json def show end # GET /sharks/new def new @shark = Shark.new end # GET /sharks/1/edit def edit end # POST /sharks or /sharks.json def create @shark = Shark.new(shark_params) respond_to do |format| if @shark.save format.html { redirect_to shark_url(@shark), notice: “Shark was successfully created.” } format.json { render :show, status: :created, location: @shark } else format.html { render :new, status: :unprocessable_entity } format.json { render json: @shark.errors, status: :unprocessable_entity } end end end # PATCH/PUT /sharks/1 or /sharks/1.json def update respond_to do |format| if @shark.update(shark_params) format.html { redirect_to shark_url(@shark), notice: “Shark was successfully updated.” } format.json { render :show, status: :ok, location: @shark } else format.html { render :edit, status: :unprocessable_entity } format.json { render json: @shark.errors, status: :unprocessable_entity } end end end # DELETE /sharks/1 or /sharks/1.json def destroy @shark.destroy respond_to do |format| format.html { redirect_to sharks_url, notice: “Shark was successfully destroyed.” } format.json { head :no_content } end end private # Use callbacks to share common setup or constraints between actions. def set_shark @shark = Shark.find(params[:id]) end # Only allow a list of trusted parameters through. def shark_params params.require(:shark).permit(:name, :facts) end end
The responsibility of the controller is to handle the retrieval and transfer of information to its related model, as well as its connection with specific views. For example, in the case of the sharks controller, it comprises a set of methods that can be roughly matched with standard CRUD operations. Additional methods are included to ensure efficiency in handling errors.
Let’s take the create method as an illustration.
. . .
  def create
    @shark = Shark.new(shark_params)

    respond_to do |format|
      if @shark.save
        format.html { redirect_to @shark, notice: 'Shark was successfully created.' }
        format.json { render :show, status: :created, location: @shark }
      else
        format.html { render :new }
        format.json { render json: @shark.errors, status: :unprocessable_entity }
      end
    end
  end
. . .
When a new instance of the Shark class is saved successfully, the redirect_to function will initiate a new request to the controller. This request, which is a GET request, will be handled by the show method. The show method will then display to the user the input they have just added.
In case of a failure, Rails will display the app/views/sharks/new.html.erb template anew instead of sending another request to the router, providing users with another opportunity to submit their data.
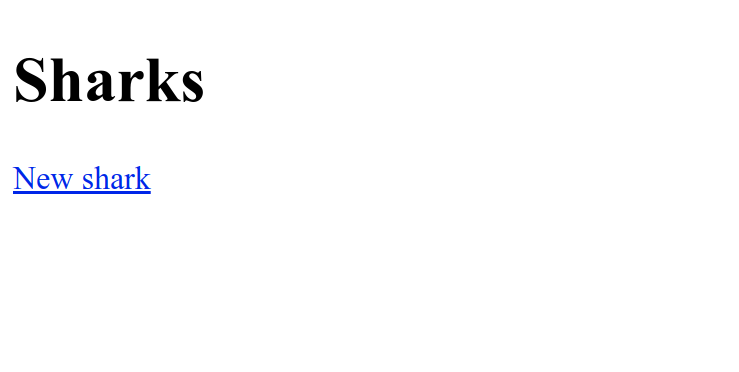
Rails creates a template for an index view, which corresponds to the index method in your controller, in addition to the sharks controller. This index view will serve as the main view for your application.
To produce the file’s output, execute the given command.
- cat app/views/sharks/index.html.erb
<p style=”color: green”><%= notice %></p> <h1>Sharks</h1> <div id=”sharks”> <% @sharks.each do |shark| %> <%= render shark %> <p> <%= link_to “Show this shark”, shark %> </p> <% end %> </div> <%= link_to “New shark”, new_shark_path %>
In the index view, the loops iterate over the instances of your Shark class that correspond to the sharks table in your database. By utilizing ERB templating, the view displays the name and facts fields associated with each shark instance individually.
In the view, the link_to helper is utilized to generate a hyperlink. The provided string is used as the link’s text, and the provided path determines where the link will lead to. These paths are enabled by the helpers that were made available to you when you defined the sharks resourceful route through the rails generate scaffold command.
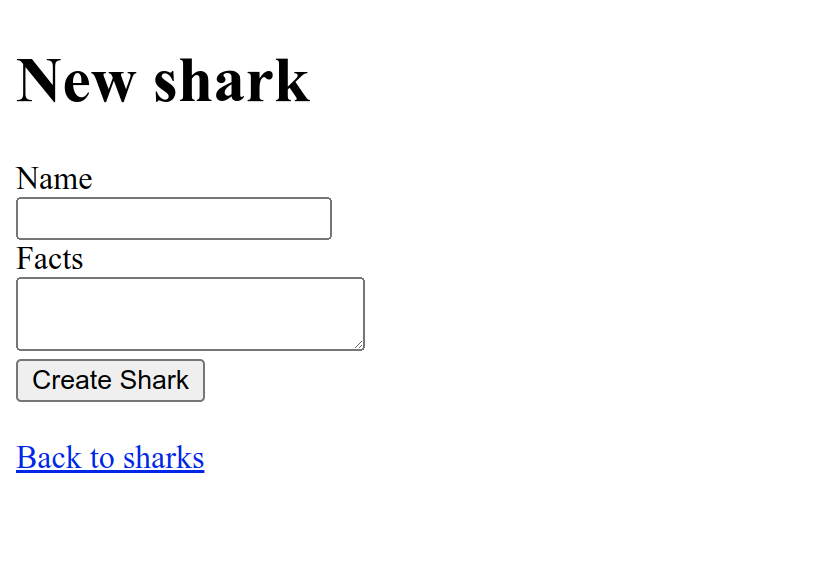
To retrieve the “new.html.erb” template located in “app/views/sharks” using partials, execute the given code.
- cat app/views/sharks/new.html.erb
<h1>New shark</h1> <%= render “form”, shark: @shark %> <br> <div> <%= link_to “Back to sharks”, sharks_path %> </div>
While this template may seem to not include input fields for adding a new shark entry, the mention of the ‘form’ suggests that the template is utilizing the _form.html.erb partial. This partial extracts repetitive code from various views.
To gain a better understanding of the process of creating a new shark instance, examine the contents of the _form.html.erb file.
- cat app/views/sharks/_form.html.erb
<%= form_with(model: shark) do |form| %> <% if shark.errors.any? %> <div style=”color: red”> <h2><%= pluralize(shark.errors.count, “error”) %> prohibited this shark from being saved:</h2> <ul> <% shark.errors.each do |error| %> <li><%= error.full_message %></li> <% end %> </ul> </div> <% end %> <div> <%= form.label :name, style: “display: block” %> <%= form.text_field :name %> </div> <div> <%= form.label :facts, style: “display: block” %> <%= form.text_area :facts %> </div> <div> <%= form.submit %> </div> <% end %>
This template utilizes the form_with form helper, which is intended to simplify the process of creating new objects based on user input using specific models’ fields and scope. In this particular case, form_with takes the argument model: shark, resulting in the creation of a new form builder object that includes field inputs matching the fields in the sharks table. Consequently, users are provided with form fields to input both a shark name and shark facts.
When you submit this form, a JSON response will be generated, containing user data that can be accessed by the rest of your application using the params method. This generates an ActionController::Parameters object, which holds the aforementioned data.
After exploring the output of rails generate scaffold, you can proceed to configuring the main view for your application.
Step 4 involves creating the main view of the application and checking its functionality.
It is preferable for the landing page of your application to correspond to the root of the application, allowing users to quickly understand the purpose of the application.
Just an option, not a direct paraphrase:
To illustrate, you have the ability to generate a Welcome controller that is accompanied by an index view. This allows users to have a basic initial page that can subsequently provide links to various sections of the application.
To get this configured, you must edit the routing settings in config/routes.rb and indicate the main page of the application.
To begin editing, open the file config/routes.rb using nano or any editor of your choice.
- nano config/routes.rb
One possible native paraphrase of the given text could be:
“The routes.rb file located in the sharkapp configuration directory.”
Rails.application.routes.draw do
  resources :sharks
  # Define your application routes per the DSL in https://guides.rubyonrails.org/routing.html

  # Defines the root path route ("/")
  # root "articles#index"
end
If you don’t specify anything specific, the default page seen at http://localhost:3000 or http://your_server_ip:3000 will be the default Rails welcome page.
To assign the main view of the app to the home page of the sharks controller, simply remove the “#” symbol and replace “articles” with “sharks” in the default “#root “articles#index” line.
“The routes.rb file can be found at ~/sharkapp/config/routes.rb.”
Rails.application.routes.draw do
  resources :sharks

  root 'sharks#index'
  # For details on the DSL available within this file, see http://guides.rubyonrails.org/routing.html
end
Once you have finished editing, remember to save the file and exit the editor. In case you used nano as your editor, press CTRL+X, followed by Y and ENTER to exit the file.
Users will now be directed to the shark landing page instead of the default Rails landing page when they visit your application root. In addition, they will be able to create new shark entries, review existing entries, and make edits or deletions to specific entries.
Afterwards, execute the subsequent command to perform migrations.
- rails db:migrate
This result verifies the migration.
== 20230124215633 CreateSharks: migrating ===================================== — create_table(:sharks) -> 0.0041s == 20230124215633 CreateSharks: migrated (0.0045s) ============================
Restart your Rails server once more. In case you are working on your local machine, execute the following command:
- rails s
Execute on a developmental server.
- rails s –binding=your_server_ip
To access your new landing page, go to localhost:3000 if you are working locally, or http://your_server_ip:3000 if you are working on a development server.
In order to generate a fresh shark, simply click on the New Shark link. By doing so, you will be directed to the sharks/new route.
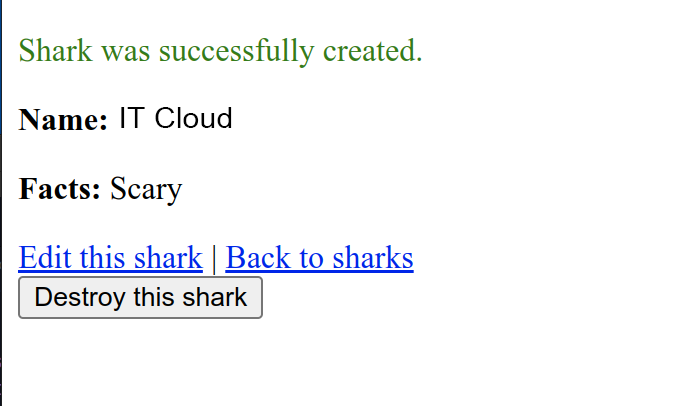
To test your application, input “Great White” in the Name section and “Scary” in the Facts section to include additional information.

Next, simply click the Create Shark button to generate the shark.
By clicking on this button, you will be directed to the show route. The show route is configured to use the set_shark method through the before_action filter, allowing it to retrieve the id of the shark that you have created.
class SharksController < ApplicationController
  before_action :set_shark, only: %i[ show edit update destroy ]

  . . .
  # GET /sharks/1 or /sharks/1.json
  def show
  end

  . . .

  private
    # Use callbacks to share common setup or constraints between actions.
    def set_shark
      @shark = Shark.find(params[:id])
    end
  . . .
To try out the edit feature, simply click on “Edit this shark” on your shark entry. This action will redirect you to the edit path specifically designed for that shark.
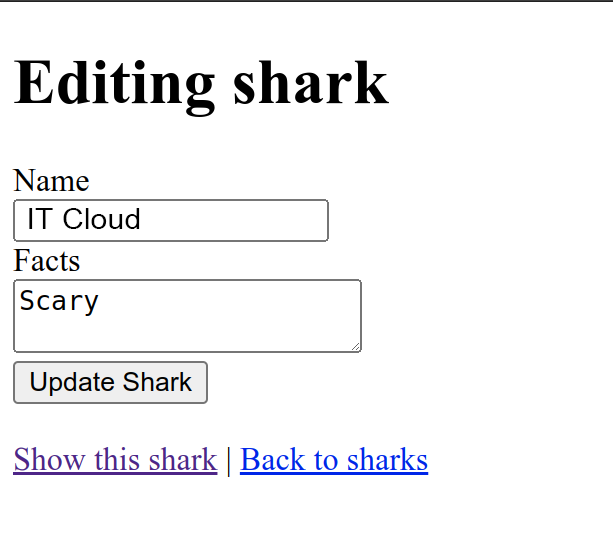
Make a modification to the information concerning the Great White by replacing “Scary” with “Large”. Afterwards, click on Update Shark to go back to the show route.
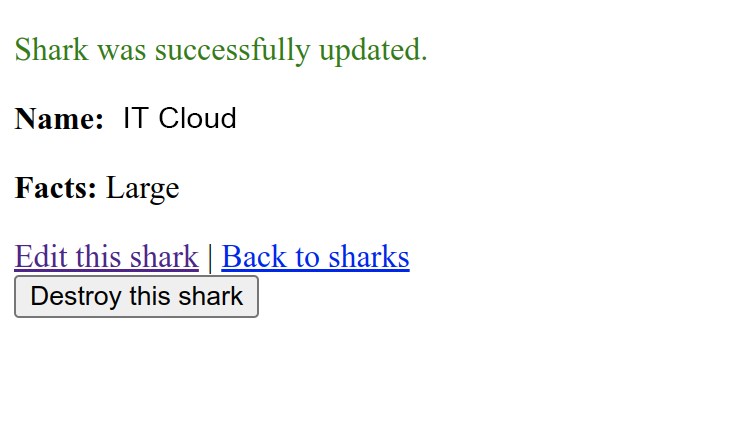
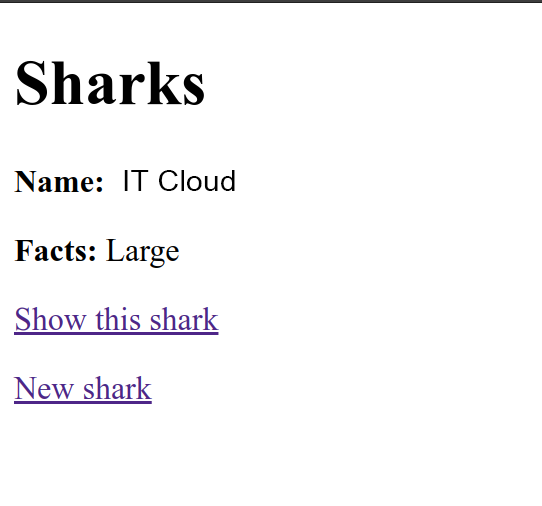
In conclusion, when you click on the Back button to return to sharks, you will be directed to the latest version of your index view.
Once you have verified the fundamental functionality of your application, incorporating validations and security checks will enhance its overall security.
Step 5 involves incorporating validations.
One possibility:
Imagine a situation where a user tries to create a shark without providing any information, or attempts to add an entry for a shark already present in the database. To prevent this, you can incorporate validation mechanisms in your models, which will check the data before it is saved to the database. As the application’s logic is contained within its models, it is suitable to validate the input data there.
Please be aware that this tutorial does not include information on writing validation tests. However, for more details on testing, you can refer to the Rails documentation.
If you have not yet stopped the server, please stop the server immediately by pressing CTRL+C on your terminal.
Please access your model file named shark.rb.
- nano app/models/shark.rb
At the moment, the information in the document states that the Shark class is a subclass of ApplicationRecord, and ApplicationRecord is a subclass of ActiveRecord::Base.
class Shark < ApplicationRecord
end
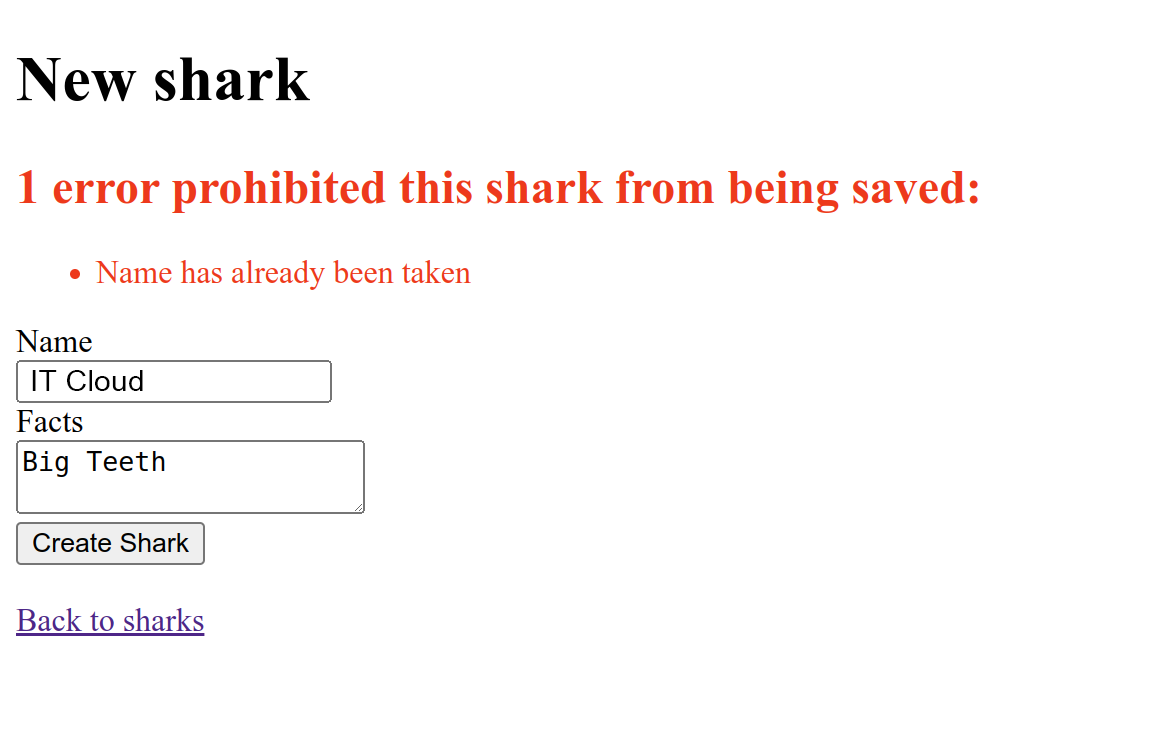
To ensure the name field is completed and avoid duplicate entries, incorporate validations to confirm its completion and uniqueness.
One possible paraphrase could be:
– The shark.rb file is located in the models directory of the sharkapp.
class Shark < ApplicationRecord
  validates :name, presence: true, uniqueness: true
end
Afterwards, incorporate a verification process for the information section to guarantee its completion as well.
class Shark < ApplicationRecord
  validates :name, presence: true, uniqueness: true
  validates :facts, presence: true
end
Only the presence of the facts is validated by the line of code, it does not check if the facts are unique. It ensures that the facts are associated with distinct shark entries.
Once you are done, save and close the file.
To begin, restart your server by typing either rails s or rails s –binding=your_server_ip, and then visit the root of your application by going to http://localhost:3000 or http://your_server_ip:3000.
Click on the New Shark link. Fill in the Name field with “Great White” and the Facts field with “Big Teeth.” After that, click on the Create Shark button. In this case, a warning message will be displayed.
To verify the remaining validation, go back to the sharks’ homepage by clicking on “Back to sharks,” then select “New Shark” once more. In the fresh form, input “Tiger Shark” in the Name section and leave the Facts field blank. After clicking on Create Shark, a warning message will be displayed.

Now that you have made these modifications, your application is equipped with a set of validations to guarantee the accuracy of the data stored in the database. At this point, you can focus on determining which users have the ability to make changes to the application data.
Step 6 involves the inclusion of authentication.
Once you implement certain validations, you acquire assurances about the data being stored in the database. However, what about the users? If you wish to restrict database access only to authorized users, it is advisable to implement authentication measures. By utilizing the http_basic_authenticate_with method, you can establish a username and password combination to authenticate users.
There are various approaches for verifying users with Rails, such as utilizing the bcrypt or devise gems. Currently, you should append a function to your application controller that will be applicable to actions throughout your application. This will prove beneficial if you decide to incorporate additional controllers in the future.
Halt your server by pressing CTRL+C.
Please open the file which contains the definition of your ApplicationController.
- nano app/controllers/application_controller.rb
The definition for the ApplicationController class, from which the other controllers in your application derive, is provided within.
Here’s one possible paraphrase:
“Within the sharkapp, in the controllers folder, there is a file named application_controller.rb.”
class ApplicationController < ActionController::Base
end
To verify the identity of users, employ a pre-set username and password with the http_basic_authenticate_with function. Integrate the subsequent code into the file.
class ApplicationController < ActionController::Base
  http_basic_authenticate_with name: 'sammy', password: 'shark', except: [:index, :show]
end
Besides entering the username and password here, you have also limited authentication by specifying which routes (index and show) do not require it. Alternatively, you could have only written [:create, :update, :destroy], allowing all users to access and read facts about all sharks. However, when it comes to modifying site content, users must demonstrate their access.
In a more advanced configuration, it would be undesirable to set fixed values in this manner. However, this illustration showcases how you can incorporate authentication for the routes of your application. By default, Rails saves session information in cookies, so once you authenticate during a specified process, there is no need to authenticate again within that session.
After you finish editing, save and close the file app/controllers/application_controller.rb. You can then proceed to test authentication in action.
To begin, launch the server using either rails s or rails s –binding=your_server_ip, then access your application through either http://localhost:3000 or http://your_server_ip:3000.
Click on the New Shark button located on the landing page, which will prompt the authentication window to appear.

By using the login credentials “sammy” for the username and “shark” for the password, which you added as a combination in the app/controllers/application_controller.rb file, you will have the ability to safely generate a new shark.
You currently possess a functional shark application that includes data validations and a fundamental authentication system.
In summary, to wrap things up
The Rails application you built in this tutorial is a starting point that you can utilize for further development. If you have a curiosity in delving deeper into the Rails community, the project documentation is an excellent resource to begin with.
To gain further knowledge on integrating nested resources into your project, you may explore How To Create Nested Resources for a Ruby on Rails Application. This resource will guide you through the process of constructing your application’s models and routes.
Furthermore, it would be advantageous for you to consider the possibility of establishing a stronger user interface for your project by incorporating a framework like React. A helpful resource that provides instructions on achieving this can be found in the article titled “How To Set Up a Ruby on Rails Project with a React Frontend.”
In case you are interested in exploring various database choices, you can also refer to the guide on utilizing PostgreSQL with your Ruby on Rails application on Ubuntu 20.04. This guide provides step-by-step instructions on working with PostgreSQL instead of SQLite. Additionally, you can access our collection of PostgreSQL tutorials to gain further knowledge on working with this database.
more tutorials
one-click installation feature of Ruby on Rails on Silicon Cloud.(Opens in a new browser tab)
How to include items to a list in Python(Opens in a new browser tab)
Server Configurations Frequently Used for Your Web Application(Opens in a new browser tab)
Python 3 installing on Rocky Linux 9(Opens in a new browser tab)
Spring MVC HandlerInterceptorAdapter and HandlerInterceptor.(Opens in a new browser tab)

