Tutorial on web services using AXIS2
Hello and welcome to the Apache Axis2 Tutorial. I recently attempted to enhance my knowledge of Apache Axis2 by upgrading from version 1.3 to the most recent release, version 1.5.4. Unfortunately, I couldn’t find any tutorial that adequately explained the changes and advancements in this latest version. Therefore, I decided to create this post as a comprehensive Axis2 Web Services Tutorial that covers the latest release.
Tutorial on Apache Axis2

Who is this Tutorial intended for?
This guide is designed for Java developers who want to create and implement Web Services with Apache Axis2.
Requirements
This tutorial aims to demonstrate how to create web services and call them using a Java client program, while also testing the web service using the Soap UI tool. To fully grasp the tutorial, it is essential to have a basic knowledge of Java, Web Services, XML, Ant, and application servers (specifically, Tomcat).
The software and tools employed
-
- For developing Java applications, you will need the following software installed on your computer:
– Java Development Kit (JDK) version 1.6.0 or higher (Tomcat 7 requires at least JDK 1.6)
– Apache Ant version 1.7.0 or higher (Axis2 requires a minimum version of 1.6.5)
– Apache Axis2 version 1.5.4 (Binary Distribution)
– Eclipse version 3.6.1 IDE for Project Development (Alternatively, you can use other IDEs like NetBeans)
– Apache Tomcat version 7.0.8
– SoapUI for testing our web service
Please note that while I am currently using Mac OS X 10.6.4, this tutorial should also work on other operating systems. However, some adjustments may be required when executing certain commands.
Setting up the system.
-
- Please download the most recent version of Apache Tomcat, which is currently version 7.0.8. Ensure that you have at least Java Version 1.6 installed on your system before proceeding. If Java 6 is not installed, please download and install it from Java SE Downloads. Download the Tomcat Core zip file (apache-tomcat-7.0.8.zip) and unzip it to install it on your system. Set the JAVA_HOME environment variable to start and stop the server.
Next, download the Apache Axis2 1.5.4 Binary Distribution zip from Apache Axis2 – Releases. This step is necessary to create axis2.war, which will be deployed to Tomcat, and to obtain the axis2 libraries for use in projects.
Unzip the Axis2 binary distribution zip into any convenient directory. Navigate to the axis2-1.5.4/webapp directory and run the command “ant create.war” to create the axis2.war deployment in the axis2-1.5.4/dist directory. If you do not have Apache Ant installed, you can download and install it from Apache Ant – Binary Distributions. Note that there were issues with the axis2.war downloaded from the War Distribution. It was discovered that some jars were missing in the axis2 War Distribution. The War Distribution contains only 58 jars, while the Binary Distribution contains 63 jars. (I am too lazy to find out which jars are missing.)
To deploy the axis2.war in the Tomcat application server, copy it to the tomcat webapps directory. If necessary, restart the server to support hot deployment.
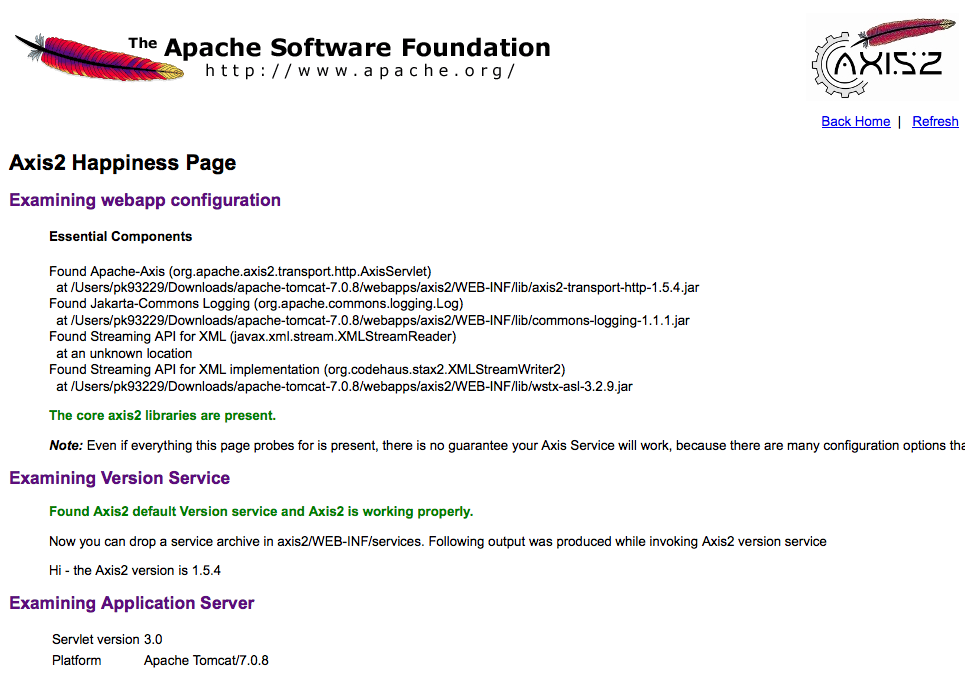
Visit https://localhost:8080/axis2/ and click on the Validate link. If the Happy Axis page appears with a GREEN color, it means that axis2 has been successfully deployed. Your system setup is now ready, and you can proceed to create Axis2 web services.
Developing an Axis2 Web Service.
To generate an Axis2 Web Service archive, the following items are required.
-
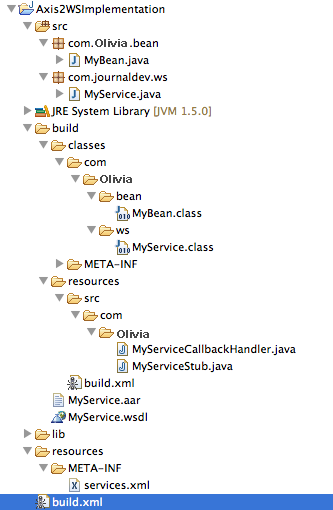
- A Java Project called Axis2WSImplementation includes a class that will be made available as a web service. In this example, I am exposing two operations from the MyService class. The first operation, getData, takes a String as input and returns a String. The second operation, getObjectData, takes a MyBean java object as input and returns a MyBean java object after performing some data manipulation. It’s important to note that the MyBean class implements the Serializable interface, allowing it to be transferred over the network.
- The project also includes an Ant build.xml file that is used to create an aar file, a wsdl file, and client-side stub and callback handler classes. Additionally, there is a services.xml file that is included in the axis2 archive and is placed in the META-INF folder.
Explanation of an Axis2 web service project
MyService.java is the implementation class that will be made available as an Axis2 web service.
package com.scdev.ws;

import com.scdev.bean.MyBean;

public class MyService {

	public String getData(String input) {
		return "Hi" + input;
	}

	public MyBean getObjectData(MyBean myBean) {

		String name = myBean.getName();
		int id = myBean.getId();
		myBean.setId(id + 100);
		myBean.setName("Output: " + name);

		return myBean;
	}
}
The Java Bean class, MyBean.java, acts as both the input and output for the getObjectData operation in the web service.
package com.scdev.bean;

import java.io.Serializable;

public class MyBean implements Serializable {

	private static final long serialVersionUID = -1129402159048345204L;

	private String name;

	private int id;

	public String getName() {
		return name;
	}

	public void setName(String name) {
		this.name = name;
	}

	public int getId() {
		return id;
	}

	public void setId(int id) {
		this.id = id;
	}

}
The XML file services.xml contains parameters related to Axis2 web services. The ServiceClass parameter indicates the class that will be used as the web service. Additionally, the targetNamespace and schemaNamespace parameters are also crucial.
<service name="MyService" scope="application" targetNamespace="https://scdev.com/">
 <description>
 MyService
 </description>
 <messageReceivers>
 <messageReceiver mep="https://www.w3.org/2004/08/wsdl/in-only" class="org.apache.axis2.rpc.receivers.RPCInOnlyMessageReceiver" />
 <messageReceiver mep="https://www.w3.org/2004/08/wsdl/in-out" class="org.apache.axis2.rpc.receivers.RPCMessageReceiver" />
 </messageReceivers>
 <schema schemaNamespace="https://scdev.com/xsd"/>
 <parameter name="ServiceClass">com.scdev.ws.MyService</parameter>
</service>
The build.xml is an Ant build file that is used for executing Axis2 tasks. It contains three targets with specific information.
-
- This target, generate.wsdl, is responsible for creating the MyService.wsdl file in the build folder. Be sure that the targetNamespace and schemaTargetNamespace in the service.xml file are identical.
-
- This target, generate.service, creates the axis2 archive in the build folder. The archive contains the services.xml file and is named MyService.aar.
- This target, generate.client, generates the client side classes. Remember to run this after executing generate.wsdl to ensure that the MyService.wsdl file exists in the build folder.
One possible paraphrase of “build.xml” could be “XML file for the building process.”
<project name="AxisWSImplementation" basedir="." default="generate.service">

 <property environment="env"/>
 <property name="build.dir" value="build"/>

 <path id="axis2.classpath">
 <fileset dir="${basedir}/lib">
 <include name="*.jar"/>
 </fileset>
 </path>

 <target name="compile.service">
 <mkdir dir="${build.dir}"/>
 <mkdir dir="${build.dir}/classes"/>
 <mkdir dir="${build.dir}/resources"/>
 <!--First let's compile the classes-->
 <javac debug="on"
 fork="true"
 destdir="${build.dir}/classes"
 srcdir="${basedir}/src"
 classpathref="axis2.classpath">
 </javac>
 </target>

 <target name="generate.wsdl" depends="compile.service">
 <taskdef name="java2wsdl"
 classname="org.apache.ws.java2wsdl.Java2WSDLTask"
 classpathref="axis2.classpath"/>
 <java2wsdl className="com.scdev.ws.MyService"
 outputLocation="${build.dir}"
 targetNamespace="https://scdev.com/"
 schemaTargetNamespace="https://scdev.com/xsd">
 <classpath>
 <pathelement path="${axis2.classpath}"/>
 <pathelement location="${build.dir}/classes"/>
 </classpath>
 </java2wsdl>
 </target>

 <target name="generate.service" depends="compile.service">
 <copy toDir="${build.dir}/classes" failonerror="false">
 <fileset dir="${basedir}/resources">
 <include name="**/*.xml"/>
 </fileset>
 </copy>
 <jar destfile="${build.dir}/MyService.aar">
 <fileset excludes="**/Test.class" dir="${build.dir}/classes"/>
 </jar>
 </target>

 <target name="generate.client" depends="compile.service">
 <taskdef name="wsdl2java"
 classname="org.apache.axis2.tool.ant.AntCodegenTask"
 classpathref="axis2.classpath"/>
 <wsdl2java
 wsdlfilename="${build.dir}/MyService.wsdl"
 output="${build.dir}/resources" />
 </target>

 <target name="clean">
 <delete dir="${build.dir}"/>
 </target>
</project>
Creating WSDL files, Axis archives, and stub files.
- Execute generate.wsdl ant target to generate MyService.wsdl file.
- Execute generate.service ant target to generate the MyService.aar file.
- Execute generate.client ant target to generate the Stub classes.
Deploying Axis2 Web Services
Testing Axis2 Web Services
Once the service has been deployed, the first step is to conduct testing. I recommend using SoapUI, as it is considered one of the top tools for testing Web Services. In case you don’t have it, you can conveniently download and install it from their website. Below are the necessary steps for conducting testing using SoapUI.
-
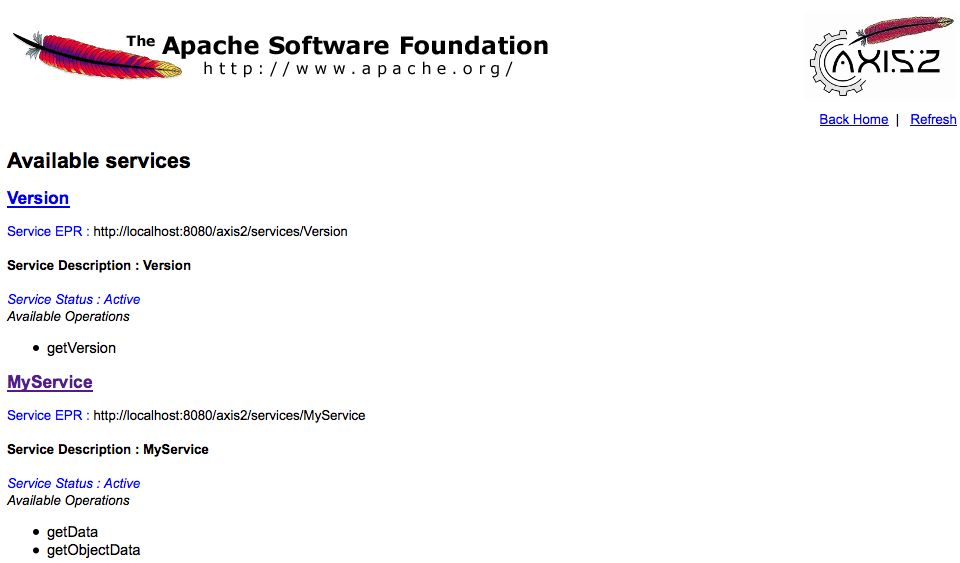
- To create a new SoapUI project, name it MyServiceTest (you can choose any name) and include the initial WSDL/WADL https://localhost:8080/axis2/services/MyService?wsdl (you can find this URL on the Axis2 List Services page by clicking on the MyService link). Keep the other options as default and click OK to create the SoapUI testing project.
-
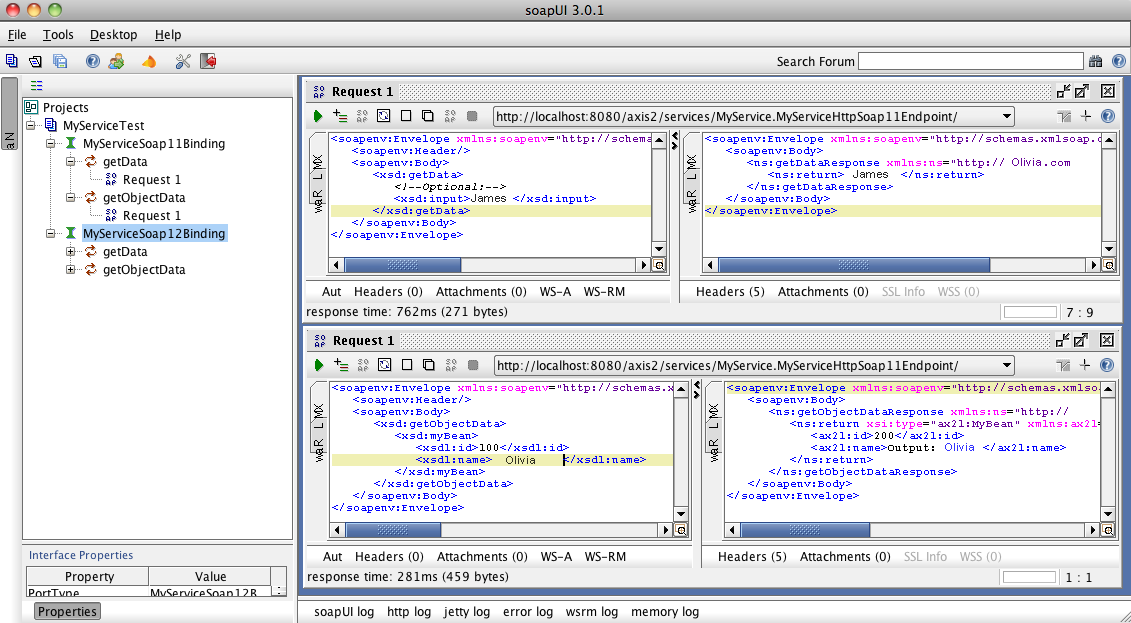
- Select one of the Soap Bindings and open the getData and getObjectData SOAP Requests by double clicking on them.
- Enter some values for the input in the request and submit it to the web service endpoint URL. You should receive output from the service similar to the image below, confirming that our web service is functioning correctly.
Invoking a Web Service in Axis2 by utilizing Stub Files.
-
- In Eclipse, create a Java Project called Axis2Client.
-
- Within the project, create a lib folder and copy all the Axis2 jars from the downloaded binary distribution lib folder. Then, add these jars to the project’s build path.
-
- Copy the previously generated MyServiceStub.java and MyServiceCallbackHandler.java files into the src folder of the project, organizing them in the correct package structure. In this case, they were copied into the com.scdev package. If you need to share these classes with someone else, it is advisable to create a jar file from them and distribute it to ensure that no modifications are made.
- Create the client class Axis2ClientUsingStubsFromAnt to call the web service operations. The project structure should resemble the image below.

package com.scdev.ws.client;

import java.rmi.RemoteException;

import com.scdev.MyServiceStub;
import com.scdev.MyServiceStub.GetData;
import com.scdev.MyServiceStub.GetDataResponse;
import com.scdev.MyServiceStub.GetObjectData;
import com.scdev.MyServiceStub.GetObjectDataResponse;
import com.scdev.MyServiceStub.MyBean;

/**
 *
 * @author Pankaj - www.scdev.com This class will invoke Axis2 web service
 *         operations using Stub classes
 *
 */
public class Axis2ClientUsingStubsFromAnt {

	/**
	 * END_POINT is the web service endpoint
	 */
	private final static String END_POINT = "https://localhost:8080/axis2/services/MyService";

	public static void main(String[] args) throws RemoteException {
		System.out.println("START");

		// Create the Stub Object by passing the Web Service Endpoint URL
		MyServiceStub stub = new MyServiceStub(END_POINT);

		// Creating an input object for the getData operation
		GetData getDataInput = new GetData();

		// Setting the input part in the getData input object
		getDataInput.setInput("PANKAJ");

		// invoking the getData operation
		GetDataResponse getDataOutput = stub.getData(getDataInput);

		// get_return method returns the web service output object. Here its
		// String, so we can
		// directly print the returned value
		System.out.println("Output:" + getDataOutput.get_return());

		// Creating input object for the getObjectData operation
		GetObjectData getObjectDataInput = new GetObjectData();
		MyBean myBean = new MyBean();
		myBean.setId(1);
		myBean.setName("KUMAR");

		// Setting the input part in the getObjectData input object
		getObjectDataInput.setMyBean(myBean);

		// invoking the getObjectData operation
		GetObjectDataResponse getObjectDataOutput = stub
				.getObjectData(getObjectDataInput);

		// Get the MyBean object from the response object
		MyBean myBeanOutput = getObjectDataOutput.get_return();

		// Print the myBeanOutput values to check that web service operations
		// are getting invoked
		System.out.println("ID:" + myBeanOutput.getId() + "NAME:"
				+ myBeanOutput.getName());

		System.out.println("DONE");

	}

}
You can run the Axis2ClientUsingStubsFromAnt class to call the web service. The result of the program mentioned above will be displayed.
START
log4j:WARN No appenders could be found for logger (org.apache.axis2.description.AxisService).
log4j:WARN Please initialize the log4j system properly.
Output:HiPANKAJ
ID:101NAME:Output: KUMAR
DONE
If you find the tutorial useful for understanding Axis2 and starting with it, please leave your feedback in the comments. And remember to share it with others too. Your small contribution can make it easier for someone else to learn Axis2. 🙂
more tutorials
Interview Questions for Web Services – SOAP, RESTful(Opens in a new browser tab)
Learn how to automate repetitive tasks using Makefiles.(Opens in a new browser tab)
Beginners can find a tutorial on Java web applications.(Opens in a new browser tab)
one-click installation feature of Ruby on Rails on Silicon Cloud.(Opens in a new browser tab)
How to Set Up Git on Ubuntu 22.04(Opens in a new browser tab)

